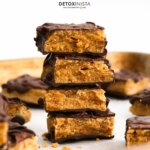
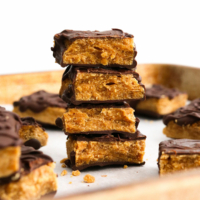
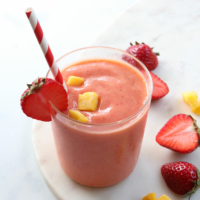
Homemade Butterfingers have the same crispy, crunchy texture as the popular name-brand candy bars, without any high-fructose corn syrup. All you need is 5 simple ingredients to make them!
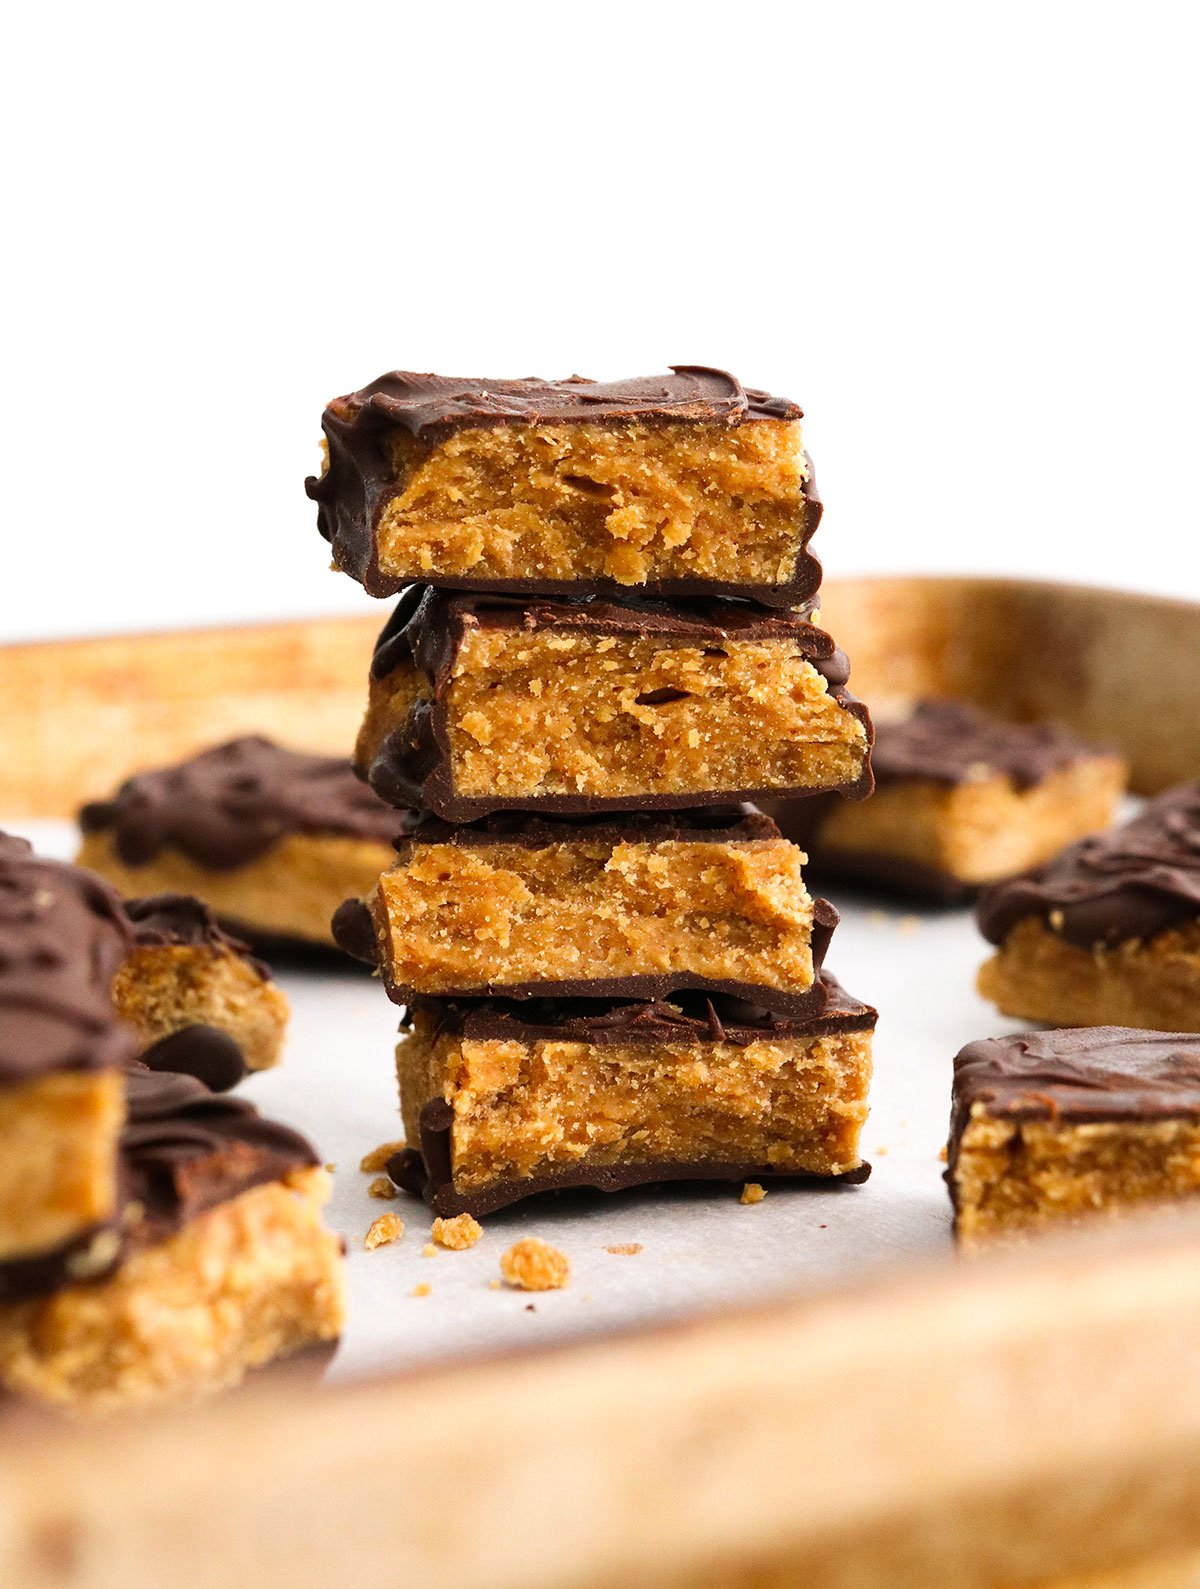
The concept of making Butterfingers is surprisingly easy. The filling is essentially a hard candy mixed with peanut butter, to create a crispy, crunchy, and buttery texture. They are the perfect treat to make for Halloween!
While other popular recipes rely on melted candy corn and crushed corn flakes, this recipe gets its crunchy texture by boiling maple syrup until it reaches the “hard crack” stage used in candy making. The result is a less-processed butterfinger candy bar.
Looking for other homemade candy recipes? Try my popular homemade Crunch Bars, Almond Butter Cups, or Vegan Snickers Bars for more delicious ideas.
Ingredients You’ll Need
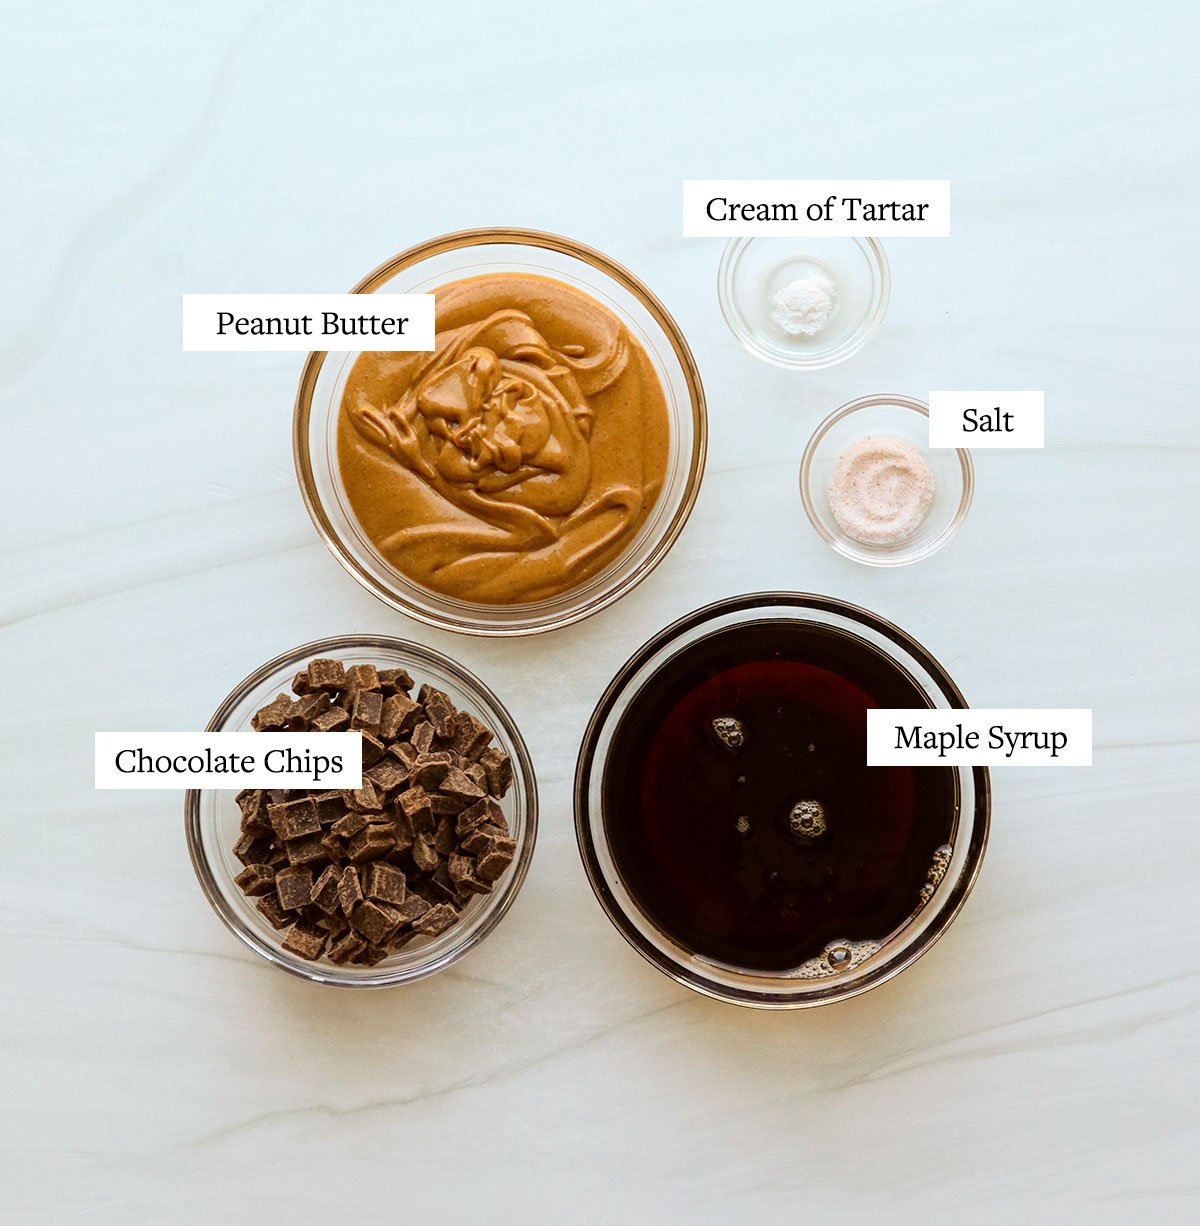
Maple syrup or honey can be used for the base in this recipe, but honey will give you a more prominent honey-flavor. I use an all-natural creamy peanut butter for this recipe, but I imagine any other nut butter could be used if you prefer.
Cream of tartar is used in candy making to prevent large sugar crystals from forming. Adding it to the maple syrup should help with the crunch factor in this recipe.
Melted dark chocolate chips make the outer chocolate coating easy, but you can also make your own chocolate coating using the one in this recipe, if you prefer.
How to Make Homemade Butterfingers
Spray a square 9-inch baking dish with cooking spray and line it with parchment paper. It’s important that this is ready to go right away because this recipe will move quickly. Measure out the peanut butter and salt, too.
In a small saucepan combine the maple syrup and cream of tartar. Whisk well until the cream of tartar has dissolved. This is the ONLY time you will stir this mixture.
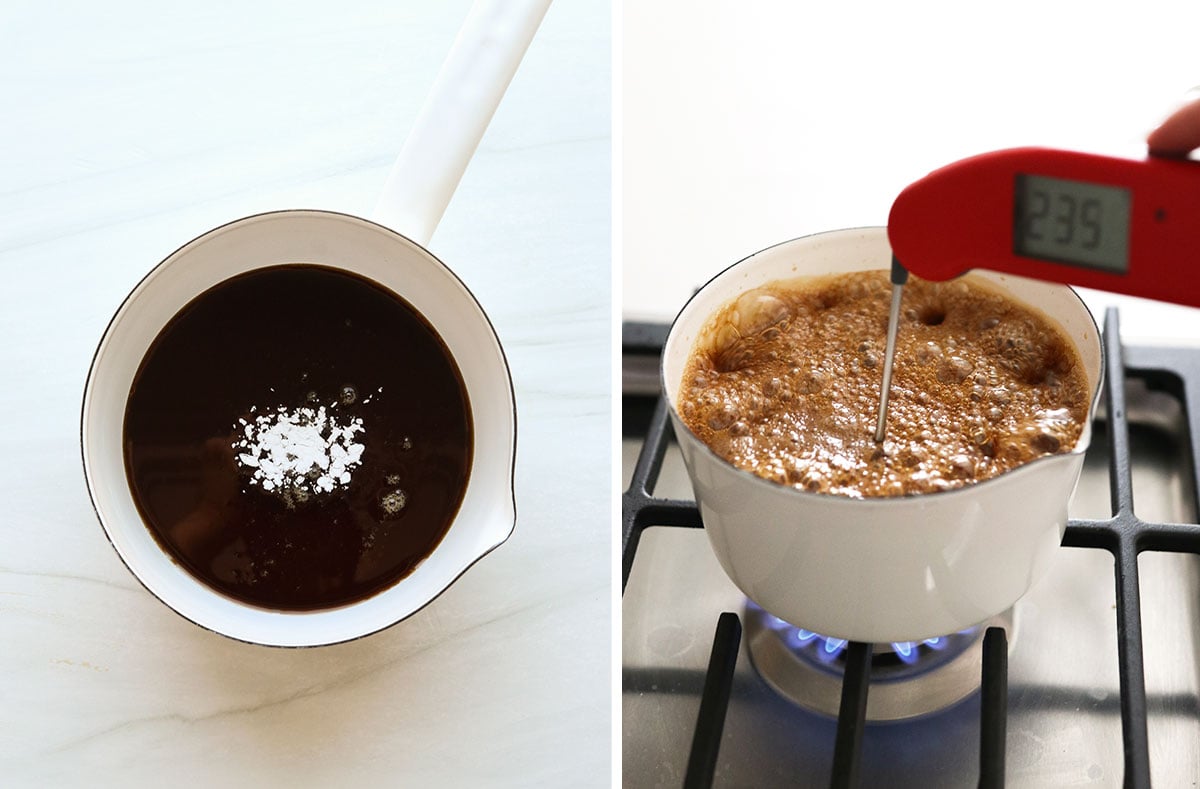
Attach a candy thermometer (affiliate link) to the saucepan, making sure that the stem of the thermometer is not touching the sides or bottom of the pot. Ideally, the tip should be submerged in 2 inches of syrup for the most accurate results, but you can also use an instant-read thermometer periodically as the maple syrup boils.
Bring the maple syrup to a rolling boil over medium-high heat. Watch the pot to make sure it doesn’t boil over (lower the heat if it starts to rise too much) and continue to boil until the maple syrup reaches the “hard crack” stage which is 300ºF.
Note: Candy making is tricky because the sugar can quickly burn once you get near the 300ºF goal temperature. You’ll get the crispiest results if you let the maple syrup reach 300ºF, but if you don’t want to risk burning it, you can remove it from the heat once it reaches at least 270ºF which is the soft crack stage. (This stage is used for making toffee and butterscotch. It’s not quite as crispy, but will still create a firm candy.)
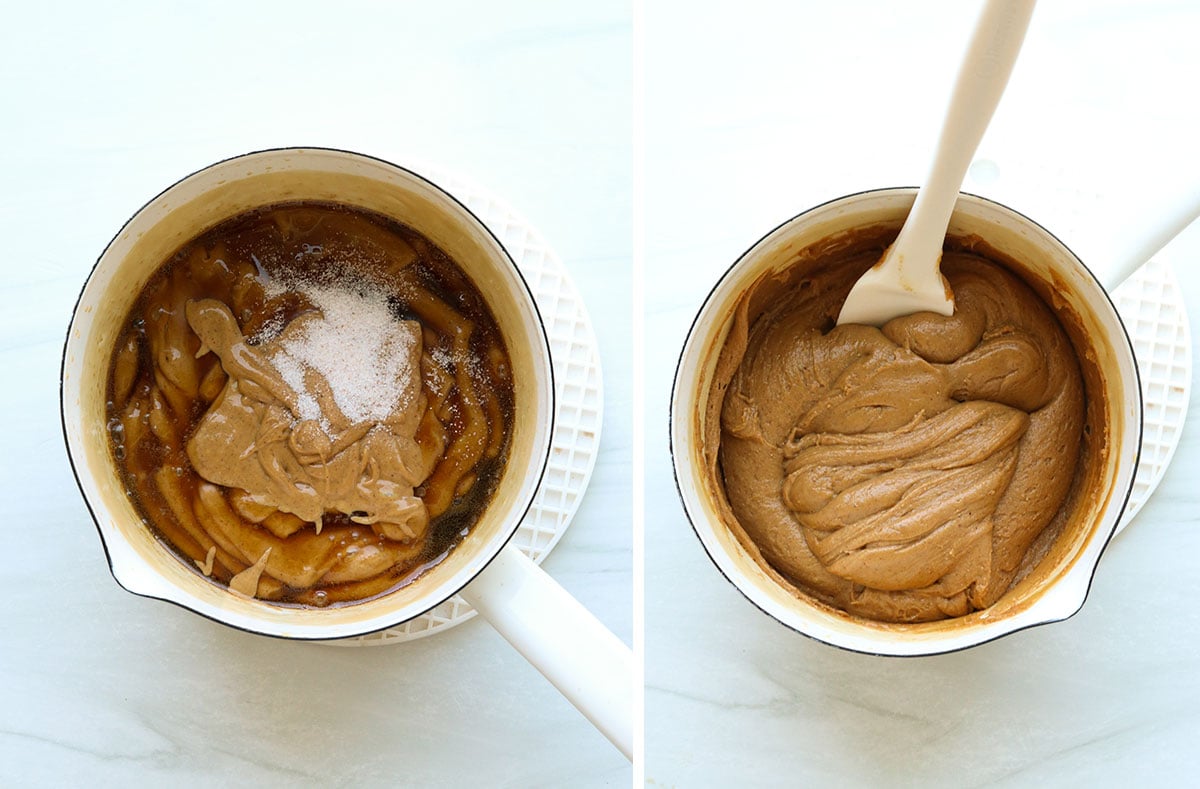
Once the maple syrup has reached the correct temperature, immediately turn off the heat and stir in the peanut butter and salt. Stir as quickly as you can without splattering (because it’s hot!) then immediately pour it into the parchment-lined pan.
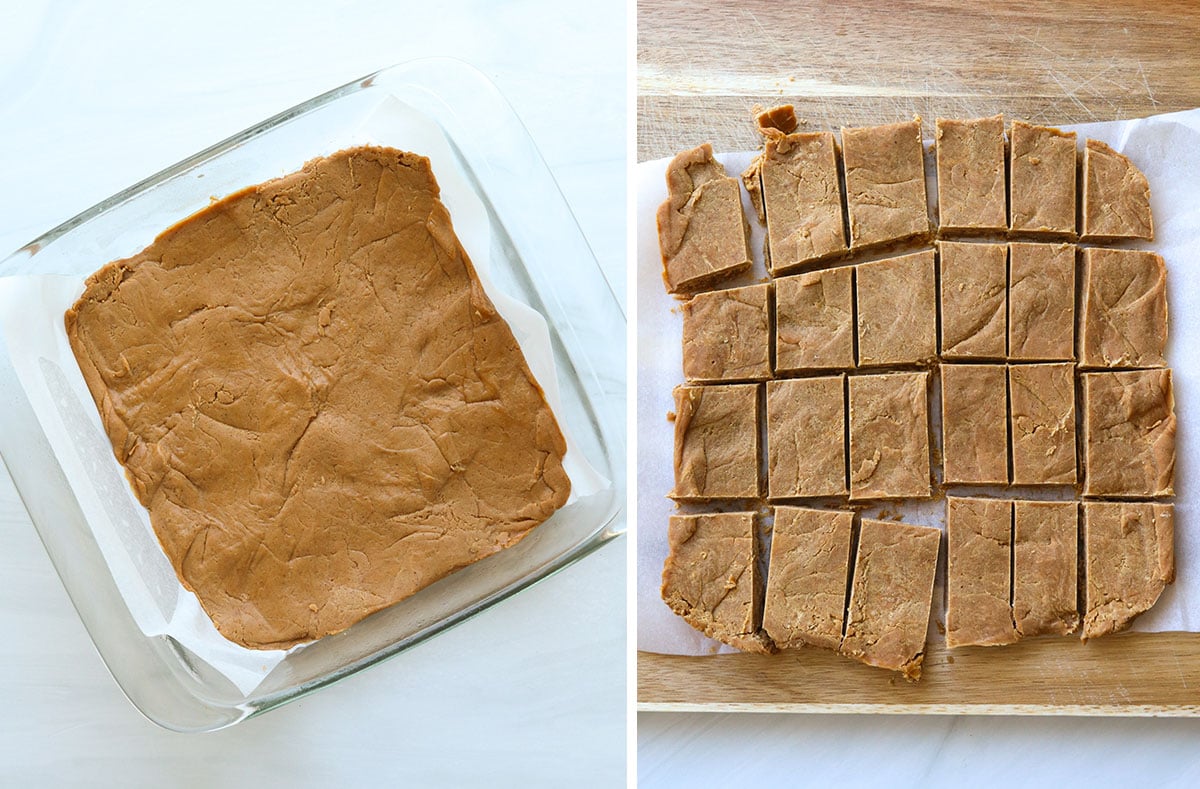
Use a spatula to spread out the mixture while it’s still hot because it will harden quickly. (For example, I took a quick photo of the mixture in the pot for this post, and it totally hardened in the pan before I could get to the next step. So work quickly!)
Transfer the pan to the freezer to chill for 10 minutes.
While you wait, go ahead and melt the chocolate over a double-boiler. The perk of using a double boiler is the pan of boiled water can be kept underneath the bowl of chocolate, so it will stay melted while you coat both sides of the candy bars. (Alternatively, you can melt the chocolate in a heat-safe bowl in the microwave using 30-second intervals.)
Remove the pan from the freezer. The bottom may still feel warm to the touch, which is good because the bars are easier to slice when they aren’t totally cold. Use a large sharp knife to cut the peanut butter layer into bars.
Make 5 vertical cuts to make 6 rows of candy bars, and then cut them in half to create 12 large candy bars. Or, cut them in half again to make smaller fun-size bars. (Or Butterfinger bites!)
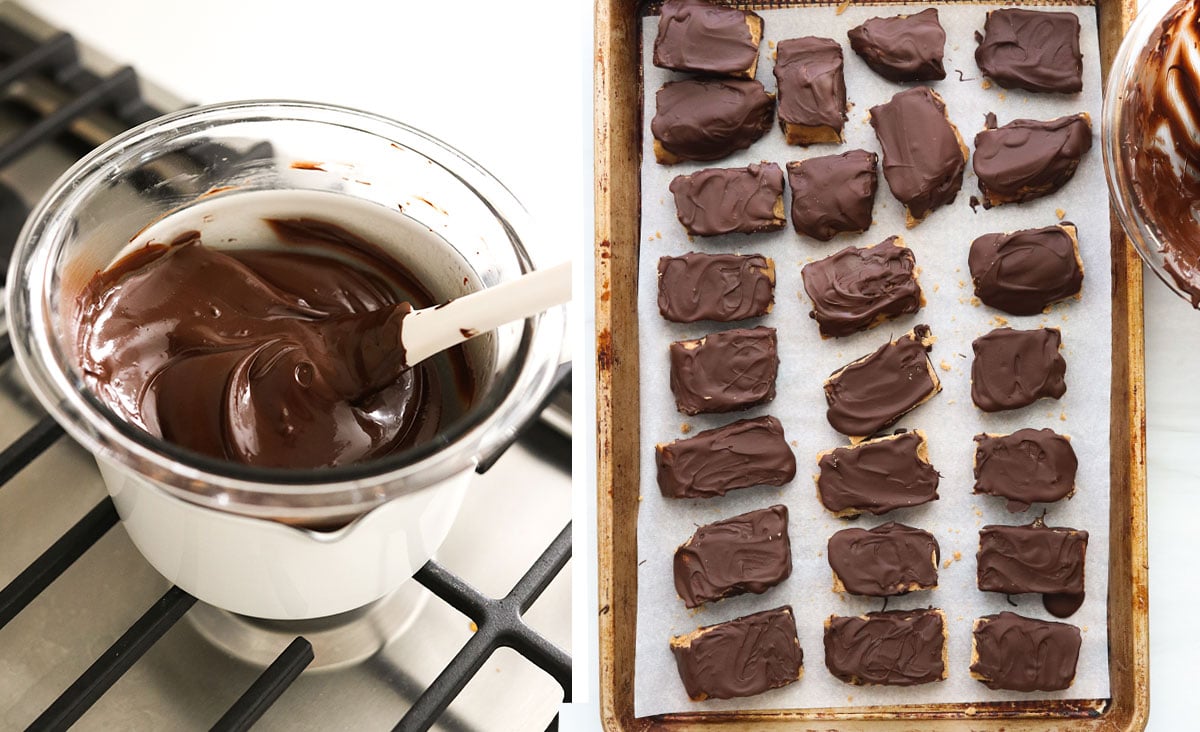
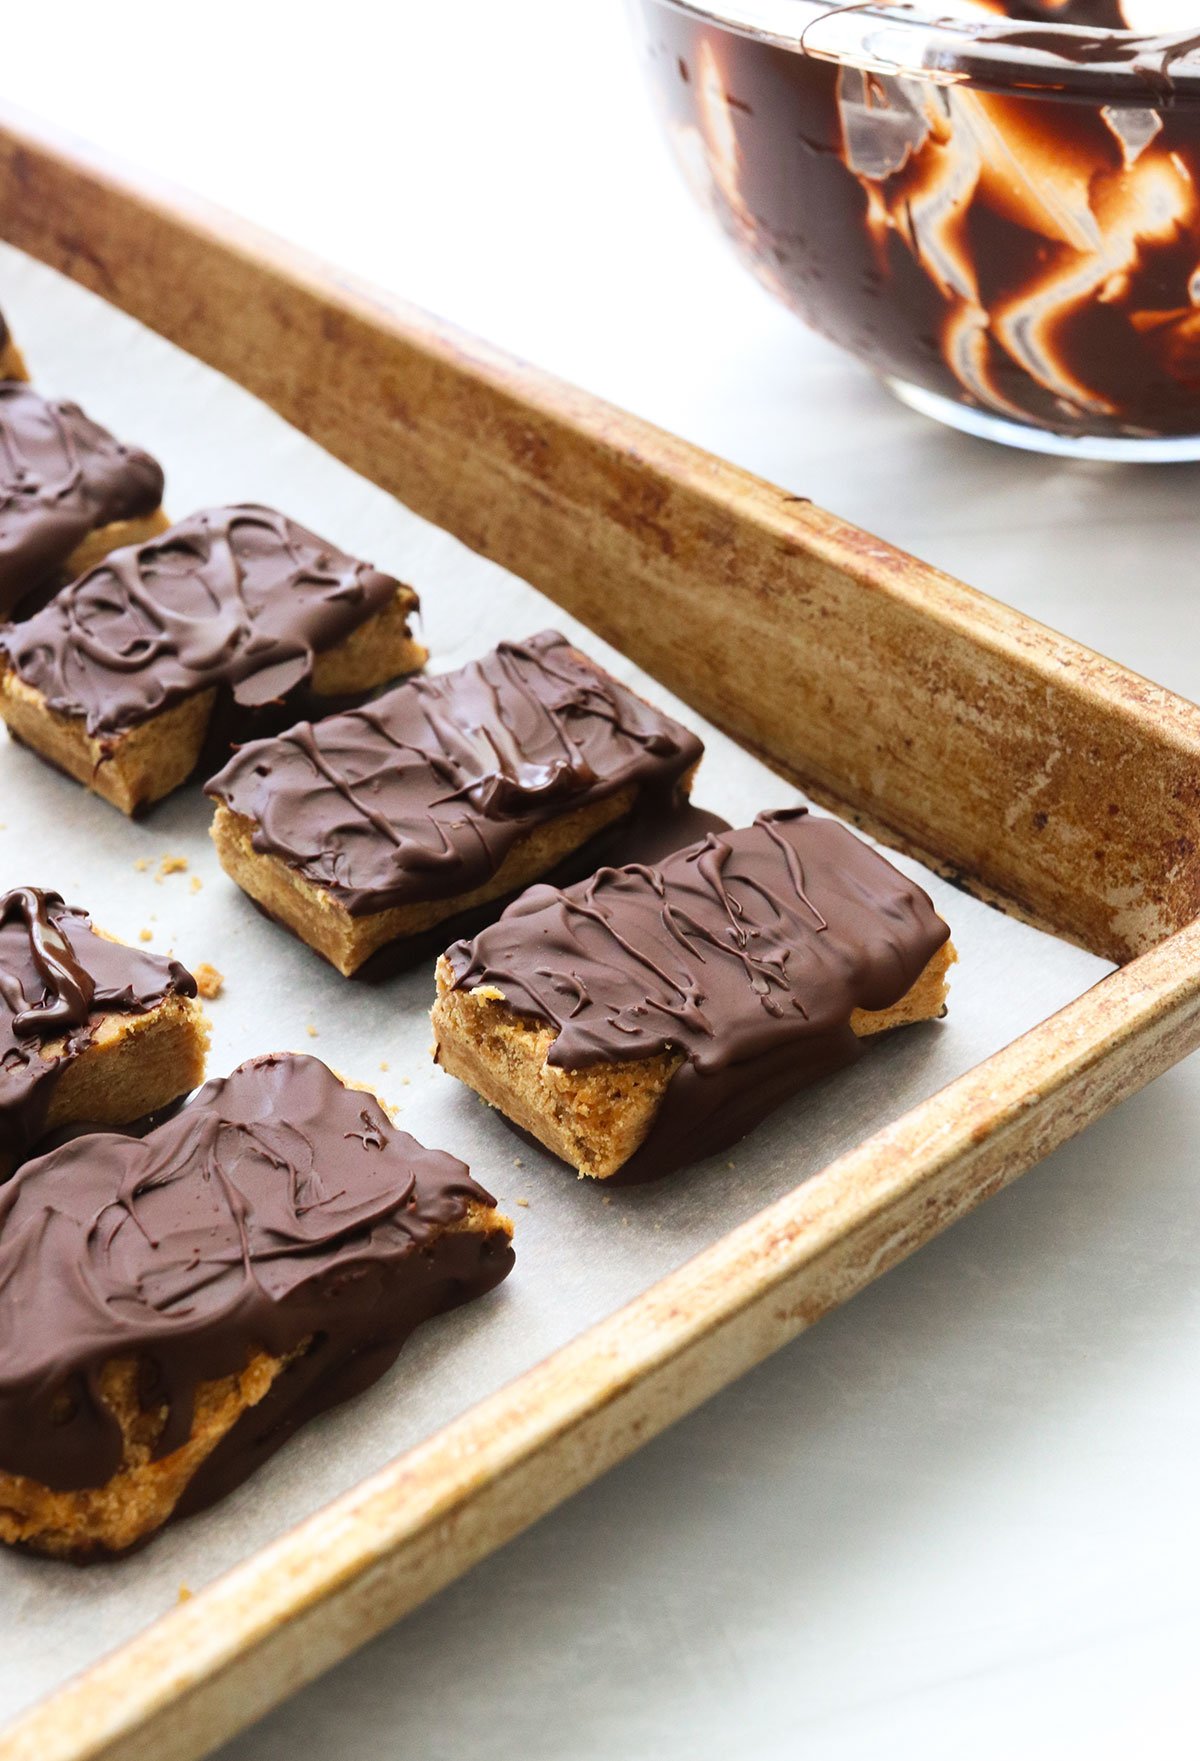
Use 2 forks to dip each bar into the melted chocolate and let the excess chocolate drip off before placing them on a parchment-lined baking sheet. Or, use a spoon to spread the melted chocolate over each bar. Once the chocolate has hardened, flip the bars over and coat the other side.
There’s no need to be perfect or totally coat the sides of the bars because the process can feel tedious. (Next time, I’d probably just coat the tops and call it a day.)
Store homemade butterfingers in the fridge or freezer for the longest shelf life and crispiest results. They will keep for 2 weeks in the fridge, or up to 6 months in the freezer.
Helpful Tips
Because candy-making has a bit of a learning curve, here are some helpful notes that may prevent any disasters during the process.
- Test your Candy Thermometer: Testing the thermometer may help to prevent any scorched maple syrup in your kitchen. Test your candy thermometer by placing it in a pot filled with at least 2 inches of water and bringing it to a boil. Boiling water should reach 212ºF. If your thermometer is off, adjust accordingly! (See tips below)
- Prevent Boiling Over: To prevent the maple syrup or honey from boiling over, spread a small amount of butter or coconut oil along the inner rim of your saucepan.
- Adjust the temperature for the level of liquid: The thermometer’s temperature reading will vary, based on the level of liquid in the saucepan. My smallest saucepan is too wide to have the liquid level cover enough of the thermometer’s tip, and as a result, I didn’t get an accurate reading. I ended up compensating for this measurement by figuring out how many degrees “off” my thermometer was with such a low level of liquid. To do this, boil exactly 1 cup of water, and see what the thermometer reading is. For mine, it only reached 180ºF, but I know the boiling point for water is actually 212ºF. So, there was a 32-degree difference, which I accounted for by only boiling my maple syrup to 268ºF, which would be the equivalent of 300ºF.
- Looking for more crunch? You can add up to 1 cup of crushed cereal for extra crunch. But be sure it’s ready to stir in quickly since this recipe hardens so fast after the maple syrup is boiled.
Looking for more healthy desserts? Try my date-sweetened Chocolate Peanut Butter Balls, Vegan Freezer Fudge, or Banana Snack Cake for more ideas.
Healthier Homemade Butterfingers
Ingredients
- 1 cup pure maple syrup
- ⅛ teaspoon cream of tartar
- 1 cup peanut butter (creamy or crunchy)
- ½ teaspoon sea salt
- 1 ½ cups dark chocolate chips
Instructions
- Lightly grease a 9-inch square baking dish and line it with parchment paper. You'll want this ready to go before you get started, because this recipe moves quickly. Measure out the peanut butter and salt, as well, so you won't have to do that later.
- Pour the maple syrup into a small saucepan and stir in the cream of tartar until dissolved. This is the ONLY time you will stir this mixture.
- Attach a candy thermometer to the saucepan, making sure that the stem of the thermometer is not touching the sides or bottom of the pot. Ideally, the tip should be submerged in 2-inches of syrup, for the most accurate results. You can also use an instant read thermometer periodically as the maple syrup boils.
- Bring the maple syrup to a rolling boil over medium heat, then continue boiling until the temperature reaches 300ºF (the hard crack stage for candy). This can take anywhere from 7 to 10 minutes, depending on your stove top.
- When the maple syrup has reached 300ºF turn off the heat immediately and stir in the peanut butter and salt. Stir as quickly as possible, without splattering.
- Immediately transfer the peanut butter mixture into the prepared pan. Use a spatula to spread it out evenly while it's still hot, because it will harden fast. (Even waiting 2 minutes might mean the mixture will be stuck in your pan, hard as a rock.) Place the pan in your freezer to cool for 5 to 10 minutes.
- Remove the pan from the freezer while the bottom is still slightly warm. The bars are easier to cut while they aren't totally cool. Make 6 vertical cuts into the bars, then cut them in half to make 12 full-size candy bars. Or, cut those bars in half again to create 24 smaller fun-size bars. Return the bars to the freezer while you melt the chocolate.
- Melt the dark chocolate in a double boiler, stirring until it's smooth. (Or use a microwave in 30-second intervals.) Arrange the bars on a large parchment lined baking sheet, and spread the melted chocolate over the top of the bars. Once it has cooled, flip the bars over and coat the other size.
- Place the chocolate covered bars in the freezer to chill until firm, about 1 hour. Then they are ready to serve, straight from the freezer! These bars are the most crispy when served frozen, but you can also serve them from the fridge or at room temperature.
- Homemade butterfingers can be stored in an airtight container in the fridge for up to 2 weeks, or in the freezer for up to 6 months.
Video
Notes
Nutrition
If you try these homemade candy bars, please leave a comment and star rating below letting me know how you like them.

You are a genius! These look so amazing!
This is brilliant. Cant wait to try it.
Wow, these look totally yummy. I just had someone ask me to makeover their favorite childhood candy bar, The Butterfinger. I’ll send them to your site to check out your recipe. Ahh, the synchronicity, eh? The candy thermometer has always daunted me but I don’t know why. Maybe if Santa brings me one I’ll give it a try:-)
Wow! Thanks for all your hard work in developing this recipe. I don’t know why I’m so afraid of candy thermometers (well, not of the thermometers themselves, but of using them!)…I need to get over that. 🙂
I was completely afraid of candy thermometers, too. However, after burning and/or under-cooking batches of maple syrup and honey, I decided to get over it! 😉
Another great idea! Can’t wait to try.
These look amazing!! I don’t have accesss to cream of tartar. Could I sub something? Thanks:) Love your recipes!!
I’ve read lemon juice will work as an acidic component to stop crystallization. I’m gonna try it!
look yummy! I wonder if almond butter could be used for those who don’t do peanuts.
Almond butter will definitely work! I’d probably add a bit more salt to the recipe, to compensate for the natural sweetness of the almonds.
Wow, made my day!
Wow girl, I am very impressed!! It’s a bit too complicated and messy for me to ever make, but great job, they look delicious! If you sold them, I’d buy one 🙂
I have a nut-free child due to allergies. Any idea if Sunbutter would work like peanut-butter? The one I try to purchase is pretty close to natural (when I grab the right one) and we do tons of substitutions with it. Thanks in advance!
Yes, sunflower butter should work just fine!
I tried this and have ended up with a delicious pile of crumbly peanut butter fudge tasting candy. I am not sure if I took it too far or not far enough, or if it is because I added a splash of vanilla, anyhow it seized up in the pan and did not pour or spread. Now I am going to figure out how to use this delicious concoction to make a bon bon!! Will definately try again, even the failure is delish!!
I’m impressed that you’ve already tried it! It seems that candy-making involves a few trials to get it “just right” but I’m glad it tasted good, regardless! 🙂
In some troubleshooting tips that I read online, they mentioned that you could add water to the boiled sugar if it gets too hard to pour, which will eventually soften the mixture, then you simply boil it again until the water dissolves and pour it quickly out of the pan. However, I don’t think this will work once you’ve added the peanut butter! So, perhaps it’s better to pour the melted syrup over the peanut butter in a separate bowl, so that the peanut butter mixture doesn’t wind up stuck in the pan…
Really enjoy your recipes and ideas. Now that it is cooled it it crumbles into a fine powder with nuts from the peanut butter in it. Should be awesome on oatmeal. I gave up refined sugar last June and am starting to think about avoiding the holiday backslide by nailing down some good recipes. I usually bake cookies and make candy all through the holidays. 🙂
Oh you are my hero. This is my ultimate favorite, and I cannot wait to try it out! I love the simple recipe too! 🙂
Oh, my gosh, this is amazing! No, I’ve never made candy before, but this would make me try it. I love butterfingers; it’s one of those processed junk foods that are hard to forget!
Wow, wow, and more wow! Those look SOOOO good!
I made a mistake with the thermometer (you tried to help!!!) and the maple syrup didn’t harden. I mixed in the PB and put it in the freezer to cool, but now its the consistency of a very soft caramel. Any hope in fixing this?
Once the peanut butter has mixed in, I don’t think you can boil it again to make it any crispier. However, you could always add in some crunch with some crispy cereal, nuts or coconut! Personally, I’d roll that soft caramel into balls, and dip them in melted chocolate– you’d have gooey peanut butter caramel truffles! Yum. 🙂
That’s a GREAT idea, thanks!
You are a genius! You will be my son’s hero once I make this recipe! I’ve never made candy before, but this will be my first attempt because it’s my son’s favorite candy bar that he gets once a year. 🙂
How do you keep these fresh? If you wanted to give these as gifts, what would you wrap them in?
I would probably wrap them individually in parchment or plastic wrap, then store them in the freezer as long as possible before gifting them. I haven’t left mine out overnight, so I’m not sure what their texture will be like– I assume they’ll be a little softer? You might add a little note on the package to “freeze for best texture” or something like that. Hope they enjoy their gifts! 🙂
Just wanted to chime in here and say I made them! And I wanted to thank you so much for all the tips – I have a candy thermometer that I long suspected did not measure accurately but it never occurred to me to work around it like that…
As for the butterfingers – well, I never bothered with the chocolate! The peanut butter/honey mixture was dead on flavor-wise and once frozen, the crunch was perfect too! I never even had to bother with Halloween candy this year because I had this in my freezer, so thank you thank you THANK YOU for that!!!
o m g! these look amazing i cant wait to get my electric back just to make these !!! and i have all the ingredients already so there really at top of my list (priorities ;-)!)
Just made these for the 2nd time! They are SO good! I have made the “unhealthy” version before and the 2nd time making these I used the technique I used when I made the unhealthy recipe. I poured your fully cooked mixture onto a silpat mat and spread it out with a spatula, waited about 30 seconds and then folded half of it on top of the other half and repeated the whole process until it felt too firm to be able to do it again. They came out more layered and crunchier when they cooled and I didn’t have to freeze them 🙂
Holy crud, that’s very clever. I can’t stand cold/frozen goods (waaay too sensitive teeth, let’s face it) so this is a wonderful solution. Thank you!!
I LOVE YOU! thank you thank you thank you!!!!!!!!!!!!!!!!!!!!!!!!! been dying for a butterfinger but refuse to eat the darn things because of all the crap in them!
Thank you!! I made these with homemade sunflower seed butter. Amazing! Haven’t even coated them with chocolate yet and they are awesome!
I will have to try this recipe sometime. It looks delicious! My mom and I love your website. Every recipe that we try turns out!
These look so good! I don’t, well, very rarely eat things that I don’t make. All the chemicals in food just make me feel off. I don’t like it, so I’m always looking for things to make that are made with natural healthy ingredients. I can’t wait to try these.
Do u think agave syrup would work instead of maple syrup?
The flavor would definitely be different, and probably sweeter, but it might work. Since I’ve never tried it, I couldn’t tell you for sure. Please come back and let us know if it works for you!
I just tried this recipe. It turned out like toffee with an of taste. Would that be because it got too hot? I used much more honey with a little bit of maple syrup. It did have an off smell right near the 300 mark. Next time I’ll just use all maple syrup I just didn’t have it on hand today.
They turned out great, and so easy! I didn’t coat all sides withe the chocolate but just put a layer on top of the bars. Also I stirred a bit if water and shredded coconut into the melted chocolate. Worked great. Thanks for the recipe.
Thank you for your recipe and DETAILED tips and instructions! These were wonderful…but, I’m sure I would have wrecked a batch or two of Maple Syrup if you hadn’t suggested boiling water first and “adjusting” the hard crack temperature based on the results! I LOVE this candy!!!
Wonderful! I used maple syrup with tahini and got halva. Really good.
Thank you! I cannot — MUST NOT — eat artificial vanilla or hfcs but Butterfingers used to be my favorite candy bar. My husband (whose culinary skills stop at boiling water and making a sandwich) and my girls made these for me for Mother’s Day. They weren’t crispy (can’t say where they went wrong??) but they were delicious.
Just finished making the candy. Before we even put it in the fridge, we tried it and it is AMAZING!! We are super excited to try it once it’s covered in chocolate. Holy smokes! Thank you so much. 🙂
Look forward to trying these. The oil on the sides of the sauce pan is used to keep the sugar crystals from climbing up the sides, and potentially falling back in the mixture. This would make the mixture very grainy by forming larger crystals. This is also why you don’t want to stir the mixture while it is boiling.
Several batches later – must give up. A failure. It would have been easier to but the company,
Thank the stars above…. I have been looking for a recipe like this and cringed at all of the recipes containing candy corn. Yuck! Pure maple syrup is my fave sweetener and I can’t wait to try this now. Thank you!
I am featuring my favorite healthy candy bar recipes and I must use this, Check out the other top icks and see your recipe featured. http://wp.me/p3DSWe-vE
I am so excited to make thee as a Valentine’s Day present. What grade of maple syrup would you recommend? I have both.
I usually use Grade B for everything, but Grade A might provide a more authentic “candy” flavor.
What size pot is everyone using? I have a 1 qt copper bottom pot that will not have 2 inches (or even one) of maple syrup covering it. 🙁 I guess I can double it but I am not sure how much of this I will want lying around! 😉
I’ve attempted this twice. The first batch came out ok, but weren’t as crunchy as the real thing, the second batch I messed up by trying to be clever and substitute sugar for some of the maple syrup. This does not work, at all. I panicked when my sugar/syrup mixture was still grainy as it was getting up to temperature and stupidly stirred it. What I ended up with as a result was a sort of hard, crumbly fudge (like Scottish tablet, if you’ve ever had that), but peanutty. It was lovely, and we’ve been crumbling it over ice cream as a treat, but it definitely wasn’t butterfingery.
I’m going back to basics and trying again with your exact recipe later. My first attempt may have failed because I tried to convert your cup measurements to weight measurements. This time I’m going to bite the bullet and measure using a measuring cup. I would like to know how you know you’ve filled a cup with something as solid as peanut butter though. Do you just squish it down until it won’t squish any more? If so, how do you get it out of the cup again without leaving half of it stuck to the sides? These are the questions that made me go in search of conversions to grams 🙂
Oh, one more thing, my mixing bowl and the peanut butter were both cold when I poured the maple syrup in, and I think it might have cooled too quickly (the second time it never even made a spreadable goo, it just turned instantly into dry, crumbly fudge), is it a good idea to try warming the bowl and the peanut butter?
I think you can use a small silicone spatula to scrape off the peanut butter and it will all come off clean from the measuring cup 🙂
I know I’m late to the game, but for what it’s worth, a better way to “calibrate” your thermometer is to put several ice cubes in a glass and add just enough water to fill any “air gaps”. Then put your thermometer in. It should read 32 degree F. The boiling water technique is good, but varies depending on the atmosphere/pressure/elevation, and some may take a rigorous simmer to be a boil, misguiding their “final” temperature. 🙂
I cannot believe I have not reported back! My family LOVED THESE! A true keeper. I made them as written and everything was fine in my 1 qt. pot.
I made these today, and my while family loved them! Thank you!!
These are delicious! I used honey and substituted almond butter. Just the honey and nut mixture at room temperature reminds me of Mary Janes. And frozen with chocolate they remind me of Heath bars. While they didn’t turn out like Butterfingers, this is still my new favorite recipe. I am going to have to keep these in the freezer at all times!
I am on the gaps diet and cannot do cream of tartar. Any substitutes?
So I just attempted these and burned the honey and my fingers. Boo 🙁 Oh well, time to clean out the pan and try again…next time I will go low(er) and slow. Your recipes never fail me, so I will push through the pain and try again 😉
These were fantastic. This was my first time making candy so I followed her tip about boiling water first to adjust the thermometer. I followed the recipe to the tee and used maple syrup. These came out tasting better and with the same texture as a real butterfinger.
Hi,
I made them as directed, poured onto the parchment and cut them, within a minute it was hard as rocks. It’s in the fridge now. What did I do wrong?
Hi. I was wondering if there was a stove top way to melt the dark chocolate? I don’t have a mircrowave and an oven safe bowl. Thanks for this recipe, sooo different.
If you have a bowl that will fit on top of a small saucepot, you can create a “double boiler” over your stove top. Just boil some water in the saucepan, and the bowl on top will gently heat up from the steam– so you can put the chocolate in that bowl to melt.
Got it! Thanks.
I tried making these with sunflower butter instead of peanut butter (kids can’t eat peanuts) and I have a crumbly, powdery mess… any idea what happened?
My guess is we boiled it too long… I think it doesn’t need to go to 300 degrees…
Oh lord help us! This recipe is amazing. My daughter has been craving Butterfingers, and I just cannot bring myself to buy that stuff and put it in her body. I am entirely sympathetic, though, and I finally decided to look for a recipe. I am utterly shocked at the texture and flavor of the peanut butter filling (I’m melting the chocolate as I type). Mineral rich maple syrup, and peanut butter…. Awesome! Thank you for posting this recipe! It is going in the family cookbook!