Vegan Sushi Bowls with Creamy Sriracha Sauce
Servings: 4
Calories: 480kcal
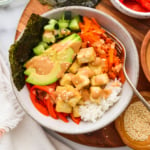
Vegan Sushi Bowls are the perfect way to enjoy your favorite sushi flavors, without the effort of making a roll. Customize them with any toppings you love!
Print Recipe
Add to Collection
Ingredients
- 1 cup uncooked white rice
Baked Tofu
- 1 block extra firm tofu
- 1 tablespoon toasted sesame oil
- ½ teaspoon garlic powder
- 1 teaspoon fine sea salt
- 1 tablespoon arrowroot starch (or cornstarch)
Creamy Sriracha Sauce
- ¼ cup tahini
- 1 tablespoon lime juice
- 1 tablespoon tamari (gluten-free soy sauce)
- 1 tablespoon sriracha
- 1 tablespoon maple syrup
- 1 garlic clove , minced
- 1 inch fresh ginger , minced
- ¼ teaspoon fine sea salt
Sushi Bowl Assembly
- 1 cucumber , diced
- 2 carrots , shredded
- 1 cup roasted red bell peppers , thinly sliced
- 1 avocado
- 1 pack roasted seaweed snacks (or 3 nori sheets)
Instructions
- Preheat the oven to 400ºF, then prepare the rice according to the directions on the package. If you would rather not watch the stovetop, use your Instant Pot to cook the rice.
- Cut the tofu into 1-inch cubes, then place it in a large bowl. Add the sesame oil, garlic powder, and salt and stir well. Then sprinkle the arrowroot powder in and stir again. Arrange the cubes in a single layer on a parchment-lined baking sheet. Bake for 20 minutes at 400ºF then flip the tofu cubes and bake for another 10 minutes.
- While the tofu and rice are cooking, prepare the sauce. In a small bowl or jar, combine the tahini, lime juice, tamari, sriracha, maple syrup, garlic, ginger, and salt. Whisk well to combine, then add 1 to 2 tablespoons of water until the sauce has a pourable consistency. Set aside.
- When the rice and tofu are cooked, it's time to assemble the bowls. Spoon some of the cooked rice to the bowl, then add the diced cucumbers, shredded carrots, roasted red peppers, and sliced avocado on top. Add some of the cooked tofu and seaweed snacks, then drizzle generously with the sauce. Sprinkle a few sesame seeds on top as a garnish, if you like.
- Leftover sauce, tofu, rice, and veggies can be stored separately in airtight containers in the fridge for up to 5 days.
Video
Notes
Nutrition information is for 1 portion, assuming you divide all of the ingredients and sauce evenly into 4 bowls. This would be roughly 3/4 cup rice, 3.5 oz of tofu, and a quarter of the sauce you prepare added to each bowl, plus the veggies. Nutrition info is automatically calculated using generic ingredients, so this is just an estimate and not a guarantee.
Rice Alternative: For a bowl of veggie-based rice, you can add peeled jicama to a food processor and blend briefly, just like you're making cauliflower rice. It's delicious and juicy, without the need for cooking if you'd like a faster option.
Update Note: This recipe was updated in January 2024 to be more filling. If you prefer the original recipe, you can find that here.
Nutrition
Serving: 1g | Calories: 480kcal | Carbohydrates: 59g | Protein: 16g | Fat: 21g | Saturated Fat: 3g | Polyunsaturated Fat: 7g | Monounsaturated Fat: 10g | Sodium: 1640mg | Potassium: 814mg | Fiber: 7g | Sugar: 7g | Vitamin A: 5422IU | Vitamin C: 30mg | Calcium: 116mg | Iron: 3mg