This post may contain affiliate links. Please read my disclosure and privacy policy.
Almond Butter Cups are an easy dessert that you can make at home, and they taste even better than the kind you’d buy at the store. All you need is a few ingredients to get started!
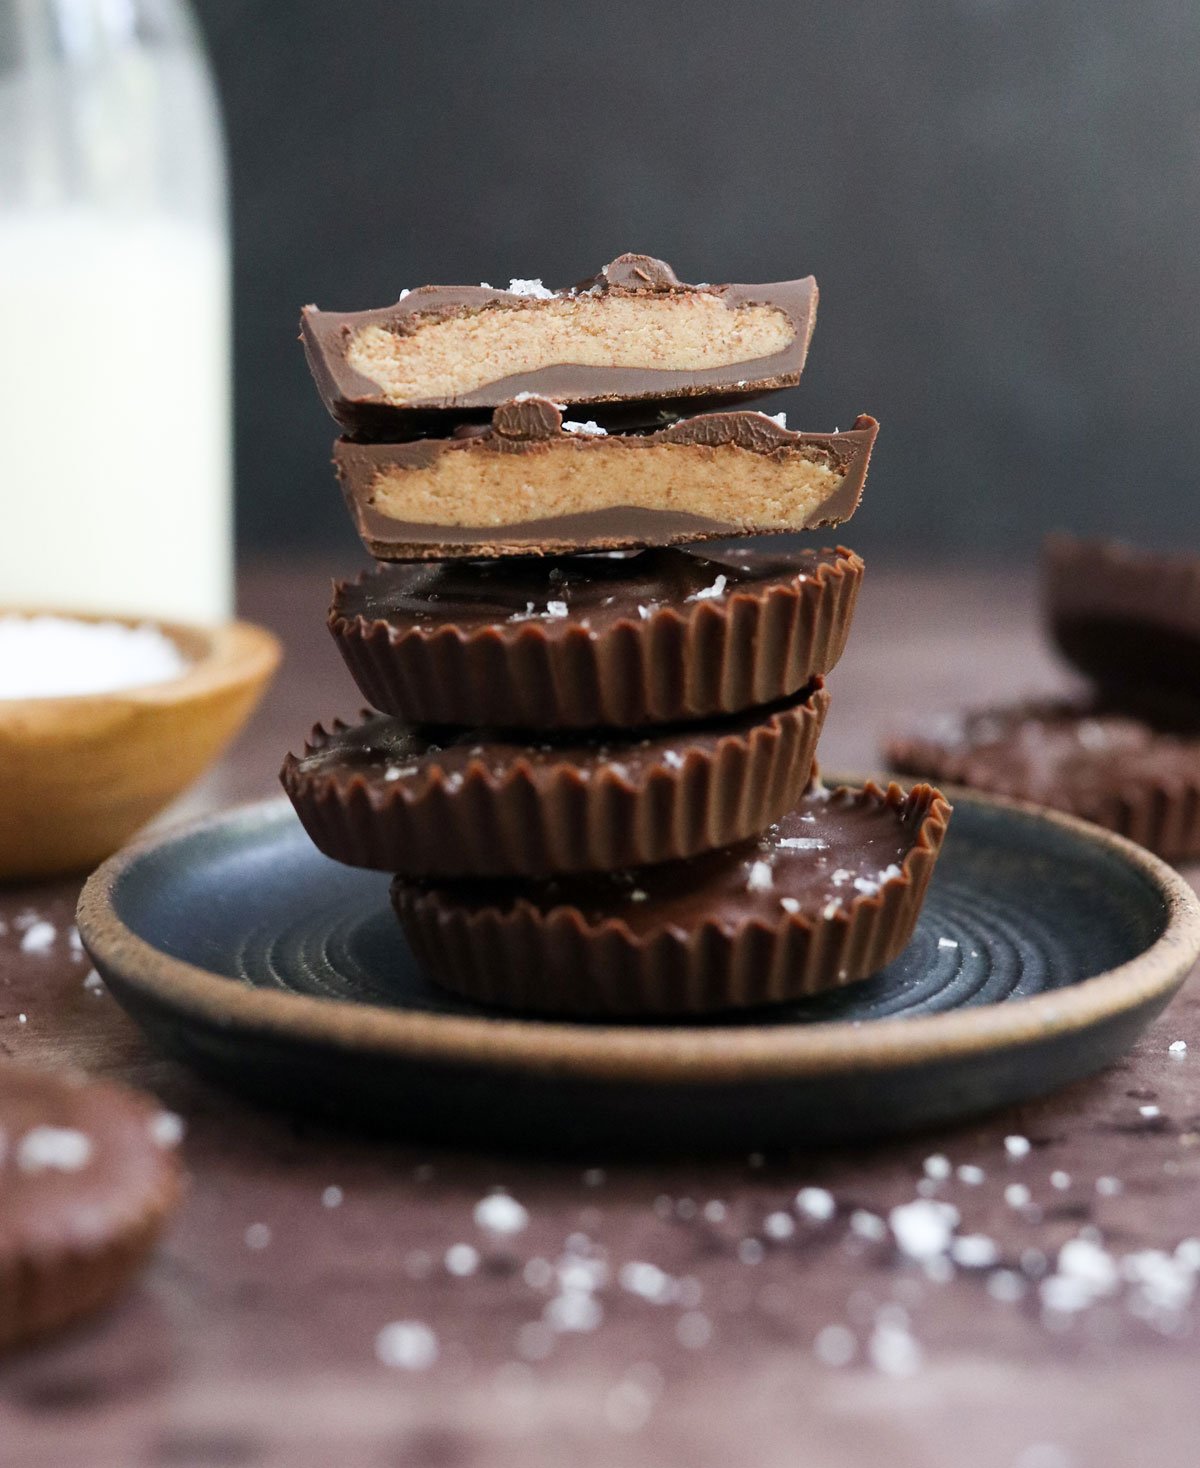
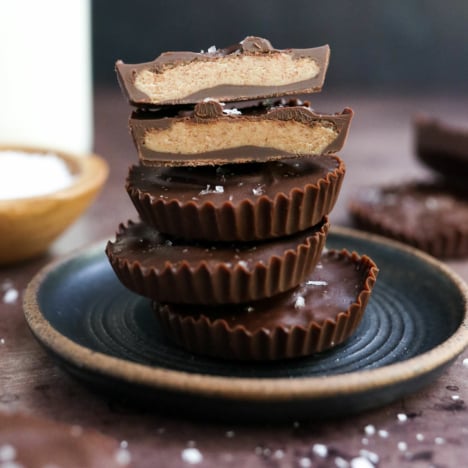
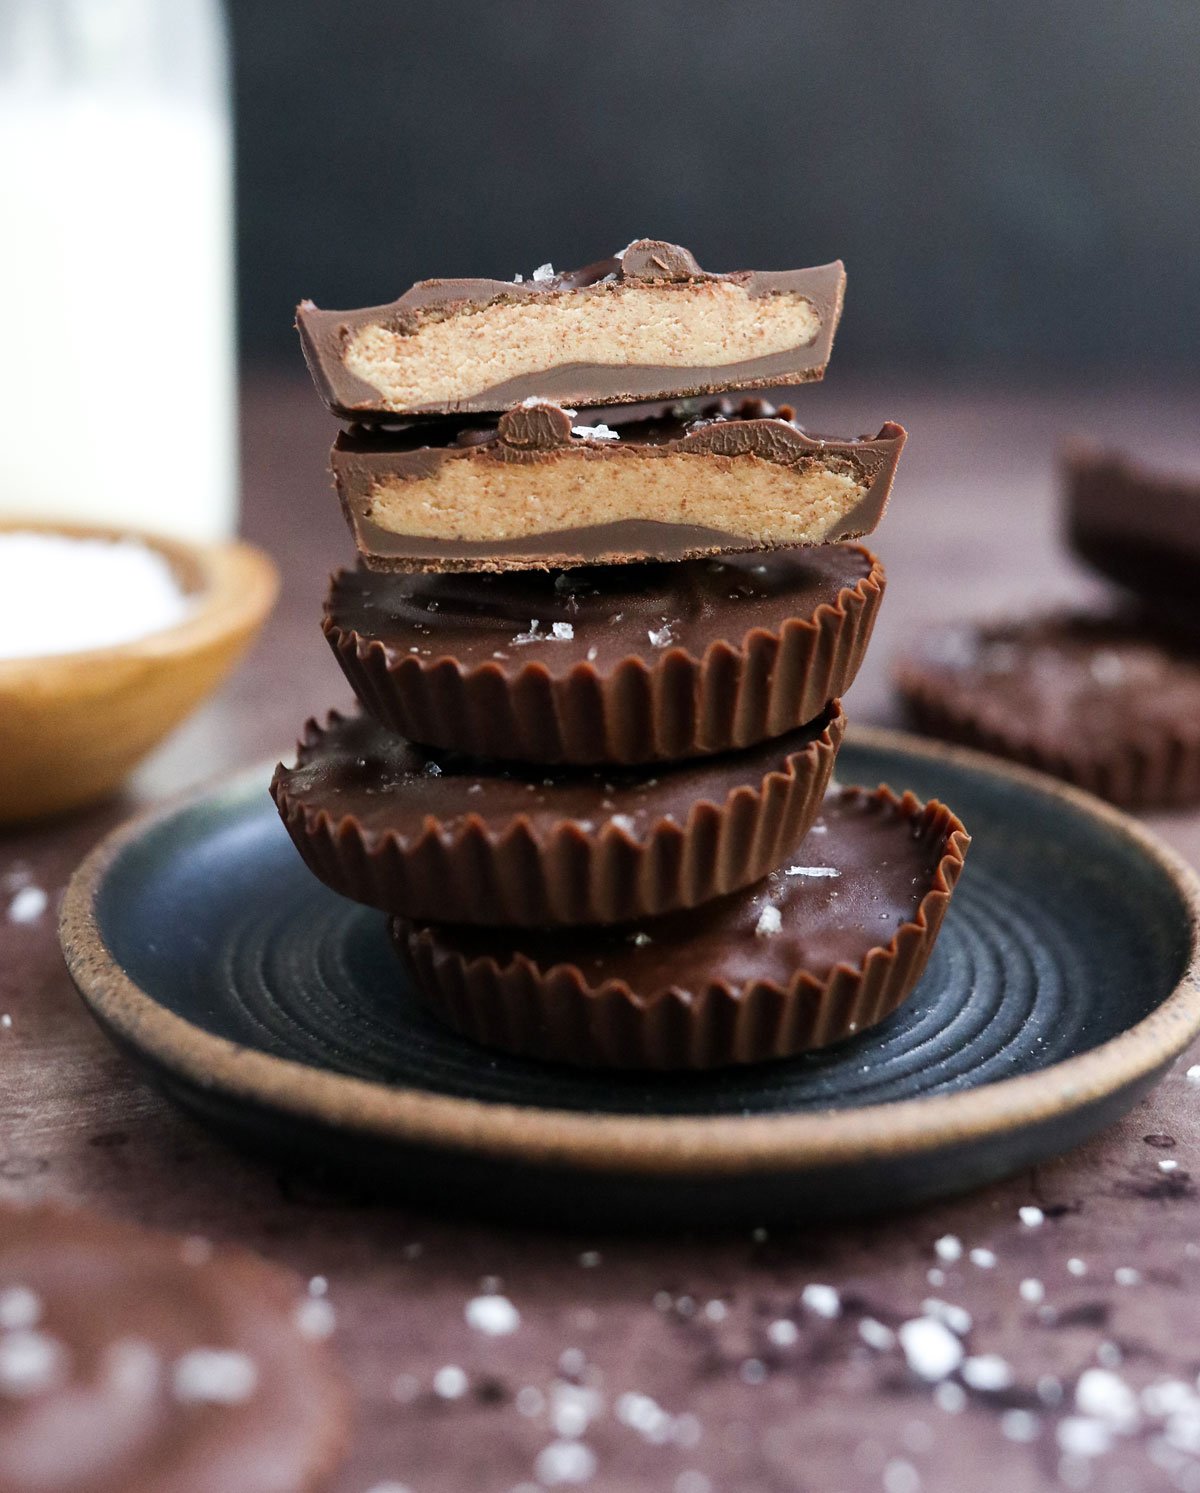
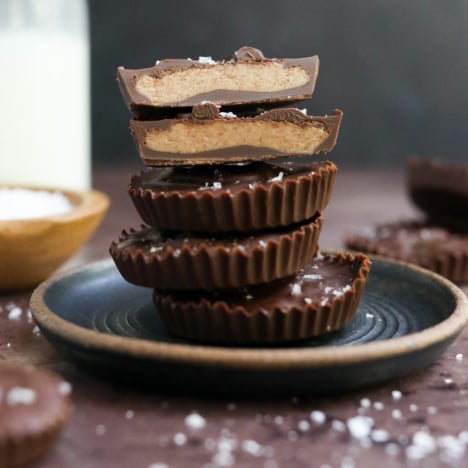
Similar to peanut butter cups, this bite-sized treat features a crisp, dark chocolate shell with creamy almond butter in the middle. I highly recommend adding a pinch of sea salt on top, too!
The sweet-and-salty combination takes the flavor over the top.
Ingredients You’ll Need
What’s in almond butter cups?
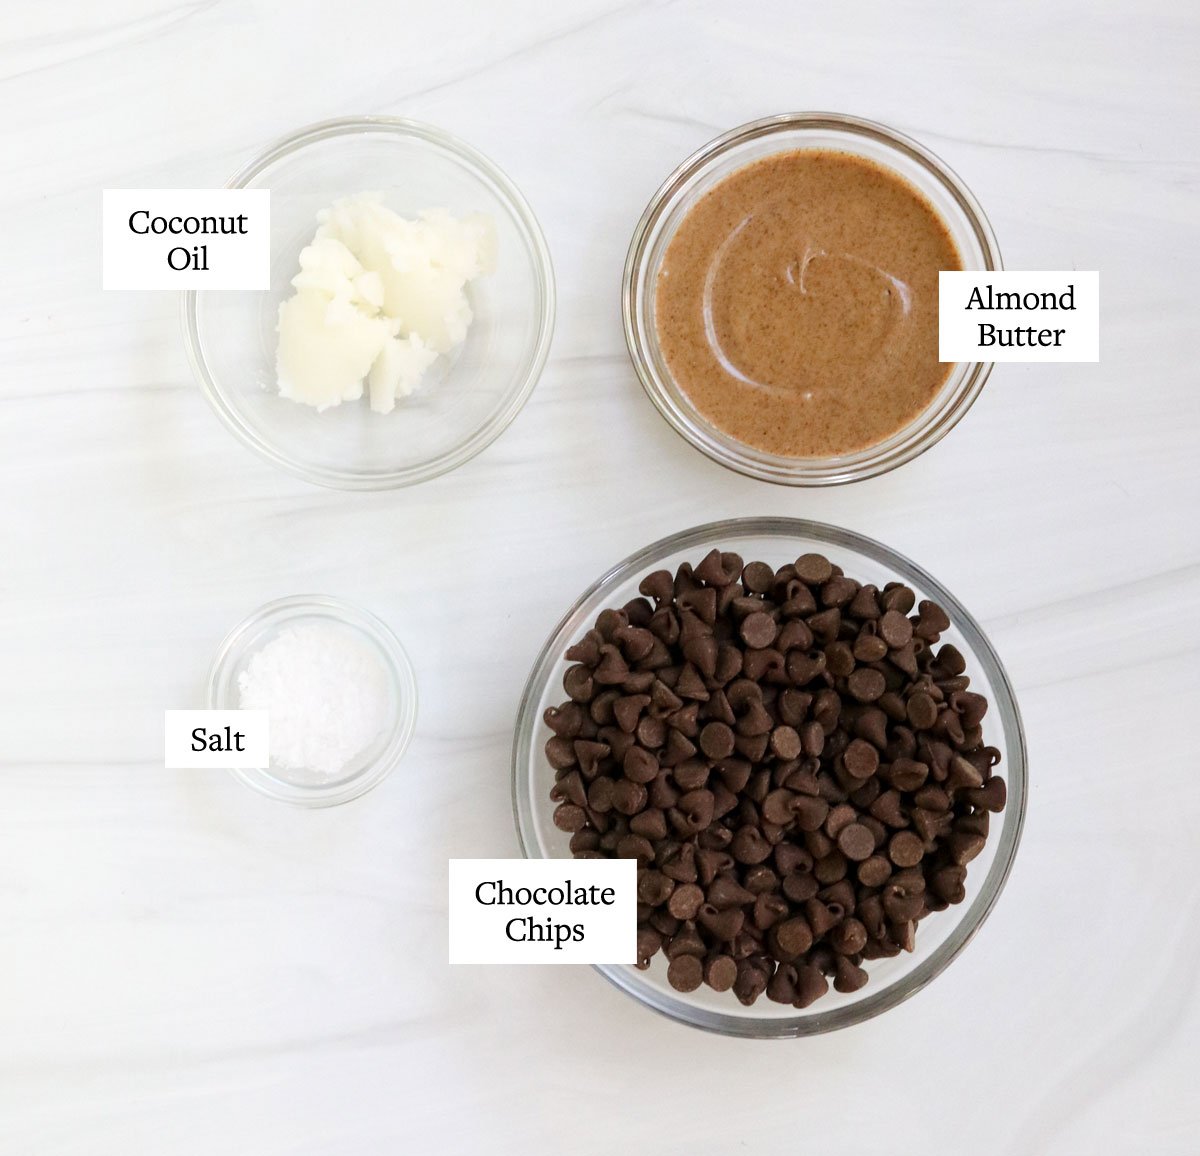
- Dark chocolate chips
- Coconut oil
- Almond butter
- Sea salt
The simple combination above will give you the fastest results, but you can also make a 3-ingredient chocolate coating (instead of using chocolate chips) which I’ll share below.
I also recommend keeping maple syrup on hand, to help thicken up the almond butter center. A small amount makes a huge difference in the texture, so the almond butter won’t spill out as you bite into the middle.
As another variation, you can also add a sliced banana into the center, along with the almond butter, for an ice-cream like center when these are frozen. In that case, you’ll want to freeze these longer (at least 4 hours). They are similar to my frozen banana bites this way!
Why You’ll Love Them
They taste amazing! You get to control how sweet or dark the chocolate is, and how much almond butter you use in the center. Feel free to add more or less, as you like! The combination of sweet and salty flavors is ultra satisfying.
They are allergy friendly. This recipe is naturally gluten-free and it’s dairy-free when you use dairy-free chocolate chips, or make your own chocolate shell. (Tips for that below.)
They store well. You can keep these in an airtight container in your fridge for up to 1 month, if you don’t eat them all before then! It’s a nice treat to have on hand when a chocolate craving strikes.
They are super-easy to make. All you need to do is melt some chocolate and have a little patience! The hardest part of this process is waiting for the chocolate to set, so you can enjoy them.
How to Make Almond Butter Cups
1. Melt the chocolate.
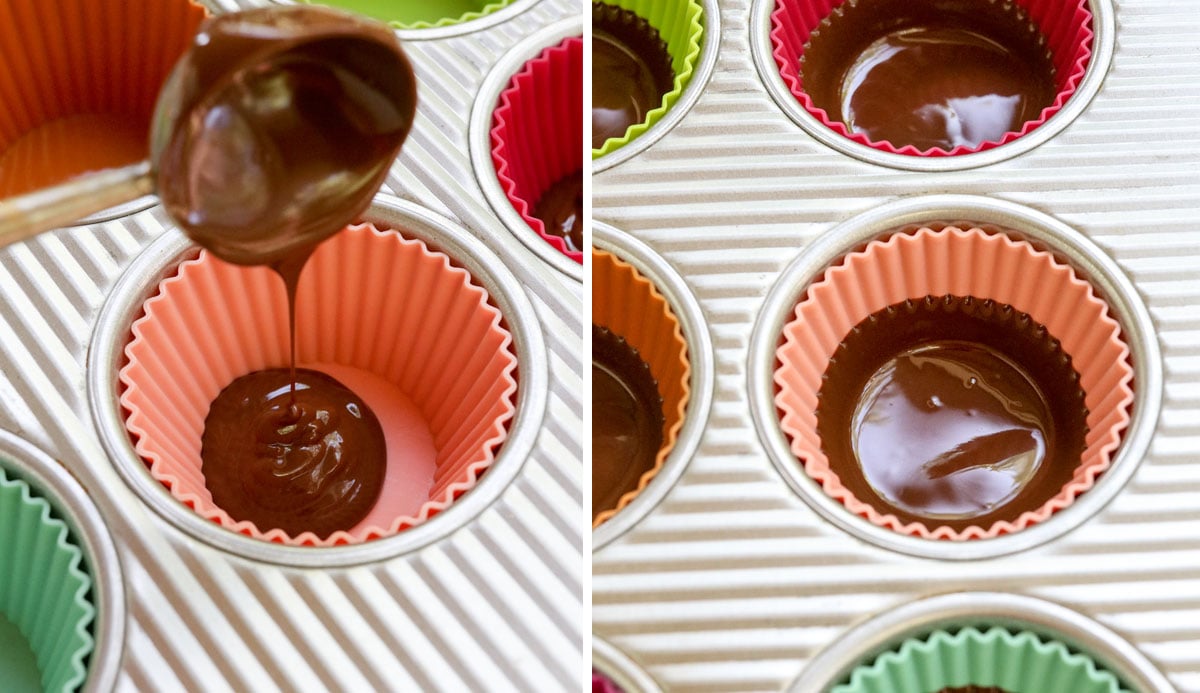
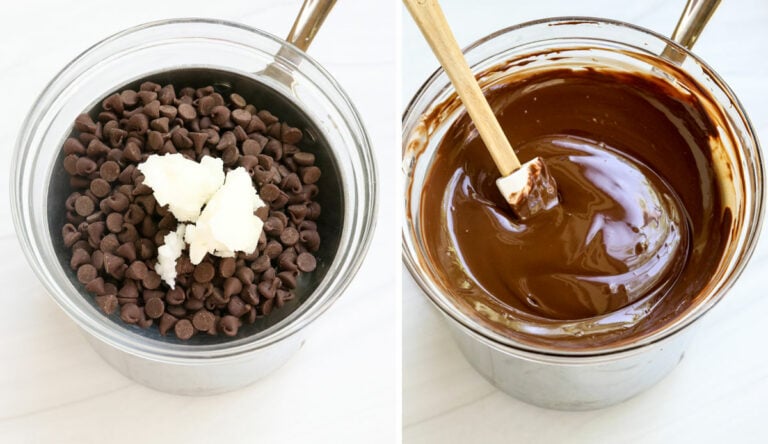
Line a standard muffin tin with 12 muffin liners, then melt the chocolate chips and coconut oil together. You can do this in a microwave, or in a double boiler by filling a small pot with an inch of water.
Place a heat-safe bowl snugly on top of the pan, and add the chocolate chips and tablespoon of coconut oil to the bowl. The steam from the boiling water below will gently melt the chocolate. Stir until the chocolate is smooth.

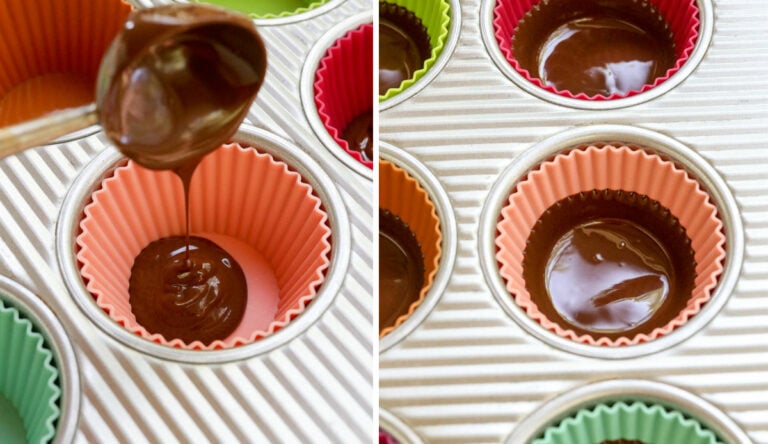
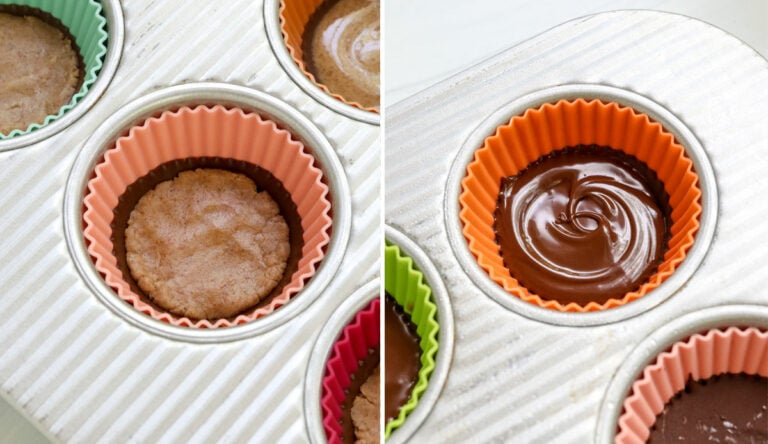
Add a teaspoon of the melted chocolate into the bottom of each muffin liner.
Repeat until all 12 cups are filled with the bottom layer of chocolate, then tilt the pan so the chocolate will swirl around each muffin cup, going up the sides of the muffin liner slightly. This will help give your almond butter cups a nice edge.
Place the pan on a flat surface in your freezer to let the chocolate set. Leave the remaining melted chocolate in the bowl on the saucepan, so it will stay warm and melted. (The stove does not need to remain on, though.)
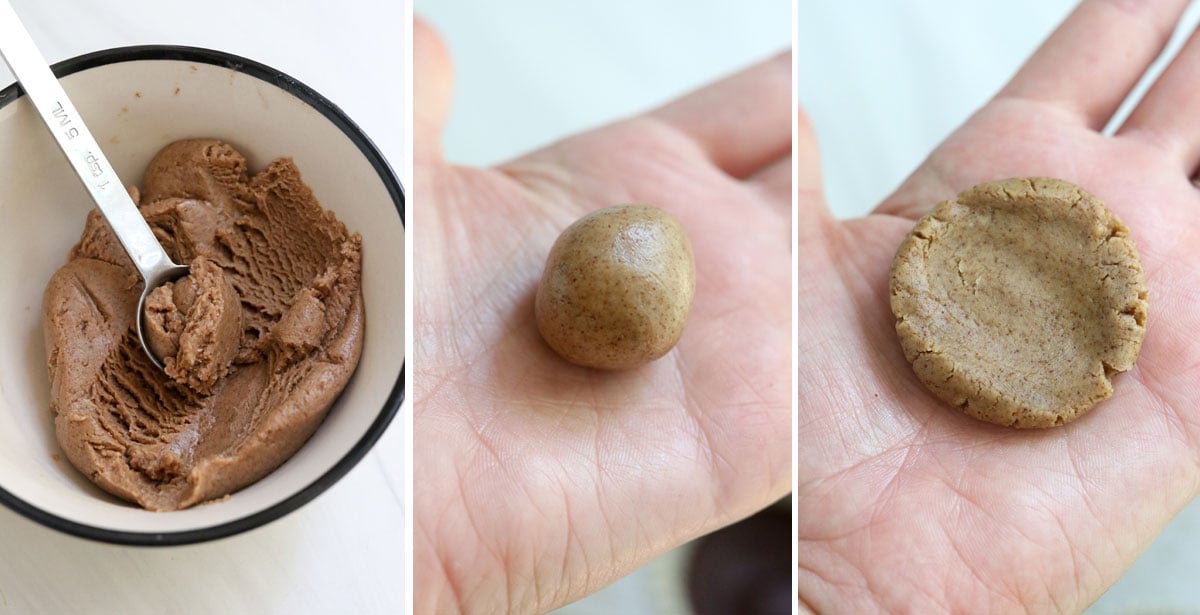
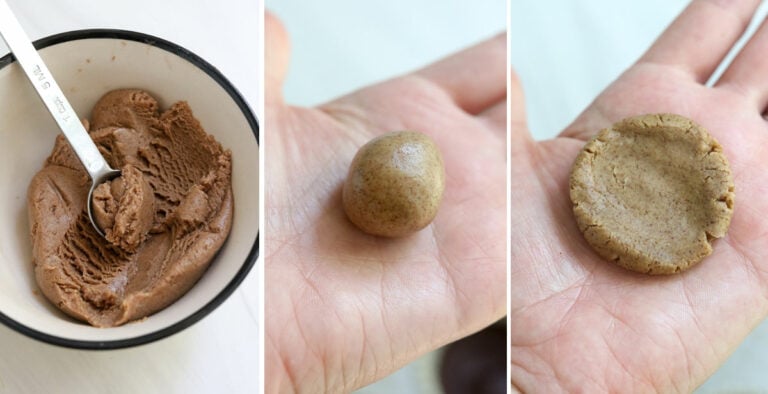
2. Prepare the almond butter layer.
While the chocolate is setting in the freezer, mix the almond butter and maple syrup together in a small bowl. Add a pinch of salt, if you are not using salted almond butter, to help the almond flavor pop.
The maple syrup will make the almond butter thicken up, so it won’t spill out of the chocolate shell later. (This gets very, very messy if you use plain almond butter that has a drippy consistency.)
When you mix the almond butter and maple syrup together, you should see the texture transform into a thicker consistency, similar to putty or play-doh.
3. Fill the cups.
Remove the pan from the freezer. Scoop the almond butter mixture using a heaping teaspoon, then roll it between your hands to form a ball. Flatten the ball to make a disc, then place it on top of the hardened chocolate layer in the muffin cup.
Repeat with the remaining almond butter mixture, until all of it has been used up and the muffin cups are each filled with almond butter. If you have extra almond butter mixture to use up, you can press the excess into any cup that might seem less-full than others.
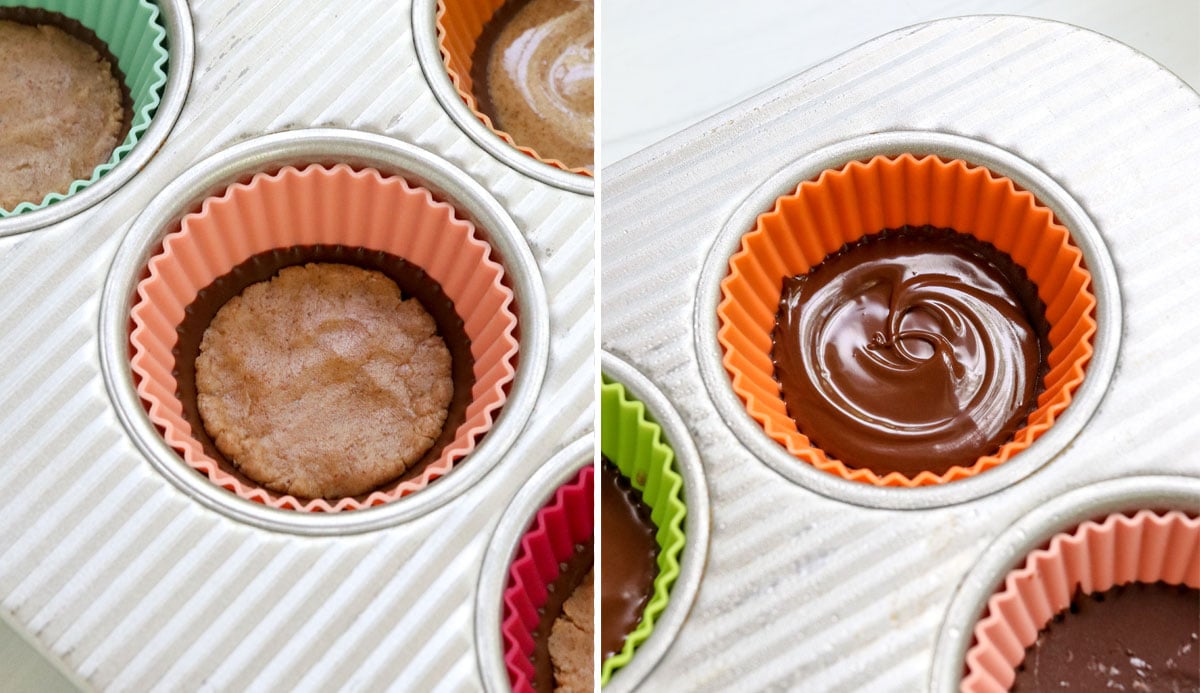
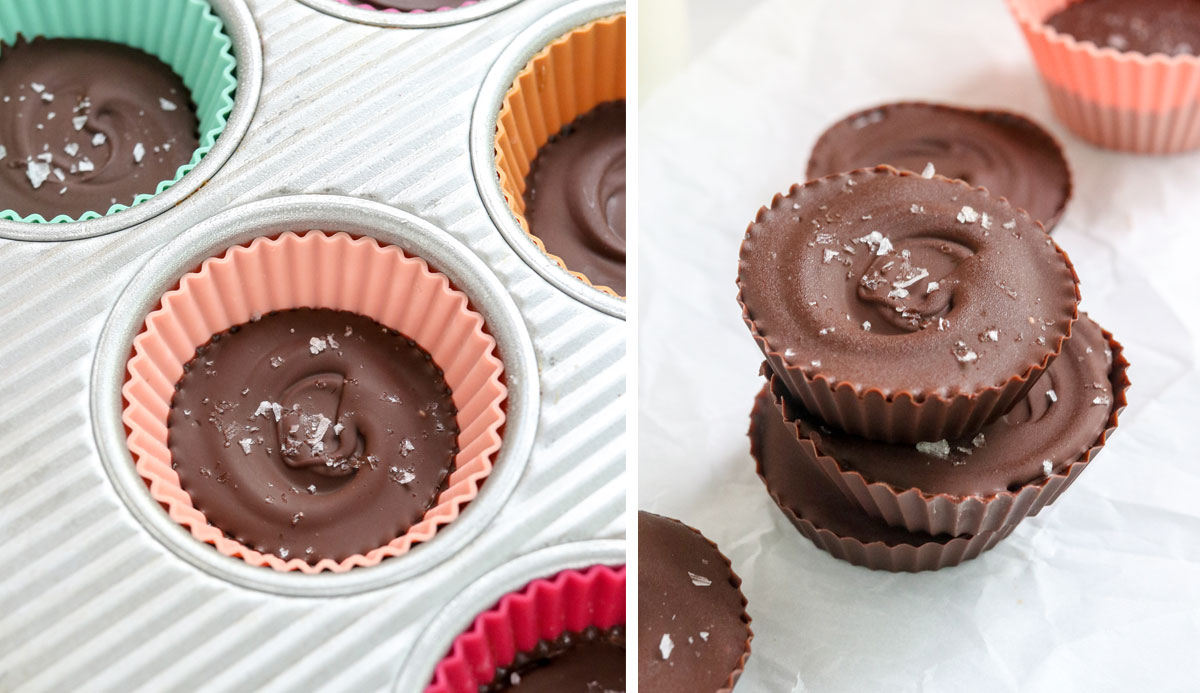
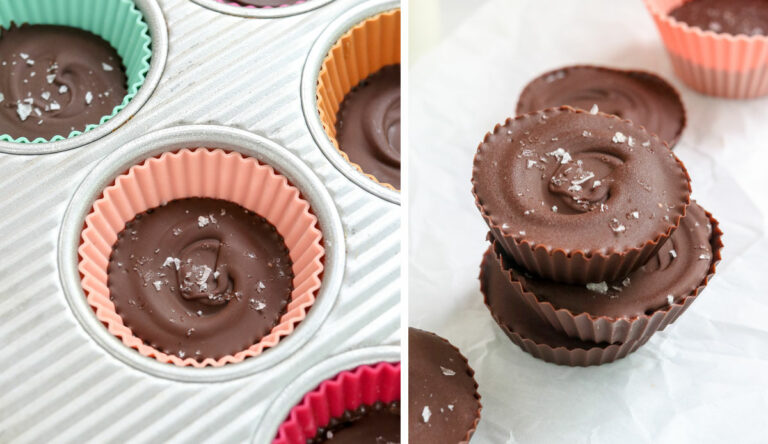
Add a teaspoon of melted chocolate to the top of each almond butter cup, and use the spoon to spread it around so the chocolate totally covers the top. Sprinkle some flaky sea salt on top of the melted chocolate, if you’d like a salted top.
Repeat until all of the almond butter cups are covered in chocolate, then place the pan in the freezer to let the chocolate set, at least 30 more minutes. Then transfer them to the fridge, so they don’t become too hard to bite into.
4. Enjoy!
As soon as the chocolate is set, the dark chocolate almond butter cups are ready to serve. The coconut oil will make these melt in a warm room, so be sure to keep them stored in an airtight container in the fridge for the best texture.
You can store almond butter cups in an airtight container in the fridge for at least 1 month. Or, you can keep them in the freezer for up to 3 months. (The texture will be much harder when they are frozen, so be cautious when biting into a frozen-solid one.)
Prefer mini almond butter cups? You can use a mini muffin pan & mini muffin liners instead! Then this recipe should make 24 small pieces, in that case, rather than just 12 large ones.
How to Make a Homemade Chocolate Shell
If you prefer to make your own naturally-sweetened chocolate shell, here’s what you’ll need:
- 5 tablespoons melted coconut oil
- 5 tablespoons cacao powder
- 5 tablespoons maple syrup
Mix these 3 ingredients together in the double boiler mentioned above, to keep it warm, and use this to replace the melted chocolate chip + coconut oil combination. This amount should give you enough to make 12 large almond butter cups in a standard muffin tin.
Frequently Asked Questions
Will other nut butters work in this recipe? Yes, you can use peanut butter, cashew butter, or even sunflower seed butter, if you’d like a nut-free treat. I still recommend mixing these with the maple syrup to help them thicken up, so your almond butter cups won’t be messy as you bite into them.
Is this recipe vegan? Yes, this is a vegan recipe when you make your own chocolate shell, or when you use vegan chocolate chips.
Can I use a different sweetener? If you don’t have maple syrup on hand, you can use honey or agave nectar with similar results. (Just keep in mind that honey is not vegan, if you need a vegan recipe.)
What if I don’t have a muffin pan? You can fill paper liners or silicone muffin cups (recommended, for stability) on a sturdy plate or tray that will fit on a flat shelf in your freezer, instead.
Ingredients
- 1 cup dark chocolate chips
- 1 tablespoon coconut oil (see notes)
- 1/2 cup almond butter
- 1 tablespoon maple syrup
- flaky sea salt (optional topping)
Instructions
- Line a standard muffin tin with 12 muffin liners, then melt the chocolate chips and coconut oil together. You can do this in a microwave, or in a double boiler by filling a small pot with an inch of water. Place a heat-safe bowl snugly on top of the pan, and add the chocolate chips and tablespoon of coconut oil to the bowl. The steam from the boiling water below will gently melt the chocolate. Stir until the chocolate is smooth.

- Add a teaspoon of the melted chocolate into the bottom of each muffin liner. Repeat until all 12 cups are filled with the bottom layer of chocolate, then tilt the pan so the chocolate will swirl around each muffin cup, going up the sides of the muffin liner slightly. This will help give your almond butter cups a nice edge. Place the pan on a flat surface in your freezer to let the chocolate set. Leave the remaining melted chocolate in the bowl on the saucepan, so it will stay warm and melted. (The stove does not need to remain on, though.)
- While the chocolate is setting in the freezer, mix the almond butter and maple syrup together in a small bowl. Add a pinch of salt, if you are not using salted almond butter, to help the almond flavor pop.Remove the pan from the freezer. Scoop the almond butter mixture using a heaping teaspoon, then roll it between your hands to form a ball. Flatten the ball to make a disc, then place it on top of the hardened chocolate layer in the muffin cup. Repeat with the remaining almond butter mixture, until all of it has been used up and the muffin cups are each filled with almond butter. If you have extra almond butter mixture to use up, you can press the excess into any cup that might seem less-full than others.

- Add a teaspoon of melted chocolate to the top of each almond butter cup, and use the spoon to spread it around so the chocolate totally covers the top. Sprinkle some flaky sea salt on top of the melted chocolate, if you'd like a salted top. Repeat until all of the almond butter cups are covered in chocolate, then place the pan in the freezer to let the chocolate set, at least 30 more minutes. Then transfer them to the fridge, so they don't become too hard to bite into.
- As soon as the chocolate is set, the dark chocolate almond butter cups are ready to serve. The coconut oil will make these melt in a warm room, so be sure to keep them stored in an airtight container in the fridge for the best texture. You can store almond butter cups in an airtight container in the fridge for at least 1 month. Or, you can keep them in the freezer for up to 3 months. (The texture will be much harder when they are frozen, so be cautious when biting into a frozen-solid one.)
Notes
Nutrition
If you try this almond butter cup recipe, please leave a comment + star rating below letting me know how you like it!


I made this recipe recently, everyone at home likes them.
These are in the freezer and just buy scraping out every last bit of the chocolate that was left in the bowl and devouring it…I can already say these are going to be delish! Now I have to wait 10 mins?! 😉 Oh the torture, lol. I quadrupled the recipe because I have a 9 mini muffin pan…and just couldn’t imagine only having 3 after all that waiting. I used honey instead of maple syrup and organic cacao powder instead of cocoa. Thanks again! Every recipe I have made from this site has been perfect!
Hi, I had the same problem as another person. I followed the recipe exactly but their was so little to use and it was way too thick to spread. I don’t know what I did wrong. I had to add water to thin it out and it was still difficult to spread. What kind of consistency should it be before freezing?