This post may contain affiliate links. Please read my disclosure and privacy policy.
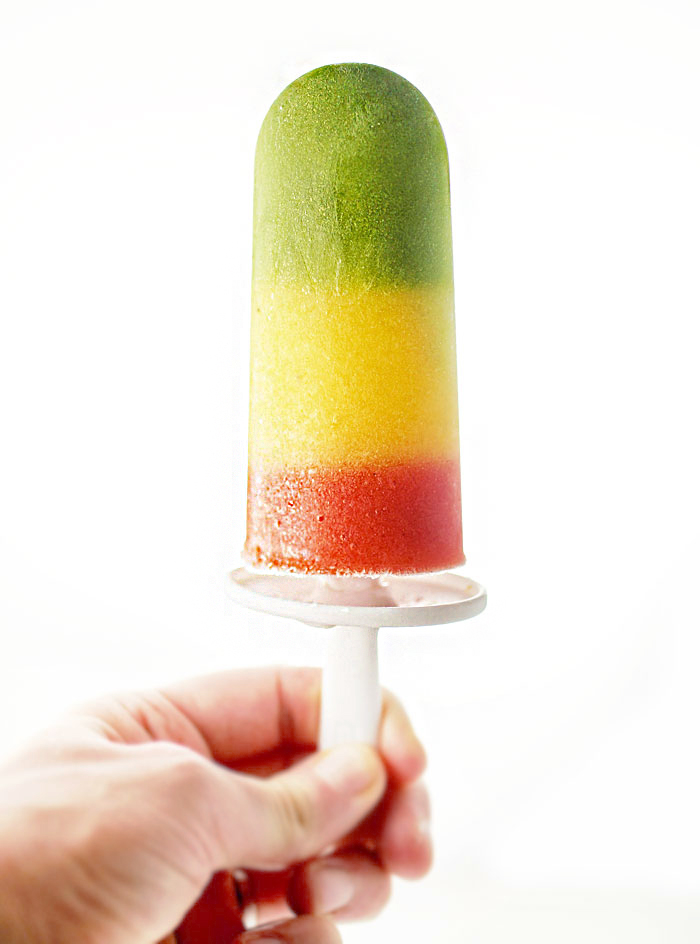
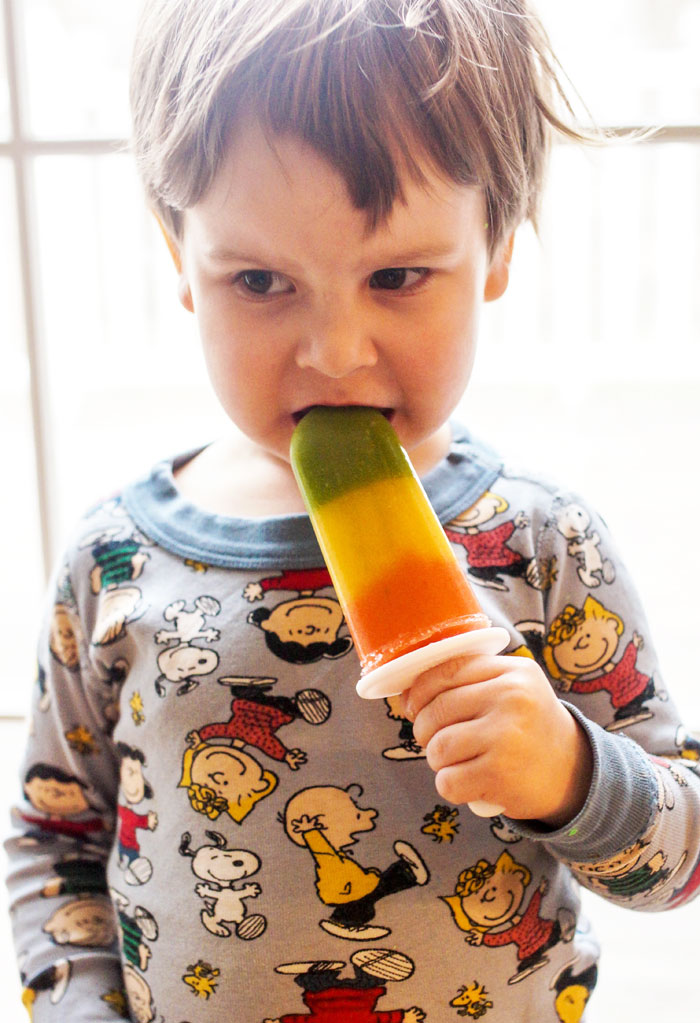
All my son wanted for Christmas this year was a popsicle. (Cutest thing ever, right?) He got the idea from one of his favorite books, Counta Block, which has a page filled with illustrations of 50 different popsicles, all with a variety of colored layers. His popsicle request was very specific– he wanted one with green, yellow, and red layers. Clearly, I needed to figure out how to make a layered popsicle ASAP. (So I could pass the info on to Santa, obviously.)
What I love about giving my son popsicles is that they are basically a healthy smoothie in popsicle-form. (Shhh… don’t tell him!) He thinks he’s getting a treat, and I get to sneak an extra serving of fruits and veggies into his diet. It’s a total win-win.
In case you ever find yourself in a situation where you need to make layered popsicles, I hope you’ll find this tutorial helpful. It can be used with any number of smoothie recipes, so you can turn any leftover smoothie you have on hand into a fun popsicle. Any leftover “popsicle filling” you make for these can obviously be served as a smoothie snack, too. Waste not, want not!
—
How To Make Healthy Layered Popsicles
Step 1: Make the lightest color first.
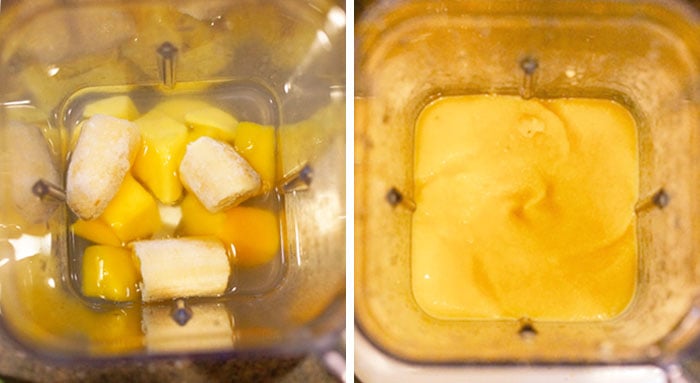
After making at least a batch of these a week, I’ve figured out that the most effective way to make a 3-layered popsicle is to start with the lightest color first. So, even though my son likes the yellow layer to be in the middle, I make a big batch of “yellow” base first, so I can add things to color it from there.
Here’s my basic recipe for the yellow base:
- 1 1/4 cups water
- 1 heaping cup frozen mango chunks
- 1/2 frozen banana
- 1 teaspoon honey (optional)
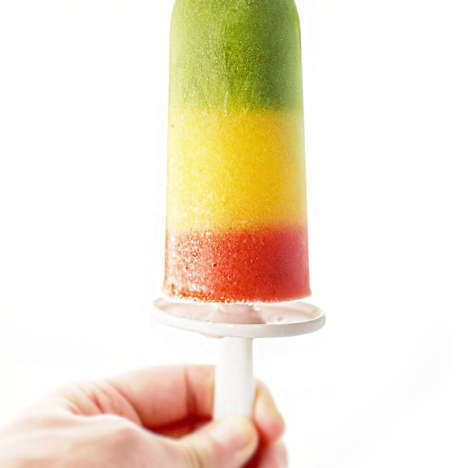
Combine all of the ingredients in a blender and blend until completely smooth. If you want to make the popsicle pictured above, with the yellow layer in the middle, pour about 2/3 of the mixture into a separate cup and set it aside.
Step 2: Make the top layer.
Now, if you don’t have a super-picky toddler, I personally would just use the yellow smoothie as the “top” of your popsicle and add the next colored layers after that. My son wanted the yellow part to be in the middle, so that’s why I’m making the top layer now, in the second step, instead of in the first step. Hopefully that’s not too confusing. Feel free to switch these layers around if you’d prefer!
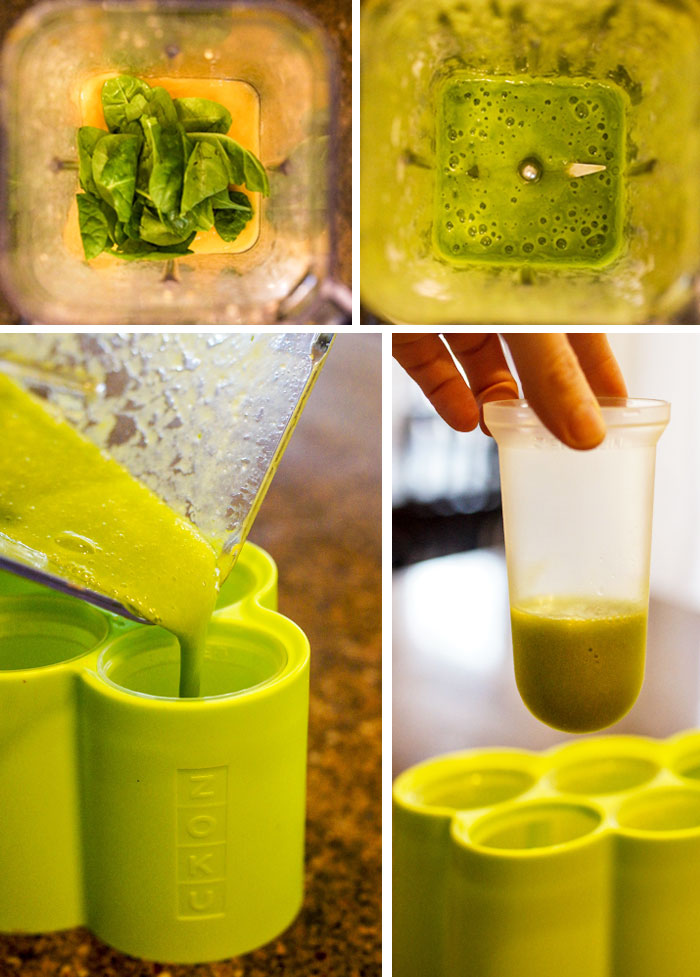
To the remaining smoothie that is left in the blender (there should be about 1 cup of yellow smoothie left in there) add in a small handful of fresh baby spinach. Blend until the spinach is completely broken down, then pour the greens smoothie into the bottom of each popsicle mold. (I used this Zoku Classic Pop Mold, which I bought on Amazon.) Fill the popsicle mold only 1/3 of the way up, to leave room for more layers later.
Place the popsicle mold with the green smoothie filling in the freezer to set for 20 minutes. Set a timer, so you don’t forget! I also like to place the yellow filling that you set aside in the fridge or freezer, so it stays nice and cold. If you let it get too liquid-y at room temperature, it will be difficult to layer in the popsicle molds later. (Colder filling works best!)
Step 3: Add the second layer.
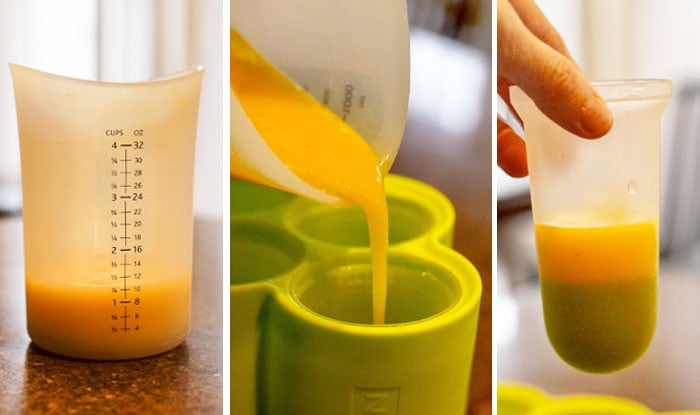
When the timer goes off, simply pour the yellow mixture on top of the frozen green layer, leaving some space at the top of the mold for the third layer. The yellow should sit right on top of the green. If for some reason it breaks through the green layer, it means the yellow is too runny or the first layer isn’t firm enough yet. In that case, return the popsicles and yellow filling to the freezer to firm-up some more, about 15 more minutes.
Once you’ve added the second layer, return the popsicles to the freezer for another 20 minutes. Set a timer!

Step 4: Make the final layer.
Add your remaining yellow smoothie back into the blender, and add in 4 to 5 frozen strawberries. Blend until very smooth, adding a splash of water if needed to help facilitate blending. Remove the popsicle molds from the freezer, and add the last layer, filling the molds only to the “fill line.” You want to leave some space at the top to account for frozen things expanding.
Insert a stick into each mold, making sure it goes through all three layers, and then return the popsicles to the freezer to freeze until solid, 4 to 6 hours.
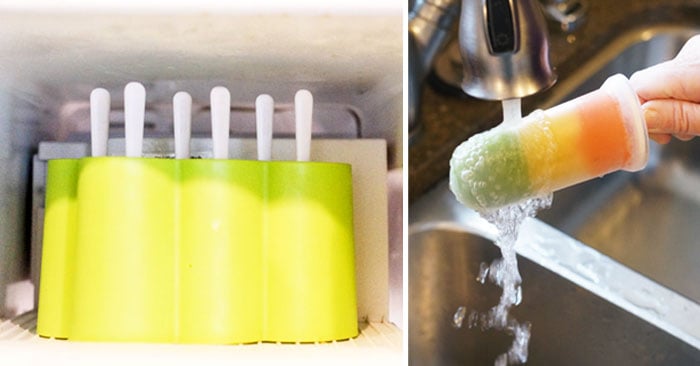
To remove the popsicles from the molds, simply run each one under warm water for about 30 to 60 seconds. The sleeve should pop right off! (That’s why I like this particular mold set— each popsicle is individual, so you can easily thaw one at a time.)
Ingredients
Yellow layer:
- 1 1/4 cups water
- 1 heaping cup frozen mango chunks
- 1/2 frozen banana
- 1 teaspoon honey (optional)
Green layer:
- 1 handful of fresh baby spinach
Red layer:
- 4 to 5 frozen strawberries
Instructions
- To make the yellow "base," combine the water, mango, banana, and honey (if using) in a blender and blend until completely smooth. If you want to make the popsicle pictured above, with the yellow layer in the middle, pour about 2/3 of the mixture into a separate cup and set it aside. Note: If you don't have a super-picky toddler, I personally would just use the yellow smoothie as the "top" of your popsicle and add the next colored layers after that. My son wanted the yellow part to be in the middle, so that's why I'm making the top layer now, in the second step, instead of in the first step. Hopefully that's not too confusing. Feel free to switch these layers around if you'd prefer!
- To the remaining smoothie that is left in the blender (there should be about 1 cup of yellow smoothie left in there) add in a small handful of fresh baby spinach. Blend until the spinach is completely broken down, then pour the greens smoothie into the bottom of each popsicle mold. Fill the popsicle mold only 1/3 of the way up, to leave room for more layers later. Place the popsicle mold with the green smoothie filling in the freezer to set for 20 minutes. Set a timer, so you don't forget! I also like to place the yellow filling that you set aside in the fridge or freezer, so it stays nice and cold. If you let it get too liquid-y at room temperature, it will be difficult to layer in the popsicle molds later. (Colder filling works best!)
- When the timer goes off, simply pour the yellow mixture on top of the frozen green layer, leaving some space at the top of the mold for the third layer. The yellow should sit right on top of the green. If for some reason it breaks through the green layer, it means the yellow is too runny or the first layer isn't firm enough yet. In that case, return the popsicles and yellow filling to the freezer to firm-up some more, about 15 more minutes. Once you've added the second layer, return the popsicles to the freezer for another 20 minutes. Set a timer!
- To make the final layer, add your remaining yellow smoothie back into the blender, and add in 4 to 5 frozen strawberries. Blend until very smooth, adding a splash of water if needed to help facilitate blending. Remove the popsicle molds from the freezer, and add the last layer, filling the molds only to the "fill line." You want to leave some space at the top to account for frozen things expanding.
- Insert a stick into each mold, making sure it goes through all three layers, and then return the popsicles to the freezer to freeze until solid, 4 to 6 hours.
- To remove the popsicles from the molds, simply run each one under warm water for about 30 to 60 seconds. The sleeve should pop right off! (That's why I like this particular mold set-- each popsicle is individual, so you can easily thaw one at a time.)
Nutrition
Per Serving: Calories: 102, Fat: 1g, Carbohydrates: 25g, Fiber: 5g, Protein: 2g
Some other color ideas you might consider for your popsicles:
- Blueberries + Strawberries = Purple
- Blueberries + Coconut Milk = Blue(ish)
- Strawberries or Raspberries + Coconut Milk = Pink
- Mango + 1 to 2 Strawberries = Orange
- Coconut milk + Vanilla = White
I hope you’ll enjoy these fun popsicles with your family, too!
—
Reader Feedback: What’s your child’s favorite treat?


Great idea and all natural w/o preservatives! I’ll have to try this out for my gr-son
This is one of the best ideas ever! I started making these awhile ago and my toddler never gets tired of them!
What a fantastic idea! These popsicles are the perfect healthy treat for the little ones! Also love the blueberries and strawberries combo!