This post may contain affiliate links. Please read my disclosure and privacy policy.

If you’ve ever tried using almond milk in your coffee, you’ve probably been disappointed in the results. Almond milk is watery, can separate in your coffee, and may taste like preservatives if you’re using a store-bought option. It’s not appealing when you’re looking for a cream substitute.
Luckily, you can make homemade coffee creamer in just about 5 minutes. I’ve been testing this relentlessly over the past week (hello, coffee jitters) to create a dairy-free creamer recipe as close as possible to half-and-half or heavy whipping cream.
When you follow this recipe closely, you’ll get an almond milk creamer that doesn’t separate in your coffee and has a creamy mouthfeel. It’s the first time I’ve actually preferred a dairy-free creamer over the real thing, so I hope you enjoy it just as much.
⭐⭐⭐⭐⭐ Featured Review
“Thank you so much for this recipe!! It is exactly as what I was looking for. So many of the plant based creamers include coconut, which I can’t have at this time. This worked beautifully.” – Geri


Healthy Coffee Creamer Ingredients
- Blanched Almonds. In my experience, blanched almonds create a slightly creamier result, but regular almonds will work, too. (There will just be more pulp to strain later.) Shop for almonds that are not roasted or salted for the most mild, neutral flavor.
- Water. Similar to making homemade almond milk, the almonds are blended with water to create a milk-like consistency. Only this recipe uses less water, for a creamier texture.
- Neutral Oil. I got the idea for adding oil to this recipe after looking at the ingredients in store-bought creamers. Oil helps emulsify the texture, giving you a creamier plant-based creamer with a mouthfeel similar to half-and-half. With that being said, it’s important to use a neutral-flavored oil, like refined avocado or coconut oil so it won’t overpower your coffee.
- Maple Syrup. Adding a touch of natural sweetener helps to balance the flavors from the almonds and added oil. However, if you prefer a sugar-free creamer, you can leave this out. (I’ve also made this with dates, if you prefer a fruit-sweetened option, but it will require more water. See the recipe notes below.)

How to Make Almond Milk Creamer
Step 1:
Add the blanched almonds, water, oil, and maple syrup to a high-speed blender. I think this batch size blends best in a small, personal-sized blender. I’m using a Beast blender (affiliate link) in these photos, but any small blender will work.
If you plan on using a larger blender, you may want to double the batch, so it blends smoothly in a bigger container.
Secure the lid on the blender and blend until the mixture looks completely smooth. This takes about 60 to 90 seconds of high-speed blending.

Step 2:
Remove the lid from the blender and arrange a fine mesh nut milk bag or thin dish towel over a storage container. (The container will be catching the strained creamer, so make sure it’s wide enough that you won’t have spills on the counter.)
Once the creamer is strained, it’s ready to use! Store it in an airtight container in the fridge for up to 5 days and shake well before each use.
Note: If you don’t want to discard the leftover pulp, save it for a recipe like Almond Pulp Brownies.

Healthy Creamer Recipe Variations
• Make Heavy Whipping Cream: Use only a quarter cup of blanched almonds per 1 cup of water, plus a tablespoon each of refined avocado oil and maple syrup. The higher ratio of oil makes the creamier have a silkier mouthfeel, similar to heavy cream. This ratio will separate when stored in the fridge, but it doesn’t separate in hot coffee.
• Skip the Nut Milk Bag: If you don’t want to invest in a nut milk bag or cheesecloth, you could make this recipe with almond butter instead of whole almonds. Use 3 tablespoons of creamy almond butter per 1 cup of water, plus the oil and maple syrup that this recipe calls for. This variation may separate slightly in hot coffee, and it definitely separates in the fridge when stored, so shake well before using it each time.
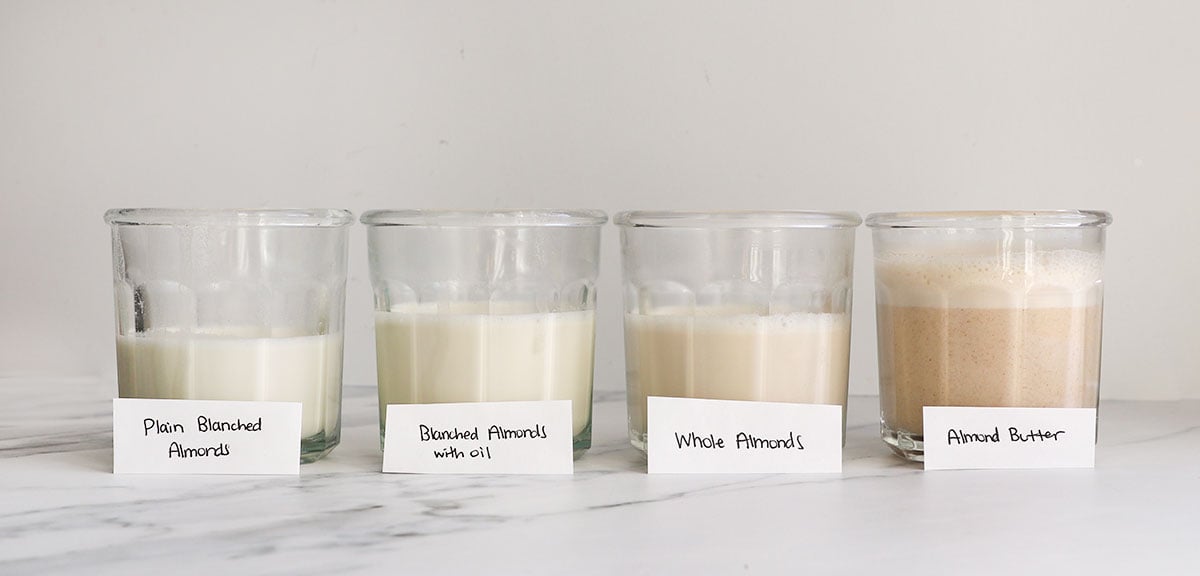
• Use Whole Almonds. If you don’t have blanched almonds on hand, regular whole almonds will work as well. (See the photo below; the whole almonds jar is just slightly more tan in color.) There will be more pulp to strain in this case, and I think the flavor is not quite as neutral in coffee, so keep that in mind.
• Skip the Added Oil. The very first option I tested was simply blending blanched almonds and water. This works as a coffee creamer, but I prefer the mouthfeel when the oil is added.

Almond Milk Creamer (The Best Version I’ve Tried!)
Ingredients
- ½ cup blanched almonds
- 1 cup water
- 1 teaspoon refined avocado oil (or other neutral oil)
- 1 tablespoon maple syrup
Instructions
- Add the almonds, water, oil, and maple syrup to a high-speed personal blender. This recipe works best in a smaller blender; you may want to double it if working with a larger blender container.
- Secure the lid and blend until smooth, about 60 to 90 seconds. Then arrange a nut milk bag over a glass storage jar with a wide opening. Pour the milk through the mesh bag and squeeze well. The strained creamer will fall into the storage jar while the pulp stays behind in the nut milk bag. Discard the pulp or save it for an almond pulp recipe later.
- As soon as the creamer has been strained, it's ready to use right away in hot coffee or tea. Store the leftovers in an airtight container in the fridge for up to 5 days.
Video
Notes
Nutrition
More Recipes to Try
- Vegan Latte (no creamer required)
- London Fog Tea Latte
- Coffee Smoothie with No Banana
- Pumpkin Cream Cold Brew
- Almond Milk Ice Cream
If you try this almond milk creamer recipe, please leave a comment and star rating below to let me know how you like it.


Sooooo good, I actually WANT a second cup of coffee, in the morning!! Thank you!!
Awesome! Thank you for your generosity. A beautiful and healthy recipe!