This post may contain affiliate links. Please read my disclosure and privacy policy.
This post is sponsored by USA Pulses and Pulse Canada.
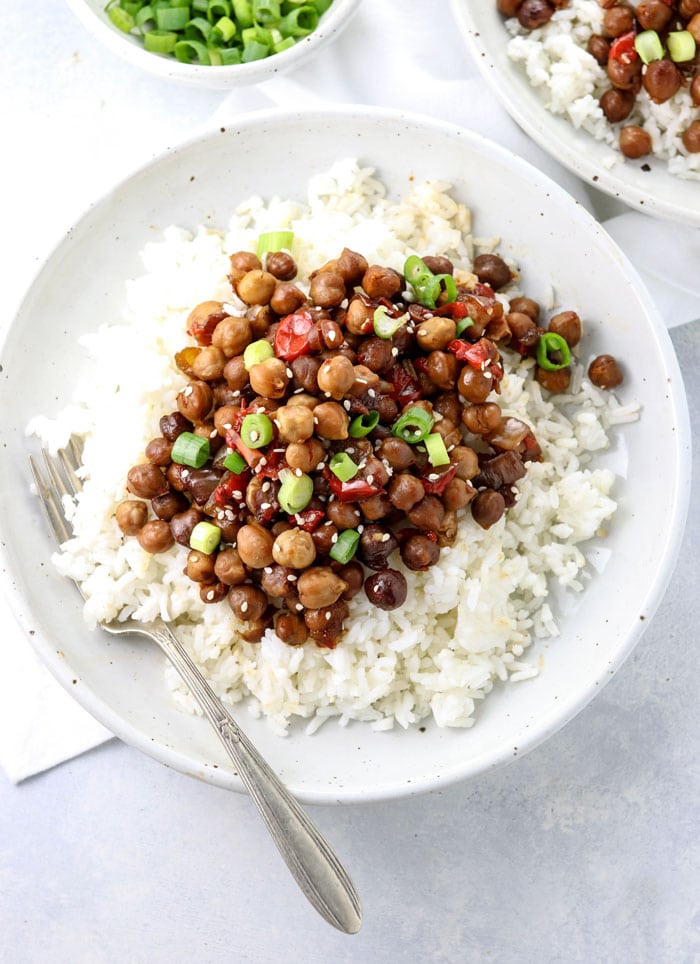
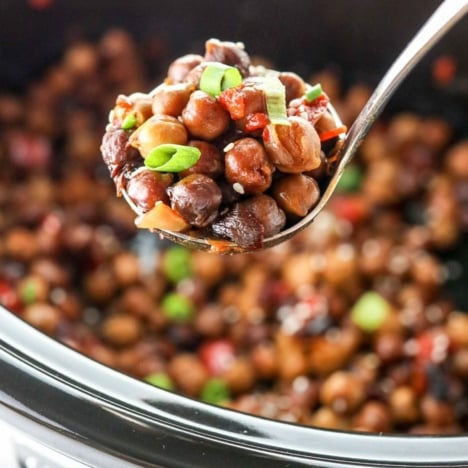
These Kung Pao Chickpeas are cooked in a flavorful sauce that rivals your favorite take-out restaurant, and they couldn’t be much easier to prepare. Just throw the ingredients in your slow cooker in the morning and it will be ready for you by dinnertime!
I love using chickpeas as a substitute for chicken in vegetarian recipes because they’re loaded with filling fiber and plant-based protein. Chickpeas have about 15 grams of protein per cup!
Like other pulses, chickpeas are also a source of complex carbohydrates, which are thought to help balance your blood sugar levels and give you sustained energy.
Cooking this dish in a slow cooker allows the chickpeas to marinate in this flavorful Kung Pao sauce, for maximum flavor with minimum effort.
While developing this recipe, I noticed that other recipes for Kung Pao Chicken call for a prepared hoisin sauce and one or more types of chiles. I’ll be honest– those ingredients sound a little too complicated for me, so my goal was to make this version as easy as possible.
I hope you’ll enjoy this less-authentic (but still totally delicious) recipe that you can make with ingredients you probably already have in your pantry.
You can can add a handful of peanuts at the end for some added crunch, but I decided to make my recipe nut-free and more allergy friendly.
Either way, it’s a total crowd-pleaser!
Ingredients
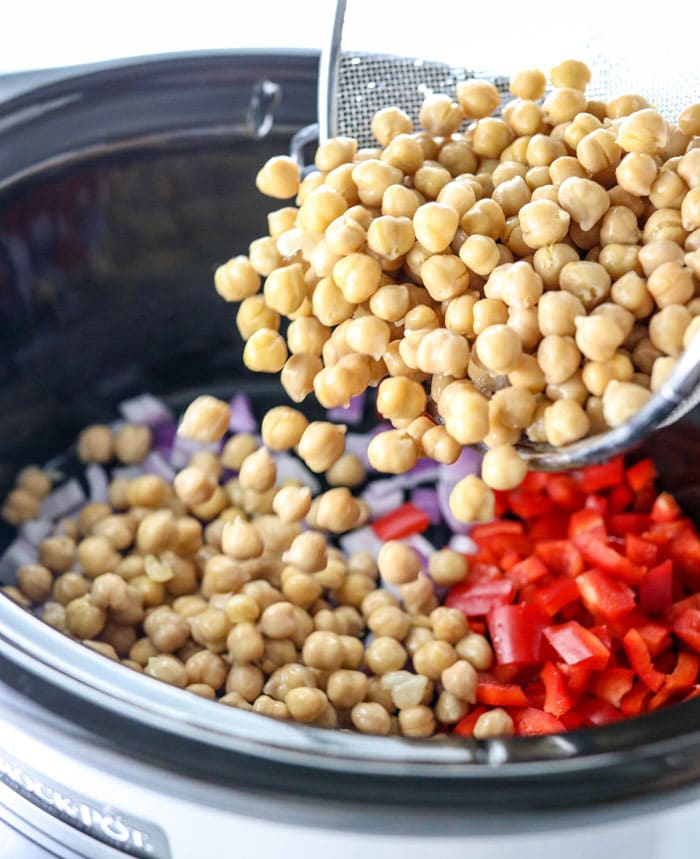
- ½ red onion , chopped
- 1 red bell pepper , chopped
- 2 (15 oz.) cans chickpeas , drained and rinsed
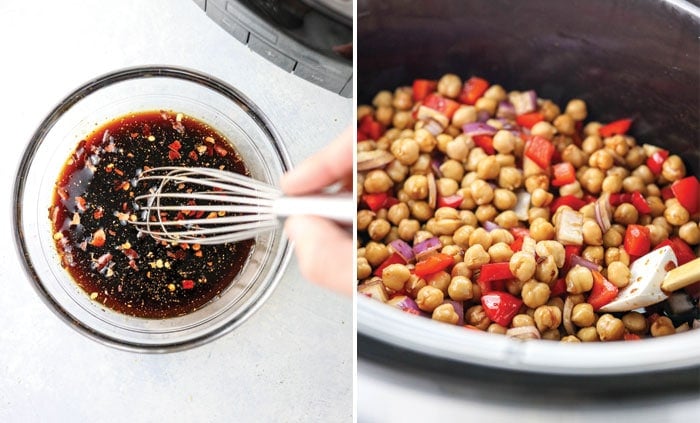
- ¼ cup tamari (gluten-free soy sauce)
- 2 tablespoons balsamic vinegar (the more syrupy, the better)
- 2 tablespoons maple syrup
- ½ teaspoon garlic powder (or 2 minced garlic cloves)
- ½ teaspoon ground ginger (or 2 teaspoons fresh minced ginger)
- 1 teaspoon red pepper flakes
- 1 teaspoon toasted sesame oil
- 3 green onions , chopped
- sesame seeds , for garnish
- Cooked white rice , for serving (or cauliflower rice)
Instructions
- Add the red onion, bell pepper, and chickpeas into the bowl of your slow cooker.
- In a small bowl, whisk together the tamari, vinegar, maple syrup, garlic, ginger, red pepper flakes, and sesame oil. Pour the sauce into the slow cooker and stir well.
- Cover the slow cooker and set it to cook for 3 hours on high heat, or 6 hours on low heat. If you need to cook it longer due to your schedule, I’d recommend adding 2-4 tablespoons of water to the mixture to help prevent the sauce from over-cooking. (If you have a super-nice slow cooker, it might also give you the option to have the cooker start cooking later in the day on a timer.)
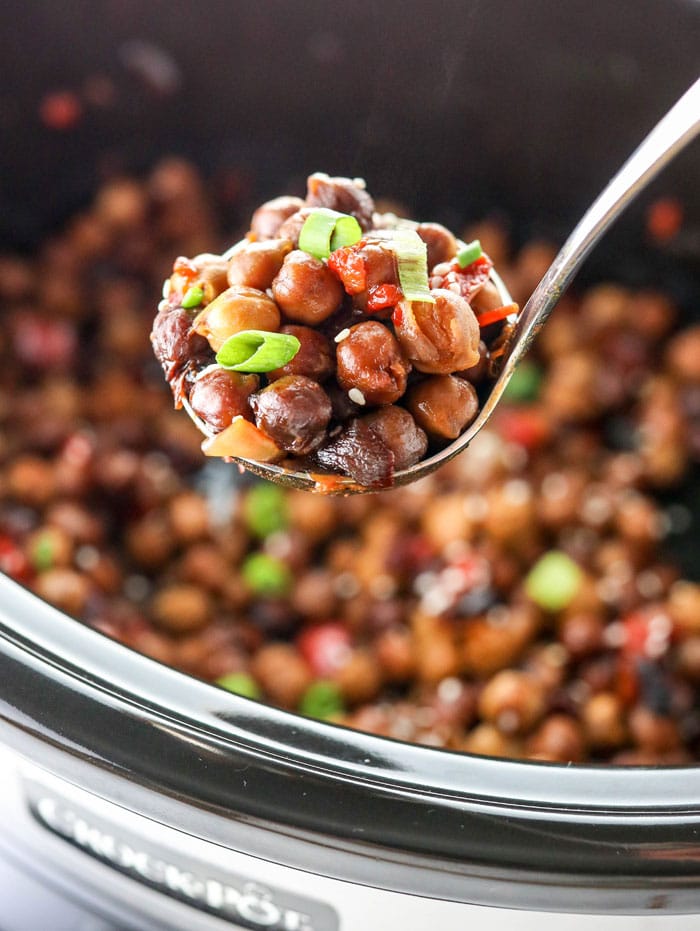
- Once the cooking is done, give the chickpeas a stir and serve them warm over a bed of white rice (or cauliflower rice) with a sprinkling of green onions and sesame seeds on top.
- Leftovers can be stored in an airtight container in the fridge for up to a week.
Video
Notes
- Nutrition information is for roughly a heaping 1/2 cup of cooked chickpeas in sauce. This information is automatically calculated and is just an estimate, not a guarantee.
- You can use honey instead of maple syrup in this recipe if you don’t need it to be vegan.
- If you’re not gluten-free, you can use regular soy sauce if you prefer. (I use full-sodium soy sauce in my recipes, but you can use low-sodium if needed.)
Nutrition
If you try this recipe, let me know what you think in the comments below! I’d also love to hear from you if you make any substitutions. We can all benefit from your experience!


This was soooo yummy! I’ve currently been obsessed with your mason jar salads, but this is getting added to the lunch rotation as well! I always love your recipes!
Hi! This looks delish! How big is a serving??
Hi, can leftovers be frozen? If yes, any reheating instructions?
Thanks!
Writing this as the same time Ee are eating this deliciousness. I prepared this on the stove. Used regular soy sauce because that’s what I had. So far from your recipes this is my hubby favorite. It was soo easy to prepare. Thank you so much for another awesome recipe.
May I ask how your process for the stovetop version? I don’t have a slow cooker. Thanks so much!
I cooked this on the stove as well. I sautéed the onions and peppers for about 10 minutes, then I added in the beans and sauce and simmered for about 30 minutes. Perfect!
I’m wondering if this would work as well with other red, pinto, or black beans.
I am wondering the same thing but personally I think that’ll work – except that the bite of those beans is a bit different. I’m going to try with white beans some time this week.
I only had one can of chickpeas, so I used a can of white cannelloni beans. Turned out great!
Tried this tonight but used a frying pan instead of a slow cooker. Added all ingredients, brought to a boil on high then lowered to a light simmer for an hour………AMAZING, AMAZING, AMAZING!
I’m so glad you enjoyed it!
SO GOOD! I made this for myself and toddler, so I left out the red pepper flakes figuring I could always add some in to a portion for myself if I felt it needed it, but it was great without. I used Braggs coconut aminos, added in kolrahni because I love it and had some, and cooked it on the stovetop per another comments directions. I found it only needed around a half hour on the stovetop.
My husband, who doesn’t love most vegetables and definitely doesn’t eat chickpeas was curious because of the great smell and took a bite, then filled up his plate with it. I actually made him a different dinner thinking he would not be interested in this dish at all. He said it was good and that he would eat it again. That is a win in my book and I will be making this again!
Hi thanks for the great recipe. Is it possible to include the times for making this in the Instant Pot?
I haven’t tried this in the Instant Pot yet, but my best guess would be to cook it for 7 minutes on high pressure with a quick release. Since the beans are already cooked, you’re really just marinating them in the sauce and want the veggies to get tender.
Can you move this to the top as a note.
I made this last night in the instapot. Doubled the sauce and added a touch of water also to make sure there was enough liquid. I sautéed the pepper and onion and then put everything in the pot with some frozen broccoli. Cooked on high pressure for 4 minutes with quick pressure release. Came out perfect for my taste!
I made this on Sunday for my week’s meal-prep, with plans to take it to work for lunches. I am eating it right now and it is great! I made as is, but substituted Bragg’s Aminos for tamari, using just shy of the amount suggested (I’ve found Bragg’s can be a little stronger than regular soy sauce or tamari). Next time, I will reduce the red pepper flakes, as mine came out with quite a bite – but, it is still great! Thanks for another great recipe 🙂
I LOVE this!!! I have gotten to the point with my newborn and Mubarak’s my 3 year old at home that making my regular from scratch suppers might not always be Ann option. I completely caved and bought a bunch of store bought pizzas and meatballs because… if it will save my sanity… short term compromises might have to be made. But I love the idea of this because … it’s cheap and I’m sure it would freezer beautifully. I could even throw in some of my frozen. Cauliflower rice for more veggies… and the sauce… I’m sure you could throw in whatever veg one had in the fridge into i completely going to try this.
Can we substitute coconut aminos instead of using Tamari?
That’s what I used it seemed to work OK