
This post may contain affiliate links. Please read my disclosure and privacy policy.
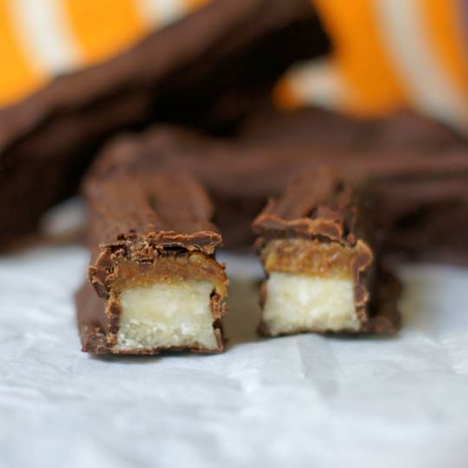
If you’re a fan of Twix candy bars, these are for you.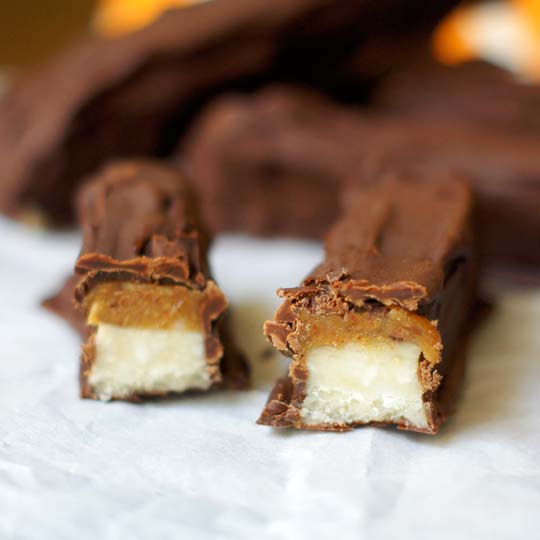
Unlike the store-bought version, these chocolate covered treats are made with just a handful of all-natural ingredients, but taste just as decadent. Even better, they’re quick to prepare!
Featuring raw cashews and fresh dates, these caramel-filled bars are loaded with heart-healthy fat, fiber, and minerals, like copper and magnesium. Magnesium is essential for bone and nerve health, and copper is thought to aid in the flexibility of joints, making these candy bars quite an upgrade from the processed versions!
—
No-Bake Twix Bars
makes 10 candy bars
Ingredients:
For the cookies:
1/2 cup raw cashew butter
1 tablespoon raw honey
1 tablespoon coconut flour
pinch of salt
For the caramel filling:
3/4 cup soft Medjool dates (about 9 dates)
2 tablespoons raw cashew butter
pinch of salt
1/4 cup water
For the chocolate coating:
3/4 cup dark chocolate chips
1 teaspoon coconut oil
Directions:
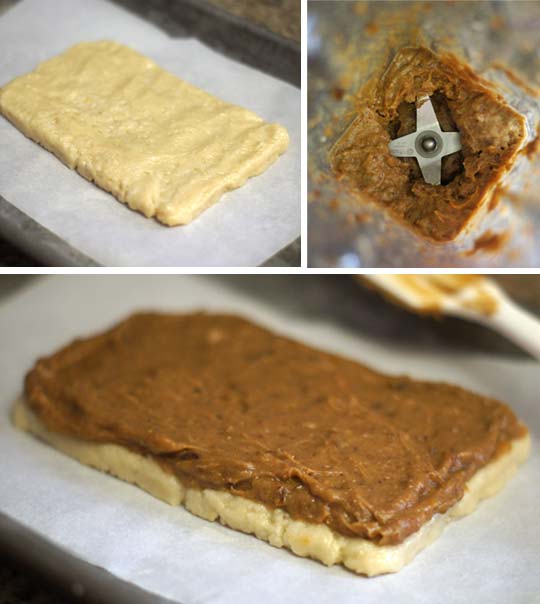
To prepare the cookie layer, combine the cashew butter, honey, coconut flour and salt in a bowl, and mix well until a thick batter is formed. Transfer the batter to a baking sheet lined with parchment paper, and use your hands to form a rectangular shape about 1/2-inch thick. Place the pan in the freezer to set while you prepare the caramel filling.
In a high-speed blender, combine the caramel filling ingredients and blend until well combined. You may need to stop and scrape down the blender a couple of times, to make sure everything is blended evenly. Remove the cookie layer from the freezer, and top with the caramel filling.
*Note: You may not need all of the caramel filling, so feel free to reserve any leftovers as a dip for fresh apple slices.
Place the caramel topped cookie layer back in the freezer to firm up for at least 20 minutes.
To prepare the chocolate coating, combine the dark chocolate chips and coconut oil in an oven-safe bowl, and melt at 350F for about 5 minutes. (Alternatively, you could use a microwave if you prefer.) Remove the caramel topped cookie from the freezer, and use a large knife to cut the cookie layer into 10 thin bars.
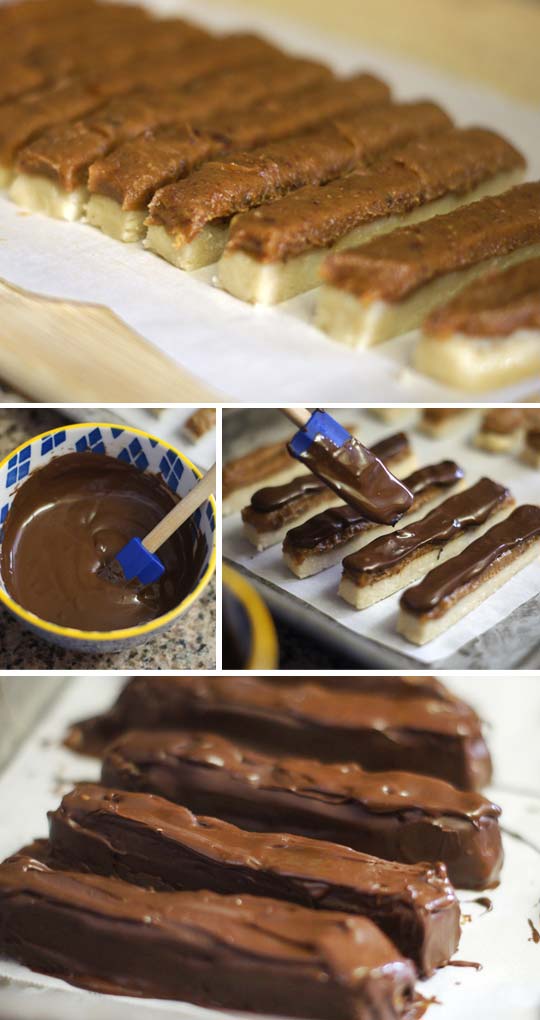
Use a spoon or spatula to spread the melted chocolate over the top, sides and bottoms of each bar, then return the chocolate coated bars to the parchment lined pan to set. Once all of the bars have been coated, place the pan back in the freezer for at least 20 minutes before serving.
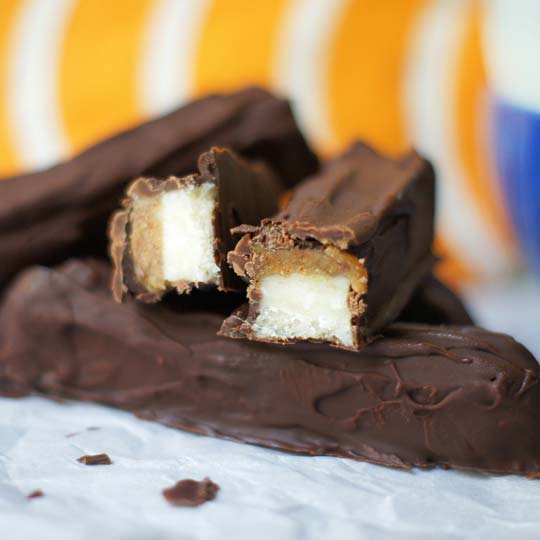 Because these bars aren’t baked, the texture will be best when served directly from the freezer. Store in a sealed container in the freezer for up to month or more, if they last that long.
Ingredients
For the cookies:
- 1/2 cup raw cashew butter
- 1 tablespoon raw honey
- 1 tablespoon coconut flour
- pinch of salt
For the caramel filling:
- 3/4 cup soft Medjool dates (about 9 dates)
- 2 tablespoons nut butter (cashew butter)
- pinch of salt
- 1/4 cup water
For the chocolate coating:
- 3/4 cup dark chocolate chips
- 1 teaspoon coconut oil
Instructions
- To prepare the cookie layer, combine the cashew butter, honey, coconut flour and salt in a bowl, and mix well until a thick batter is formed. Transfer the batter to a baking sheet lined with parchment paper, and use your hands to form a rectangular shape about 1/2-inch thick. Place the pan in the freezer to set while you prepare the caramel filling.
- In a high-speed blender, combine the caramel filling ingredients and blend until well combined. You may need to stop and scrape down the blender a couple of times, to make sure everything is blended evenly. Remove the cookie layer from the freezer, and top with the caramel filling.
- Place the caramel topped cookie layer back in the freezer to firm up for at least 20 minutes.
- To prepare the chocolate coating, combine the dark chocolate chips and coconut oil in an oven-safe bowl, and melt at 350F for about 5 minutes. (Alternatively, you could use a microwave if you prefer.) Remove the caramel topped cookie from the freezer, and use a large knife to cut the cookie layer into 10 thin bars.
- Use a spoon or spatula to spread the melted chocolate over the top, sides and bottoms of each bar, then return the chocolate coated bars to the parchment lined pan to set. Once all of the bars have been coated, place the pan back in the freezer for at least 20 minutes before serving.
- Because these bars aren't baked, the texture will be best when served directly from the freezer. Store in a sealed container in the freezer for up to month or more, if they last that long.
Notes
Nutrition
Notes:
- Feel free to use any other type of nut or seed butter to replace the raw cashew butter, if you prefer, keeping in mind that substitutions will alter the flavor.
- If you’d prefer to make your own homemade chocolate coating, rather than using store-bought chocolate chips, I recommend using this recipe.
—
Reader Feedback: What’s your favorite type of candy or candy bar?


These are amazing!
I have made them a few times with my nieces and nephew, and they love them.
I find that peanut butter upgrades the caramel layer, so I use that either in addition to the other nut butter or instead of it. I use it all and leave no leftovers (except what we eat while making it… 😉 ).
I have used almond butter instead of the cashew butter in the bottom layer when I had no cashew butter at hand, and both turned out amazingly.
Thanks for yet another fantastic recipe!
Hi ,
Can I ask politely why you advertise vegan yet use raw honey , raw honey is still a bee product….
thank you
Babette
Whoops, that was an oversight! Thanks for catching that– I’ve removed this recipe from the vegan category. I’m sure you could swap maple syrup if you’d like to, though!
These look so good! Remind me of being a kid again! Thanks for sharing 🙂
I made these but since I used maple syrup instead of honey, and used homemade coconut oil chocolate instead of chocolate chips I feel I shouldn’t rate them. But they would get a 4 star. I used all the filling on mine and I really shouldn’t have, it was too much and wouldn’t freeze firm. Plus I know they would have tasted better with a chocolate chip coating and most likely will put peanut butter on them next time instead of date filling. I don’t like dates very much. My husband wouldn’t even taste them. Thanks for the recipe though!
Oh man, I tried these but let’s just say, I failed misarbly. The cookie batter was too sticky to work with. I tried putting it in the freezer for 2 hours and it got sticky as soon as I took it back out of the freezer. I ended up just having to make sloppy clumps with chocolate on top because I didn’t want to waste the ingredients. I don’t know what I did wrong.
Any tips on blending these dates? I tried my blender and my food processor, and they just won’t blend in. I’ll keep blending….
Soaking the dates in water for 10 or more minutes beforehand can help if your blender or food processor can’t handle them dry. This is also a good trick to use if your dates aren’t very soft to begin with.