
This post may contain affiliate links. Please read my disclosure and privacy policy.
This post is sponsored by Morrocco Method
When it comes to natural hair color, henna hair dye is probably the safest form of hair dye you can use. It even has some healthy benefits for your hair!
After posting 6 Things You Should Know Before Using Henna Hair Dye, a common question I receive is how henna hair dye works for covering gray hairs. Considering the fact that I work full-time and have two kids… I’ve definitely earned a few gray hairs. So, I figured I would try it out myself and report back.
Before you dive into using henna dye on your hair, it’s important to know that not all brands are created equal. Soon after I tried using henna hair dye for the first time, I had a hair stylist tell me that I could NOT use permanent dyes on my hair until the henna grew out, because some henna brands use chemical additives that can actually “burn” your hair when you use chemical dyes over them.
Luckily, that’s not the case with Morrocco Method’s henna hair dyes, because their hair colors are made with 100% pure plant dye. There are no chemicals, metallic salts, or PPD added. They still recommend waiting 6-8 weeks after dying your hair before using henna hair dye, to allow your hair to detox from the chemical dyes.
You might also want to wait 6-8 weeks AFTER dying your hair with henna before attempting to use chemical dyes again, because the results could be unpredictable. Plant dyes don’t lift easily out of your hair and the chemical color will fade faster because henna makes your hair less porous and absorbent.
Think of henna as a permanent hair dye, just so you know what kind of commitment you are making.
How to Cover Gray Hair with Henna Hair Dye
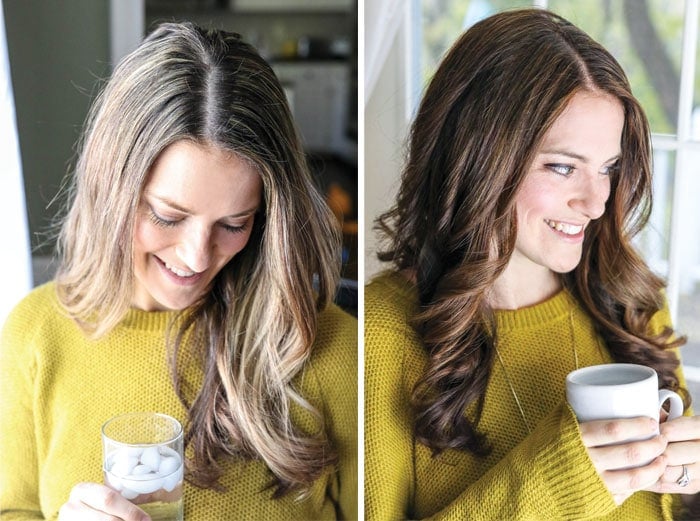
After talking with the folks at Morrocco Method about my previously bad experience using henna hair dye, they were super-helpful in teaching me how to properly cover up gray hairs (and even highlights) using 100% natural henna hair dye. If you’ll recall, last time I dyed my hair with a different brand, my blonde highlights turned bright orange, so my hair didn’t look very even in color. (I was hoping for a more even brown color at the time.)
This time, I did it the right way, and I’m super pleased with the results.
Before trying this hair dye, I had highlights added to my hair for a wedding (I was a bridesmaid, so lots of photos!), and the stylist stripped out a little TOO much color from my hair, if you ask me.
So, this hair dye test was perfect timing, because I wanted to see how much the henna could even-out my hair color and cover up the strands that had very little color to them. (I have a few real gray hairs around my scalp area, too.)
Covering up gray hair with henna dye is a two step process.
- First, you give the gray hair some color by using a red henna dye.
- Then you can use any other color you like over that red to achieve your final desired hair color.
Keep in mind that when using henna hair dye, you can only go darker in color. Like many boxed dyes, henna won’t lighten your hair. Morrocco Method does offer a blonde henna hair dye for people who already have blonde hair and want to use henna for shinier, healthier hair without going darker, but it won’t lighten your hair if it’s already dark.
IMPORTANT: When using a 100% natural henna hair dye, the preparation process can take up to 12 hours before the dye is ready to use. I recommend mixing the dye the night before you plan on using it, so that you can dye your hair first thing in the morning.
You can leave the dye on your hair anywhere from 1 to 4 hours, so it’s a good idea to do this on a weekend, when your schedule is flexible.
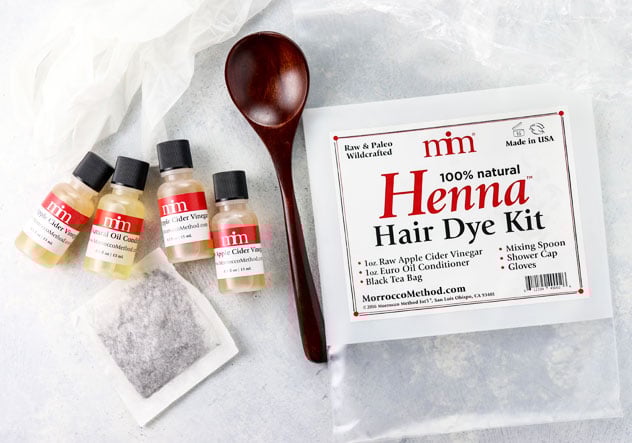
Here’s what you’ll need to prepare a batch henna hair dye:
- Glass or wooden bowl (avoid using metal)
- Wooden spoon
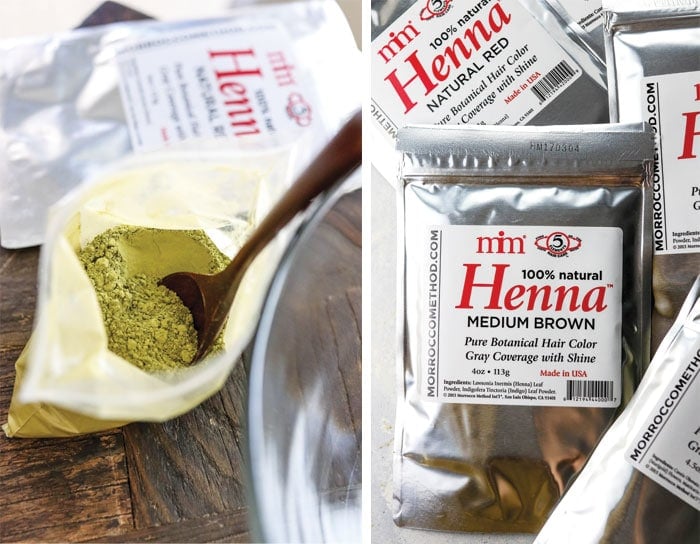
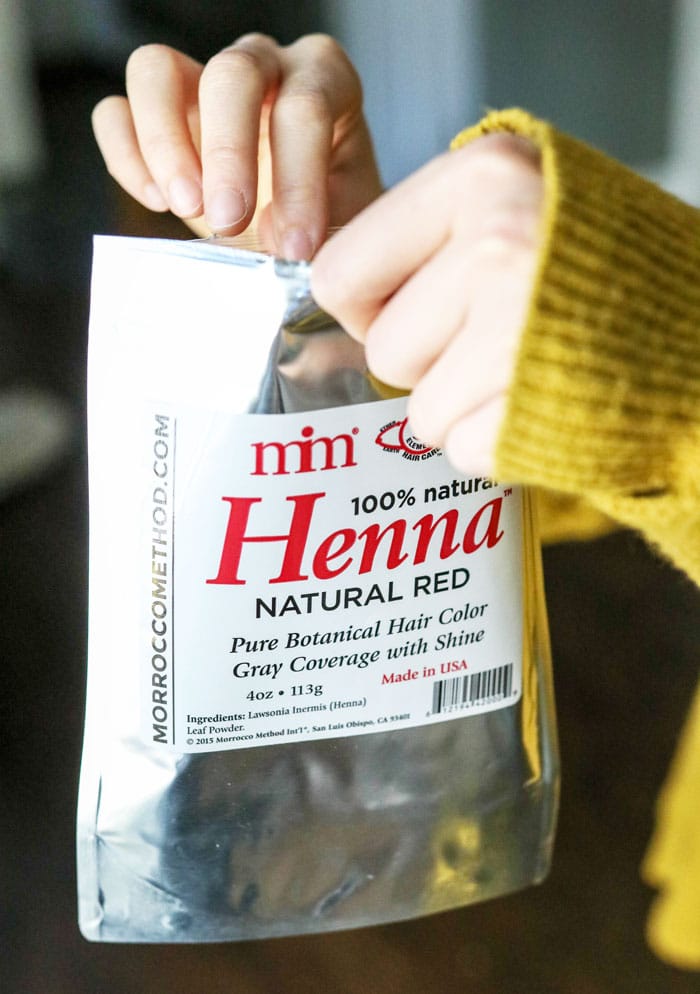
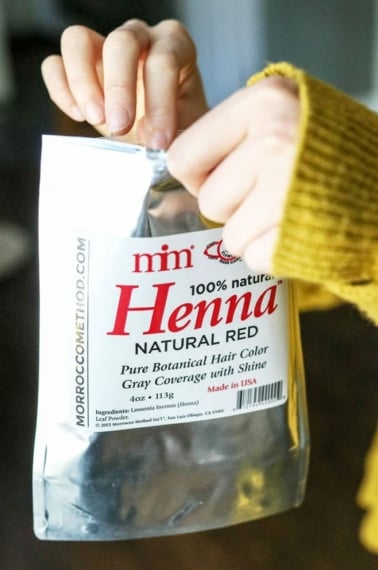
- 1 packet of 100% natural henna hair dye
- 2 cups brewed black tea, cooled
- 1-3 tablespoons apple cider vinegar
- 1-3 teaspoons ground cinnamon (for a pleasant smell)
- Oil, for protecting your scalp
- Shower cap
- Gloves, to protect your hands
- A towel to protect your shoulders and neck
- Hair clips, for sectioning your hair
Directions:
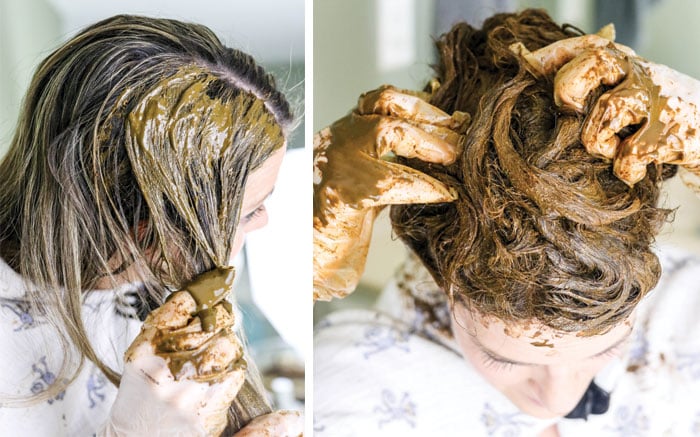
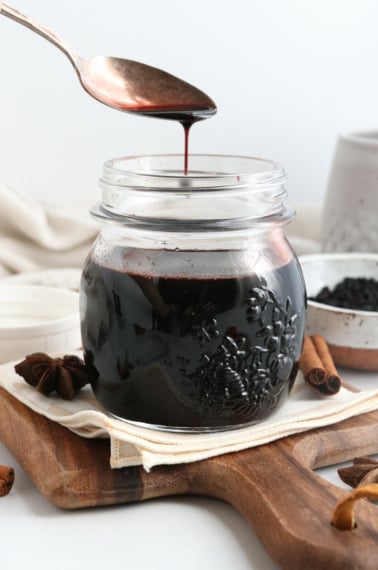
- Pour the packet of henna powder into a large bowl and add in the apple cider vinegar and cinnamon. The more vinegar you add, the deeper the end results will be.
- Slowly add the black tea to the red henna and stir until it’s the consistency of yogurt. The mixture should not drip from the spoon, but should be easily spreadable. (You might not need to use all 2 cups of tea.)
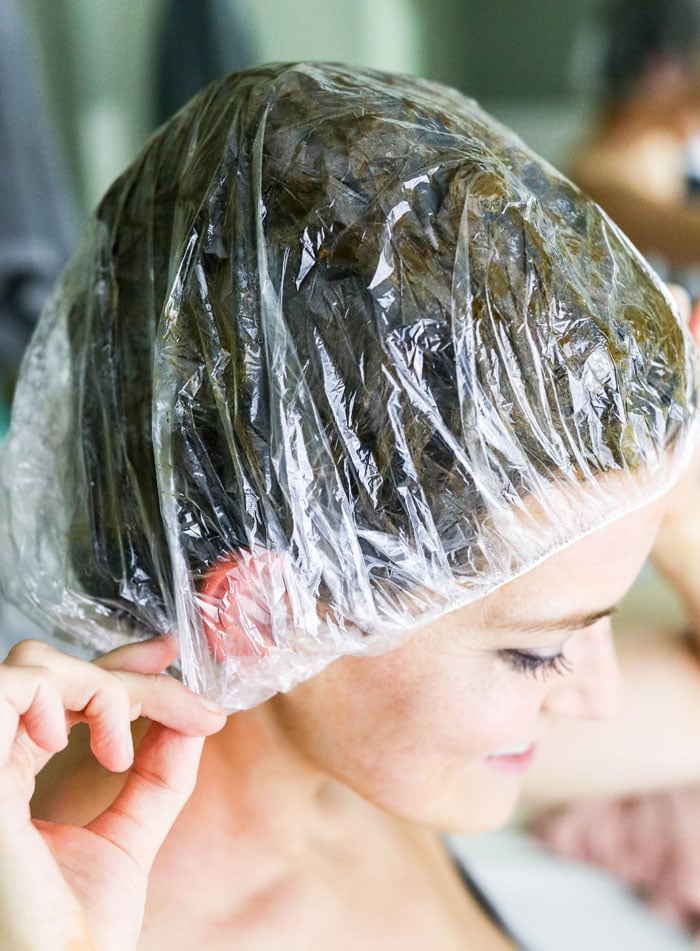
- Cover the bowl with plastic wrap (I used a shower cap), pressing on the plastic to remove any excess air, and let it sit for 8-12 hours. If you used all 3 tablespoons of vinegar, it’s a good idea to let it sit for the full 12 hours. You’ll know the dye is ready to use when it turns to a darker brown-red color from its original green color.
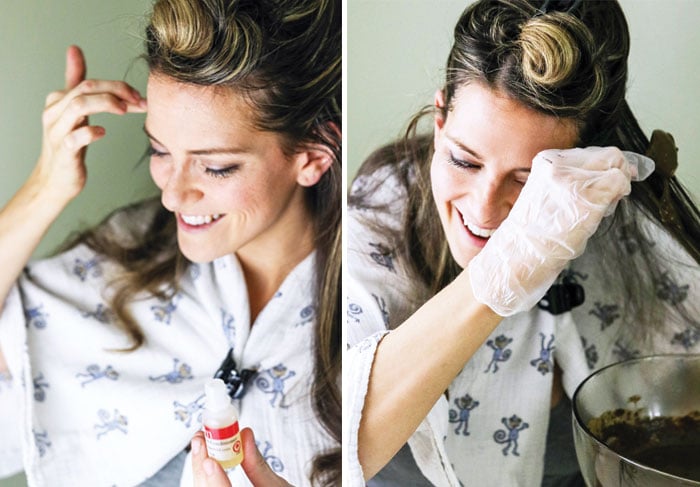
- To apply the dye, section your hair with 3-4 hair clips and cover your shoulders with a towel. Apply oil to your hairline and ears to protect them from staining, then use gloved hands to apply the henna to dry hair.
- Wrap the dyed hair in a shower cap to keep the henna moist and warm, then leave the mixture in your hair for 1-4 hours. Do not leave it in overnight.
- Unwrap your hair and rinse with water. Do not shampoo your hair until 24 hours after the henna process for best results. The full color will appear after 72 hours, and the color will last 8-12 weeks.
You’ll want to repeat this process again 72 hours later, to allow the red color to fully develop, so that you can cover the red with your desired color, such as brown or black.
I recommend choosing one shade lighter than you think you want, so that in case you don’t like the resulting color, you’ll still have the option of going darker. (Remember, it’s hard to lighten your hair after using henna!)
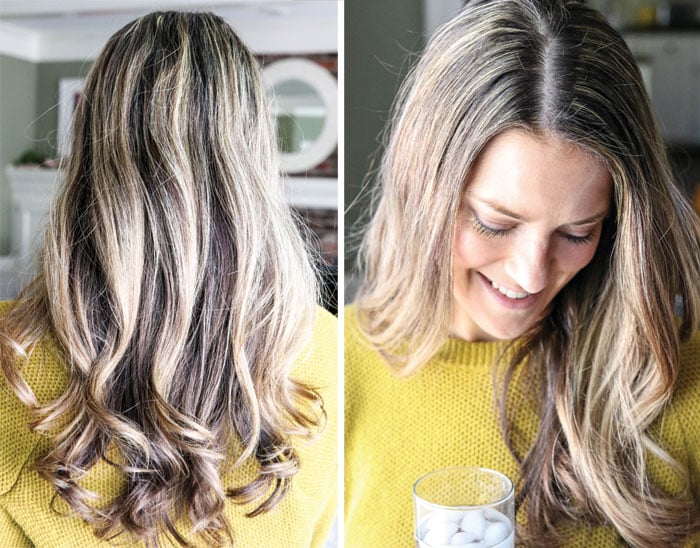
I used the Medium Brown color (which is a mix of henna and indigo) after applying the red henna color, and I’m really impressed by how well the brown color neutralized the red hue. If you’re looking for a good non-red henna hair dye, I think this color worked well!
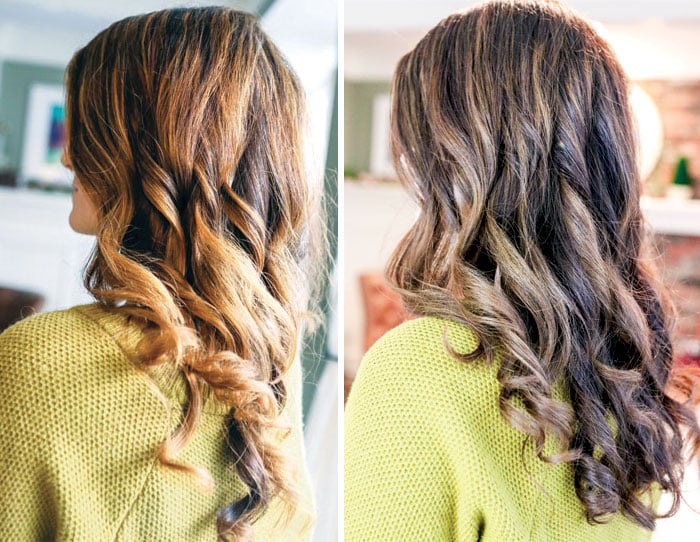
And here’s a look at the full “before and after” transformation, from the lighter, highlighted hair to the medium brown shade:
Tips for Using Henna Hair Dye:
- Be sure to follow the directions above, remembering to have gloves and a towel ready to protect your skin before the dying process. (Ask me how I know.) This process gets messy fast, so you might even want to dye your hair in a dry shower so you can simply rinse it down after you’re done.
- Don’t add too much liquid to the hair dye. The first time I dyed my hair, the red henna stuck to my hair well under the shower cap, but the second time I added too much liquid and the dye was dripping down my forehead through the shower cap for over an hour. I would have let the dye sit on my head longer, but I couldn’t take the dripping any longer! So, add less liquid than you think you should, just to be on the safe side.
- When I used the red henna hair dye, I didn’t realize that the dye was supposed to sit covered for 8-12 hours, so I ended up using it after only 4 hours of rest, and I think the color still turned out well. I’m not sure how different it would have looked had I let it sit longer, but I was happy with the result regardless! (And in the photos above, I only let the red color sit on my hair for 1 hour before rinsing.)
I hope sharing this process will help you naturally cover up any gray hairs, if that’s your goal, or to have fun trying a new hair color without using chemical dyes.
Morrocco Method Coupon Code
If you’d like to try the same henna hair dye I used in this post, you can use this coupon code AnyHenna15 for 15% off your Henna Hair Dye purchase at MorroccoMethod.com. (Coupon valid through 12/8/17)
—
Reader Feedback: Have you ever dyed your hair with henna before, or would you try it now?
Disclosure: This post is sponsored by Morrocco Method, but as always, I will only work with companies that I would have used in my own home, anyway.


Thanks for this!! I have dyed my henna for YEARS with Light Mountain Color the Gray. It worked really well. Then suddenly their boxes changed and it no longer worked (they said they didnt change the product), and I have tried SO MANY things. Maybe my gray is harder to cover now??? I bought a “black” from Azure and now I have purple tints, BLAH! My question though is HOW do you wear the red for 72 hours?!? My hair is dark brown/black and when the red is in it looks SO BAD. I need a way to cover the gray in one day. Any ideas? And now since I have purple tints and its splotchy like you said what can I do? I am finding that my henna is losing its strength, so also how do you store it? Thanks!!!
Good tips, but sounds more implicated than I’ve experienced. I’ve been using henna for 15 years and always used a light brown that was too red for a little while and then would fade to a ligh brown, which I loved. As I got gray hairs, the henna wasn’t really sticking to them as well so I went with dark brown, but that has indigo in it. It’s a gerat color, and covers my gray. When roots get really noticeable, i use a toothbrush to dip and brush just on the top and brushing down a bit and it blends in really well. I use hot water and add a dollop or two of olive oil or coconut oil. I plop some Saran up there, wrap it in a towel and give it about an hour and take a shower AND wash with shampoo. Once it’s in there, shampooing does not remove it. Now though, as I get older, I wish I could remove it and go gray, but there doesn’t seem a way without going red. Believe it or not, the pressure to go gray is big these days, and lots of judgy mc2shoes out there. Ha! That should not matter. I love the way henna makes my hair softer, takes the kinks and coarseness out of the gray, and is just like an all over conditioner. However you get it on your head, it seems to work, but make it easy on yourself.
Since I cannot find a date on this, I will continue for if someone is searching for coloring hair with henna, like I did, they will find this. First, your hair turned out beautifully! and was a great improvement over the stylists. I am not sure why this product takes so long and so many items tho.
Reshma Henna, I furst found at Sally’s Beauty Supply and I have used for several years now and with medium brown hair, some gray was sneaking in. You mix the powder with water, let it set just a few minutes, apply 15 – 30 minutes… wash out! tada! I began with the Henna Highlights which left me with wonderful red tints and gray not showing! Now, years later and much more gray, I began using the Reshma Dark Brown Henna. All natural product and does a great job giving a natural look. It also, lasts me for a few months, tho touch ups at base are more frequently needed. : O …not their fault. It is all part of nature. This Dark Brown Henna from Reshma only took me mixing the henna powder and directly putting on my dry hair, wrapping w plastic, then waiting 30 minutes. Jumped in shower, rinsed it all out, shampooed, conditioned- wallah! Thanks for sharing.
my hair was auburn and is now grey, but i want an auburn color. help