
This post may contain affiliate links. Please read my disclosure and privacy policy.

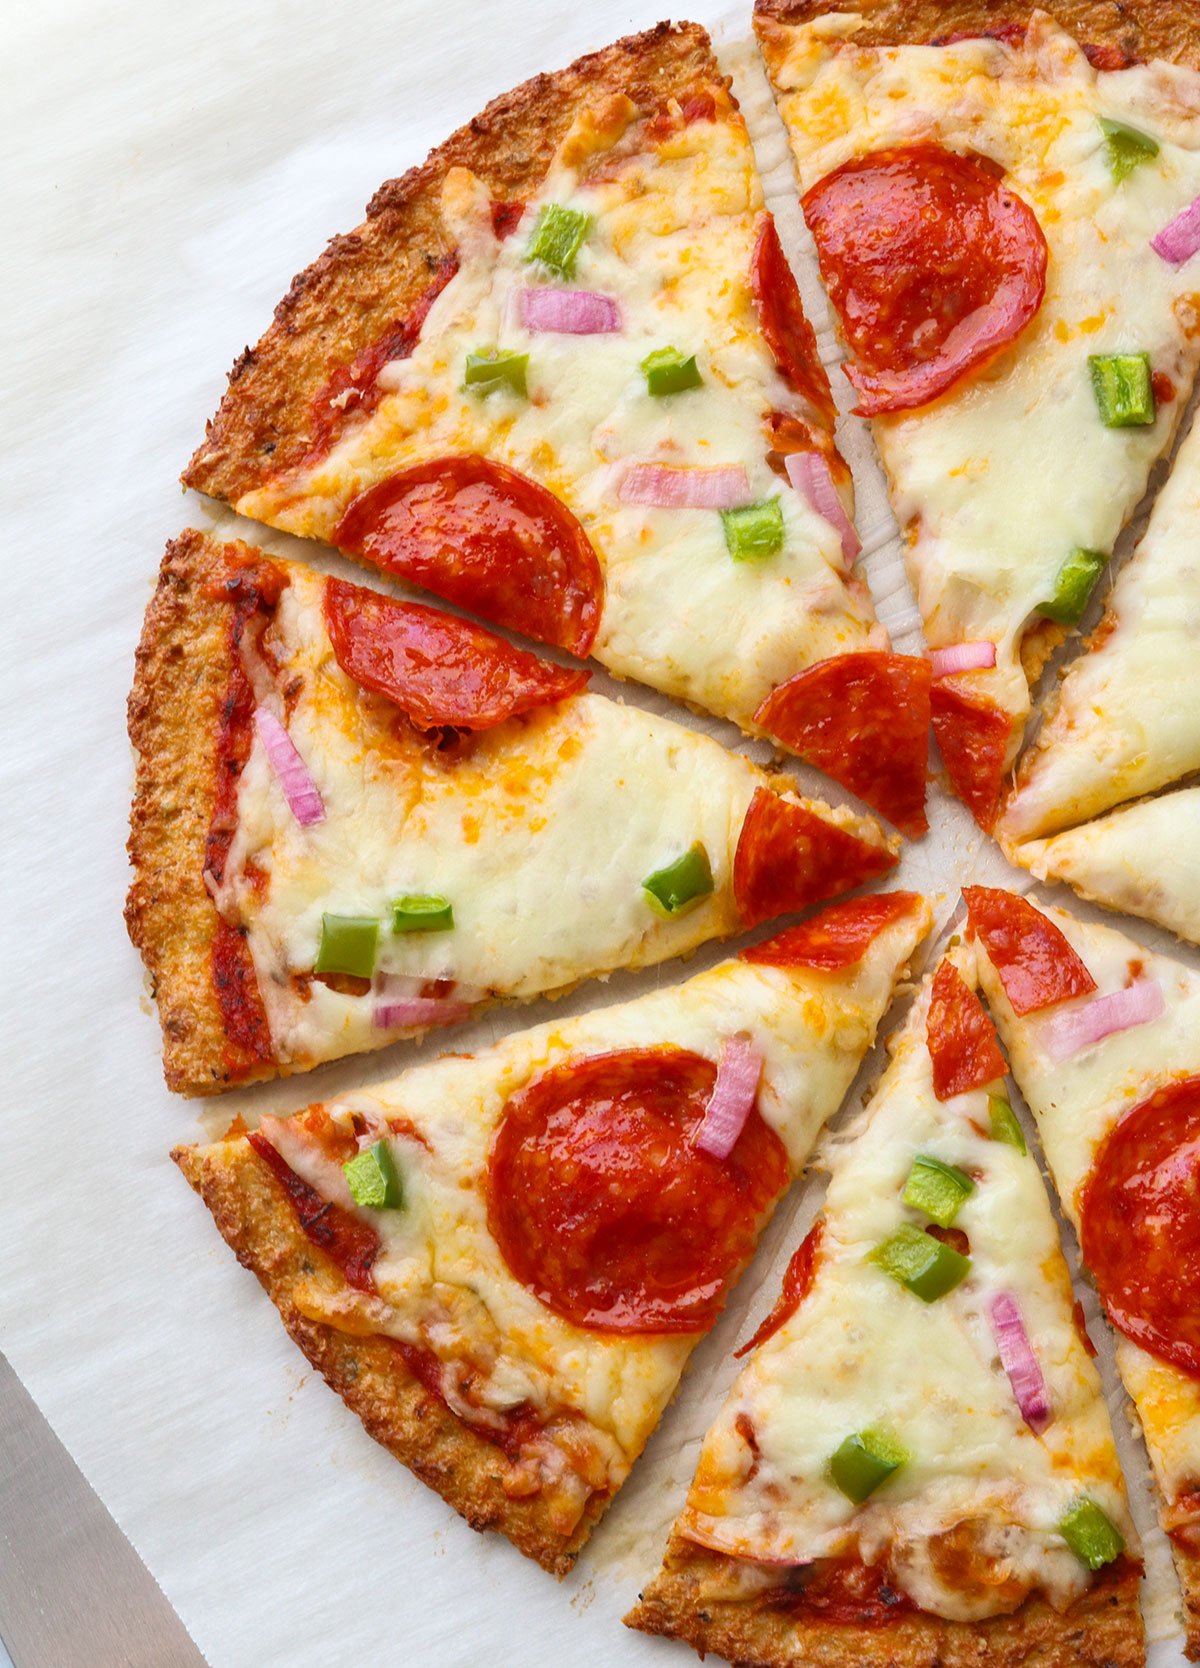
This Cauliflower Pizza Crust recipe is a delicious way to enjoy your next pizza night! It’s naturally gluten-free and grain-free, plus you’ll get extra veggies in each bite.
I originally posted this recipe back in 2011, when I learned the secret to making a cauliflower pizza crust that isn’t soggy. (You need to squeeze out the moisture from the cooked cauliflower before making your crust mixture!)
Now that we’ve been making this pizza crust for over a decade, I’ve learned some time-saving tricks, like using frozen cauliflower to skip the cooking process. Sometimes you can even find frozen riced cauliflower, which will let you skip using the food processor, too.
Be sure to read all the tips below if you’d like to make a frozen pizza crust that you can use in the future, or if you need to make any substitutions.
Ingredients You’ll Need
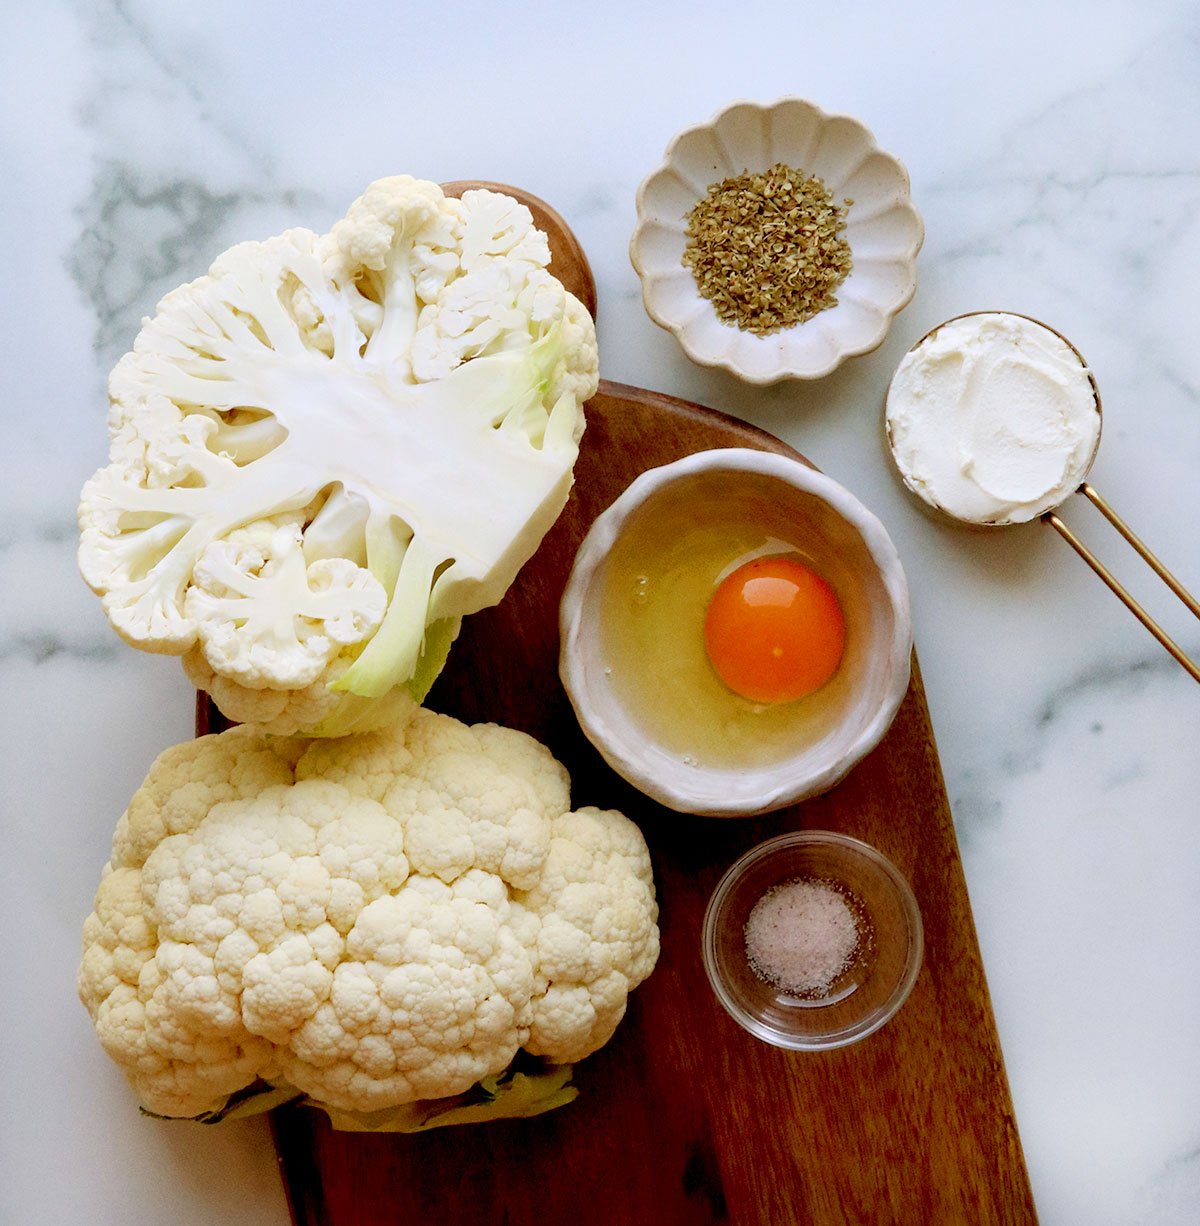
Fresh or frozen cauliflower is the base of this recipe, without using any extra flour for filler. As a result, this recipe is low-carb and keto-friendly.
The egg and cheese act as a binder and hold the crust together. Soft goat cheese (chevre) gives the crust an amazing, non-greasy texture and you can’t taste it at all. However, you can also use grated Parmesan cheese or your favorite shredded cheese to create a crust that will hold together.
Adding oregano helps add an Italian flavor you’ll love, and you can also add a pinch of garlic powder if you’d like.
Need an egg-free crust?
Try my Vegan Cauliflower Pizza Crust recipe, which is made with no eggs or cheese.
How to Make Cauliflower Pizza Crust
Preheat the oven to 400ºF and line a large baking sheet with parchment paper. If you’re using fresh cauliflower, place the cauliflower florets in a food processor fitted with an S-blade. (Mine is a 12-cup size.)
Briefly pulse the florets until they have a rice-like texture.
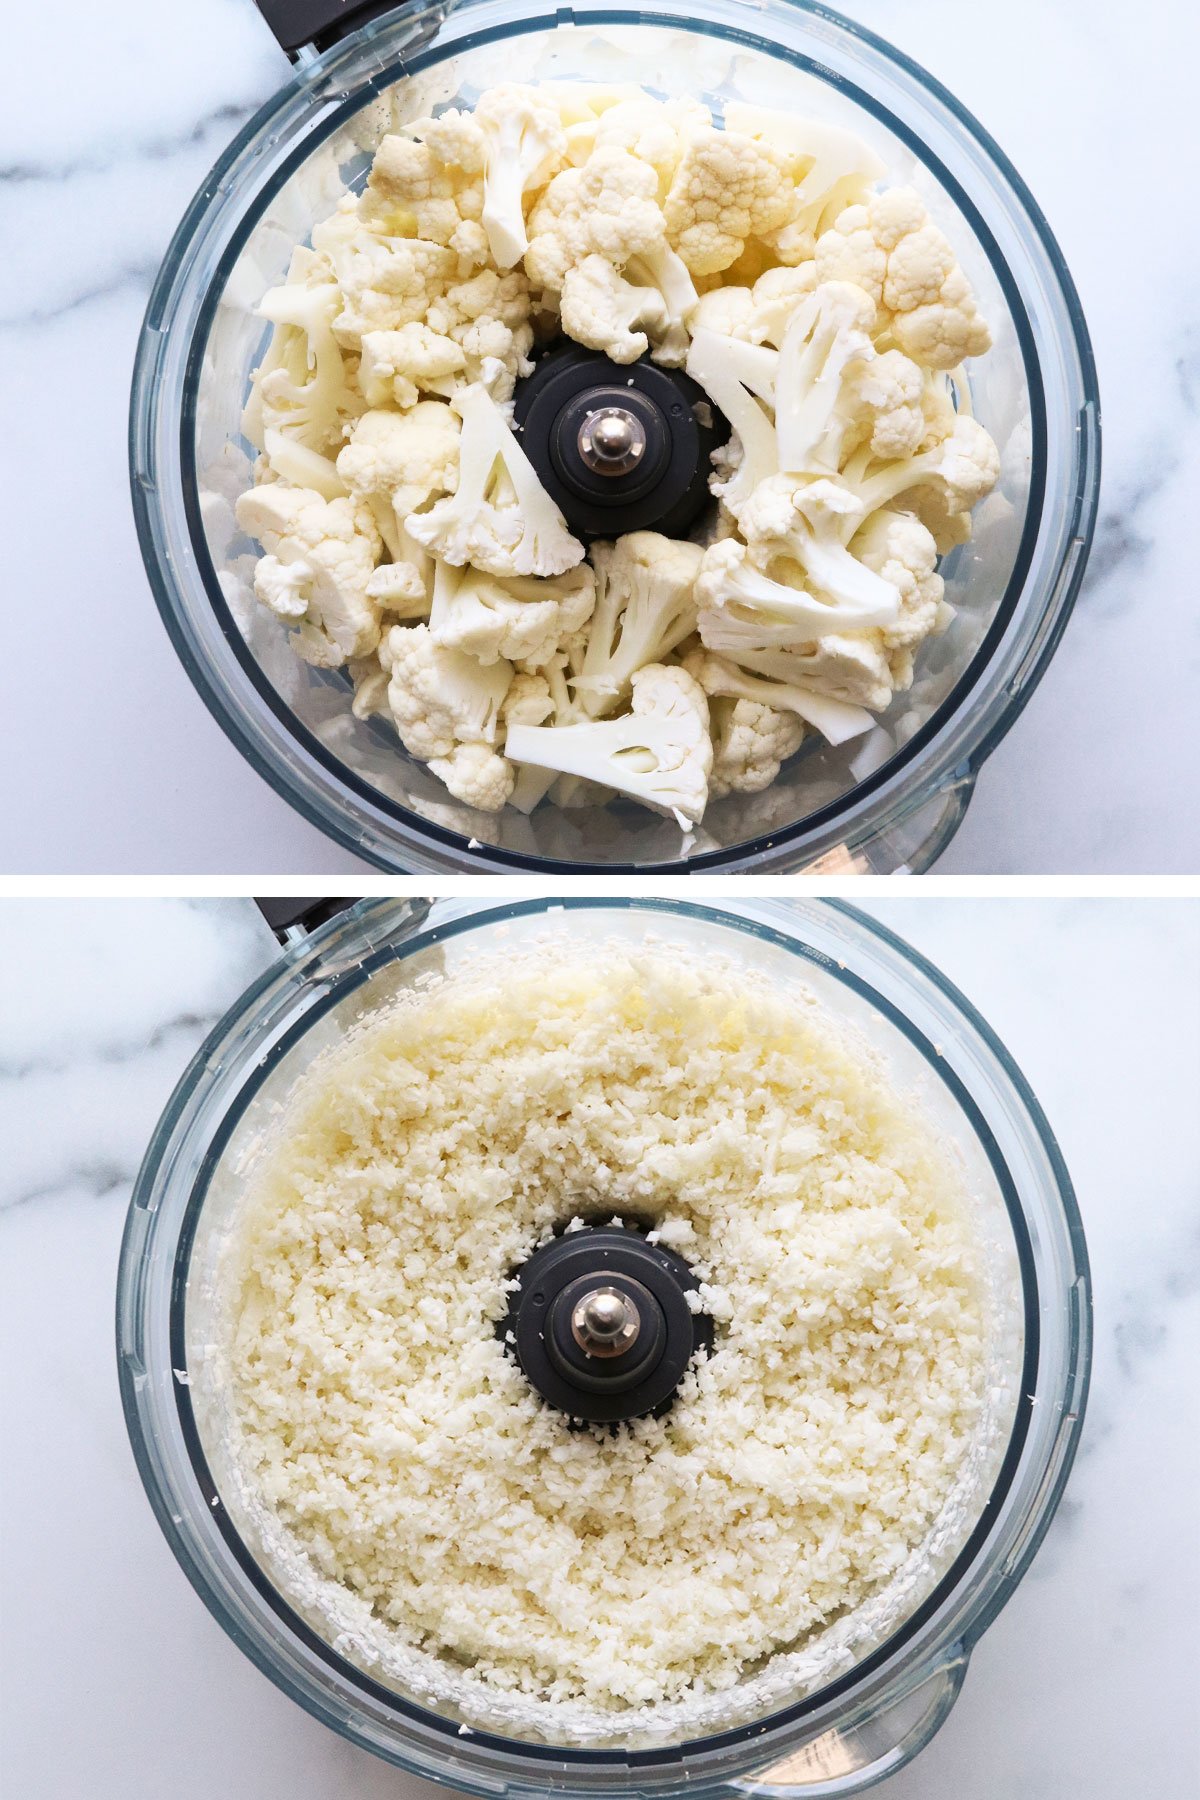
Transfer the cauliflower rice to the prepared baking sheet and spread it out into an even layer. Place it in the oven to soften and cook for 15 minutes.
Alternatively, you can place the cauliflower in a covered microwave-safe bowl and cook for 4 to 5 minutes on high to steam it. Or, you can cook it in a large skillet with a 1/4 cup of water for 8 to 10 minutes, until it has softened and the water has evaporated.
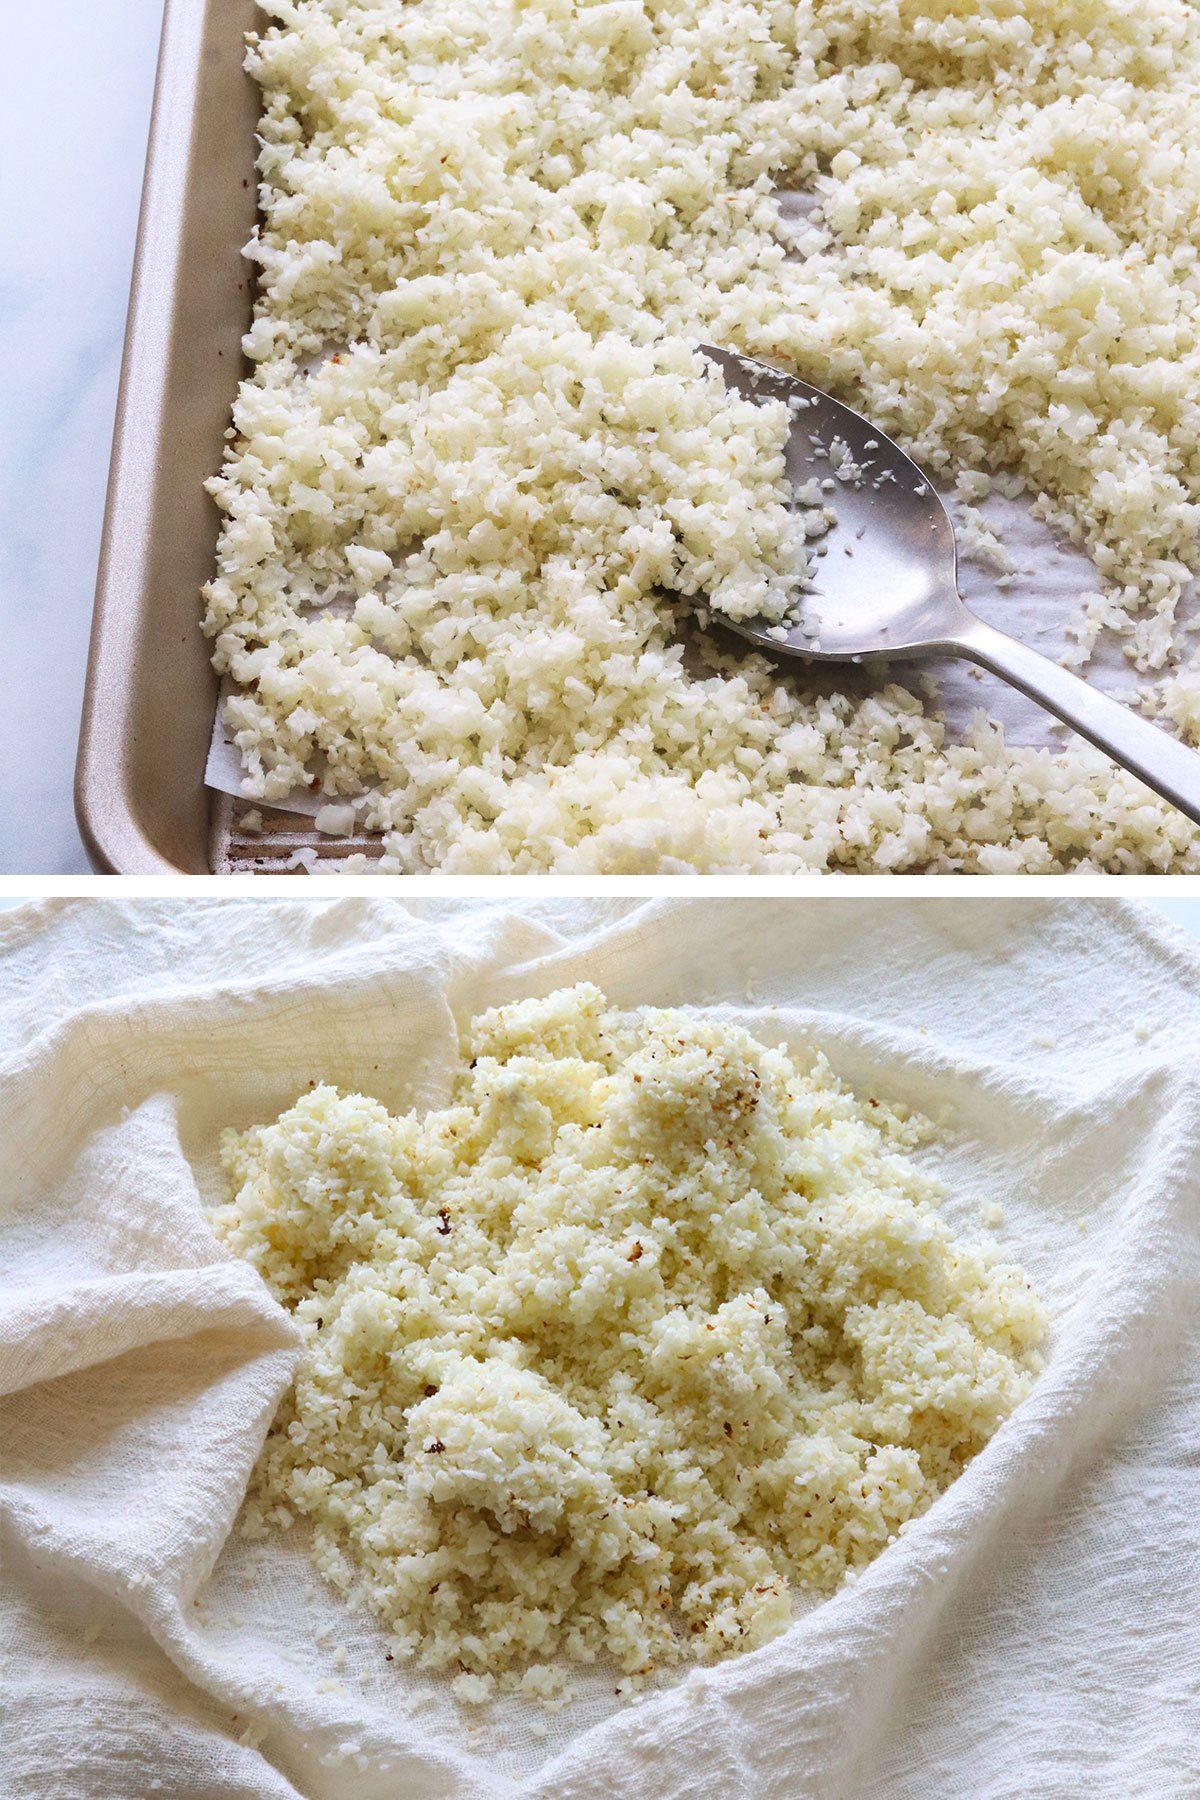
Once the cauliflower has cooked, let it cool for 10 minutes, or until you can safely handle it without burning yourself.
Time-Saving Tip
If you buy frozen cauliflower florets, you can simply let them thaw overnight in the fridge before making this crust. They will have a tender texture so you can skip the cooking step altogether! Simply pulse them in a food processor and then wring out the moisture as directed.

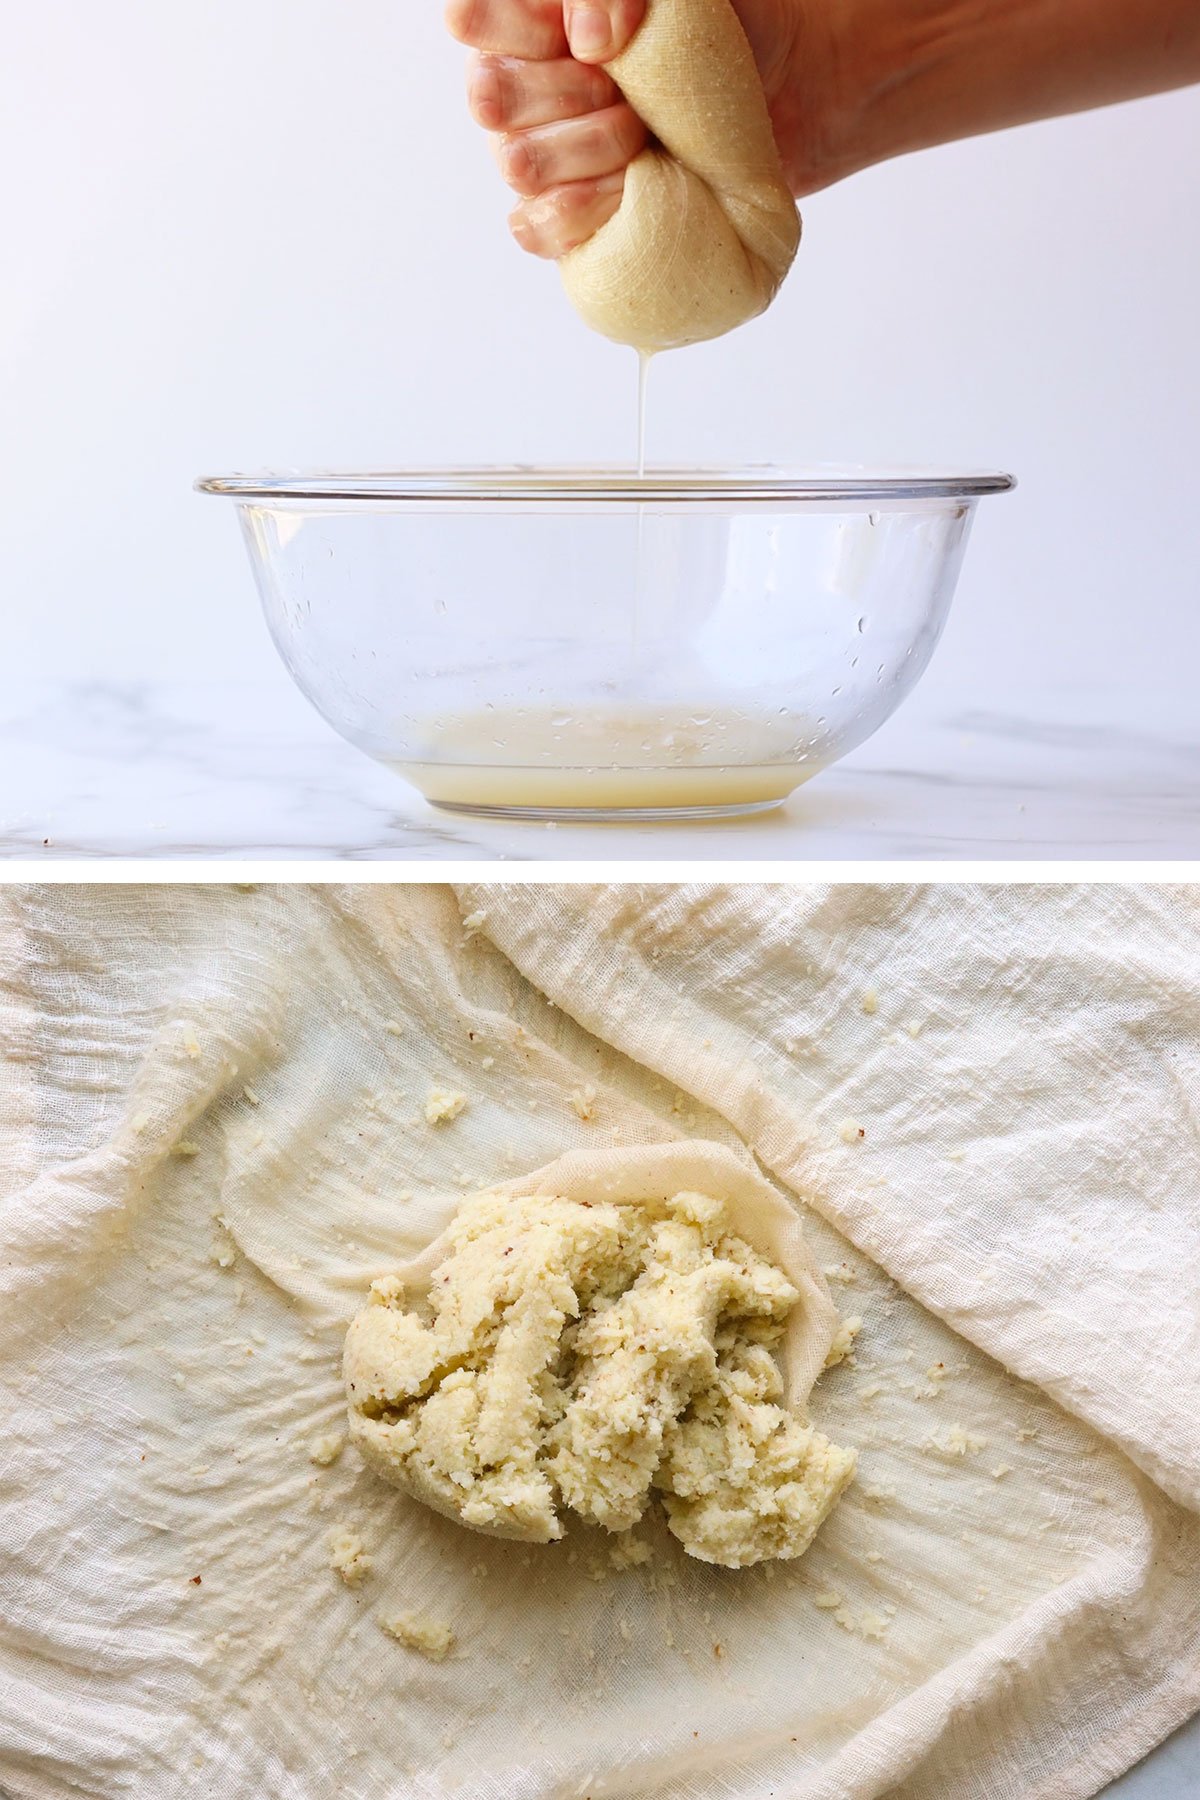
Transfer the riced cauliflower to the center of a clean dish towel. Arrange the towel filled with cauliflower over a small bowl, then squeeze as much liquid as you can out of the cooked cauliflower.
It might not feel like there’s excess moisture at first, but you may be surprised by how much liquid is released! (There should be at least 3 to 4 tablespoons of liquid in the bowl.)
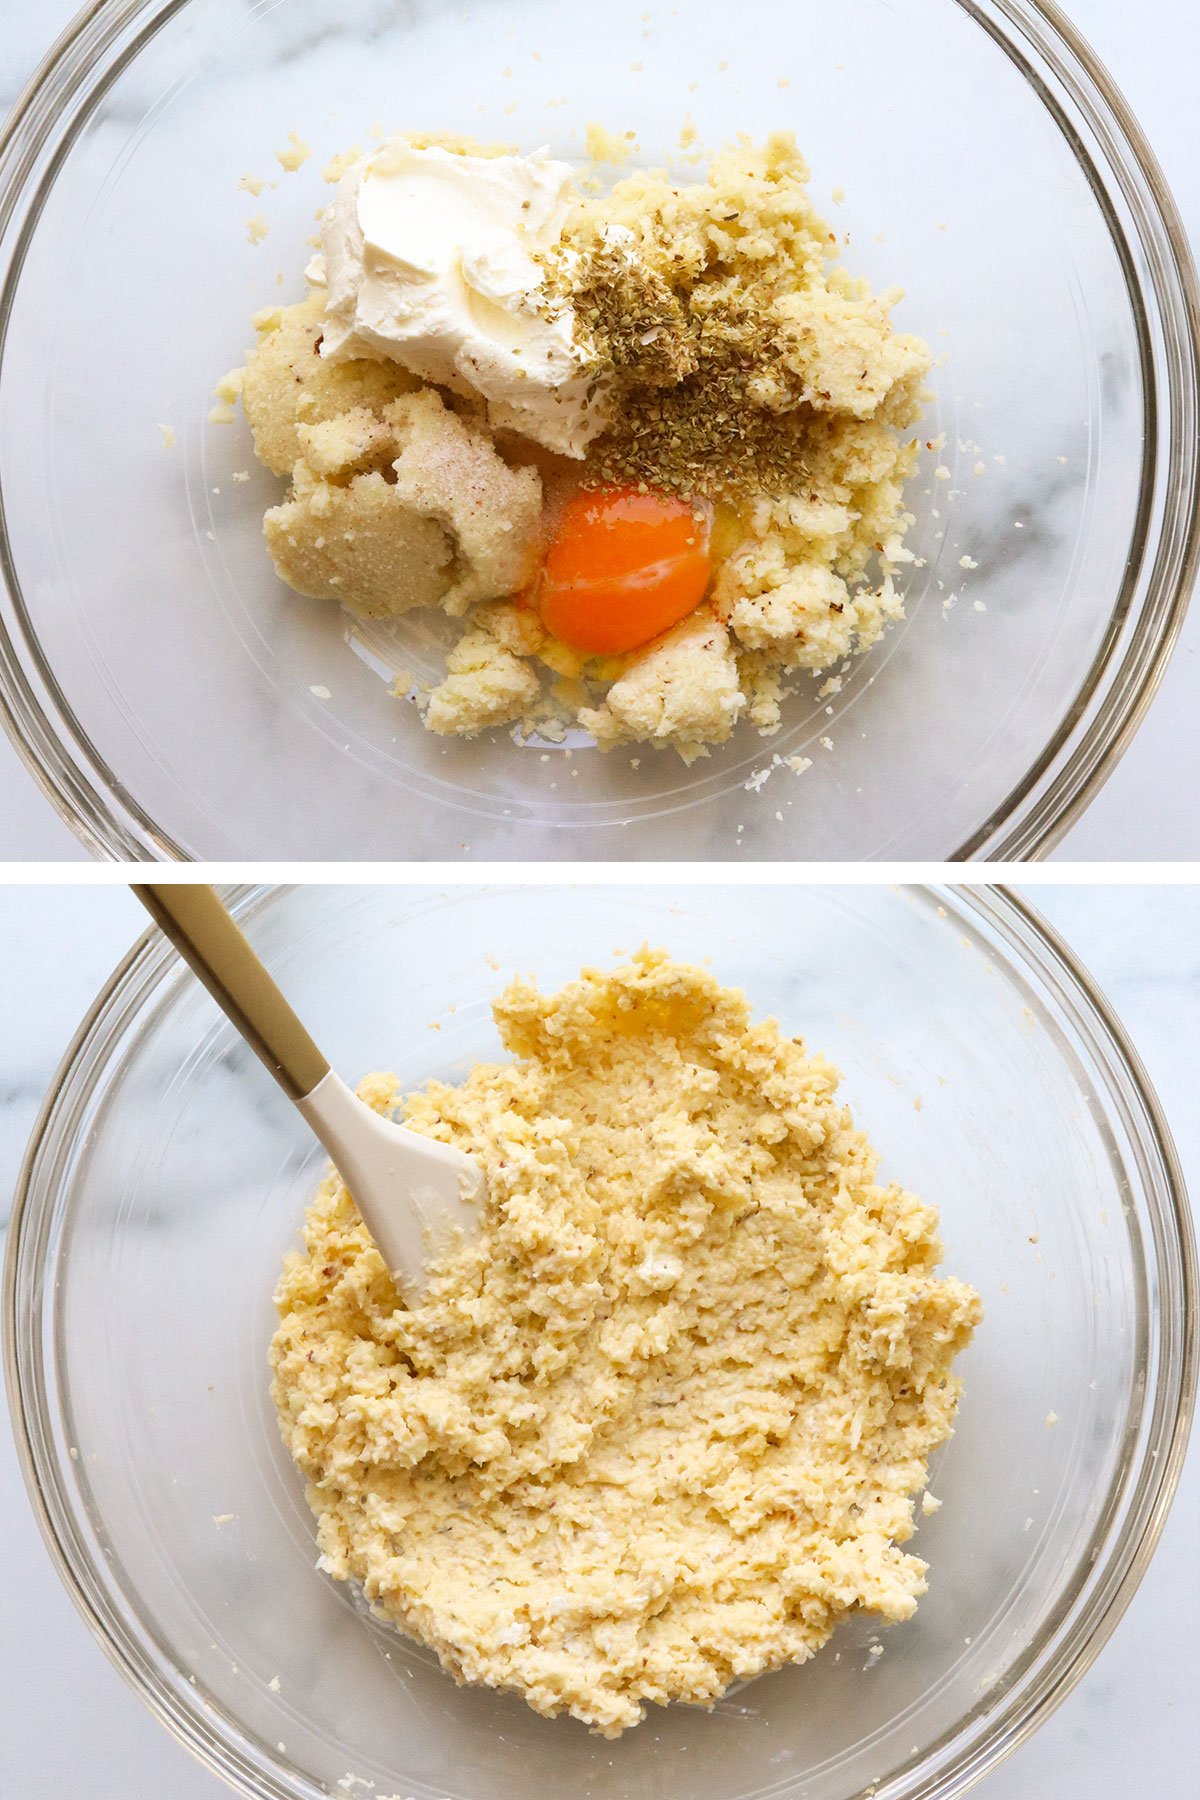
Place the cauliflower rice that you just squeezed into a large bowl, then add in the egg, cheese, oregano, salt, and a pinch of black pepper, if desired.
Use a spatula to stir well, until the cauliflower mixture looks relatively uniform.
Arrange a fresh piece of parchment paper, if needed, on the large baking sheet, then place the cauliflower mixture in the center of the pan.
Use your hands to gently press the cauliflower pizza dough into the shape of a round pizza crust, about 10 to 12 inches wide. It will be thin, but there shouldn’t be any holes in the crust.
Tip
Get your hands wet if you find that the crust is sticking to your fingers; wet hands help prevent sticking!
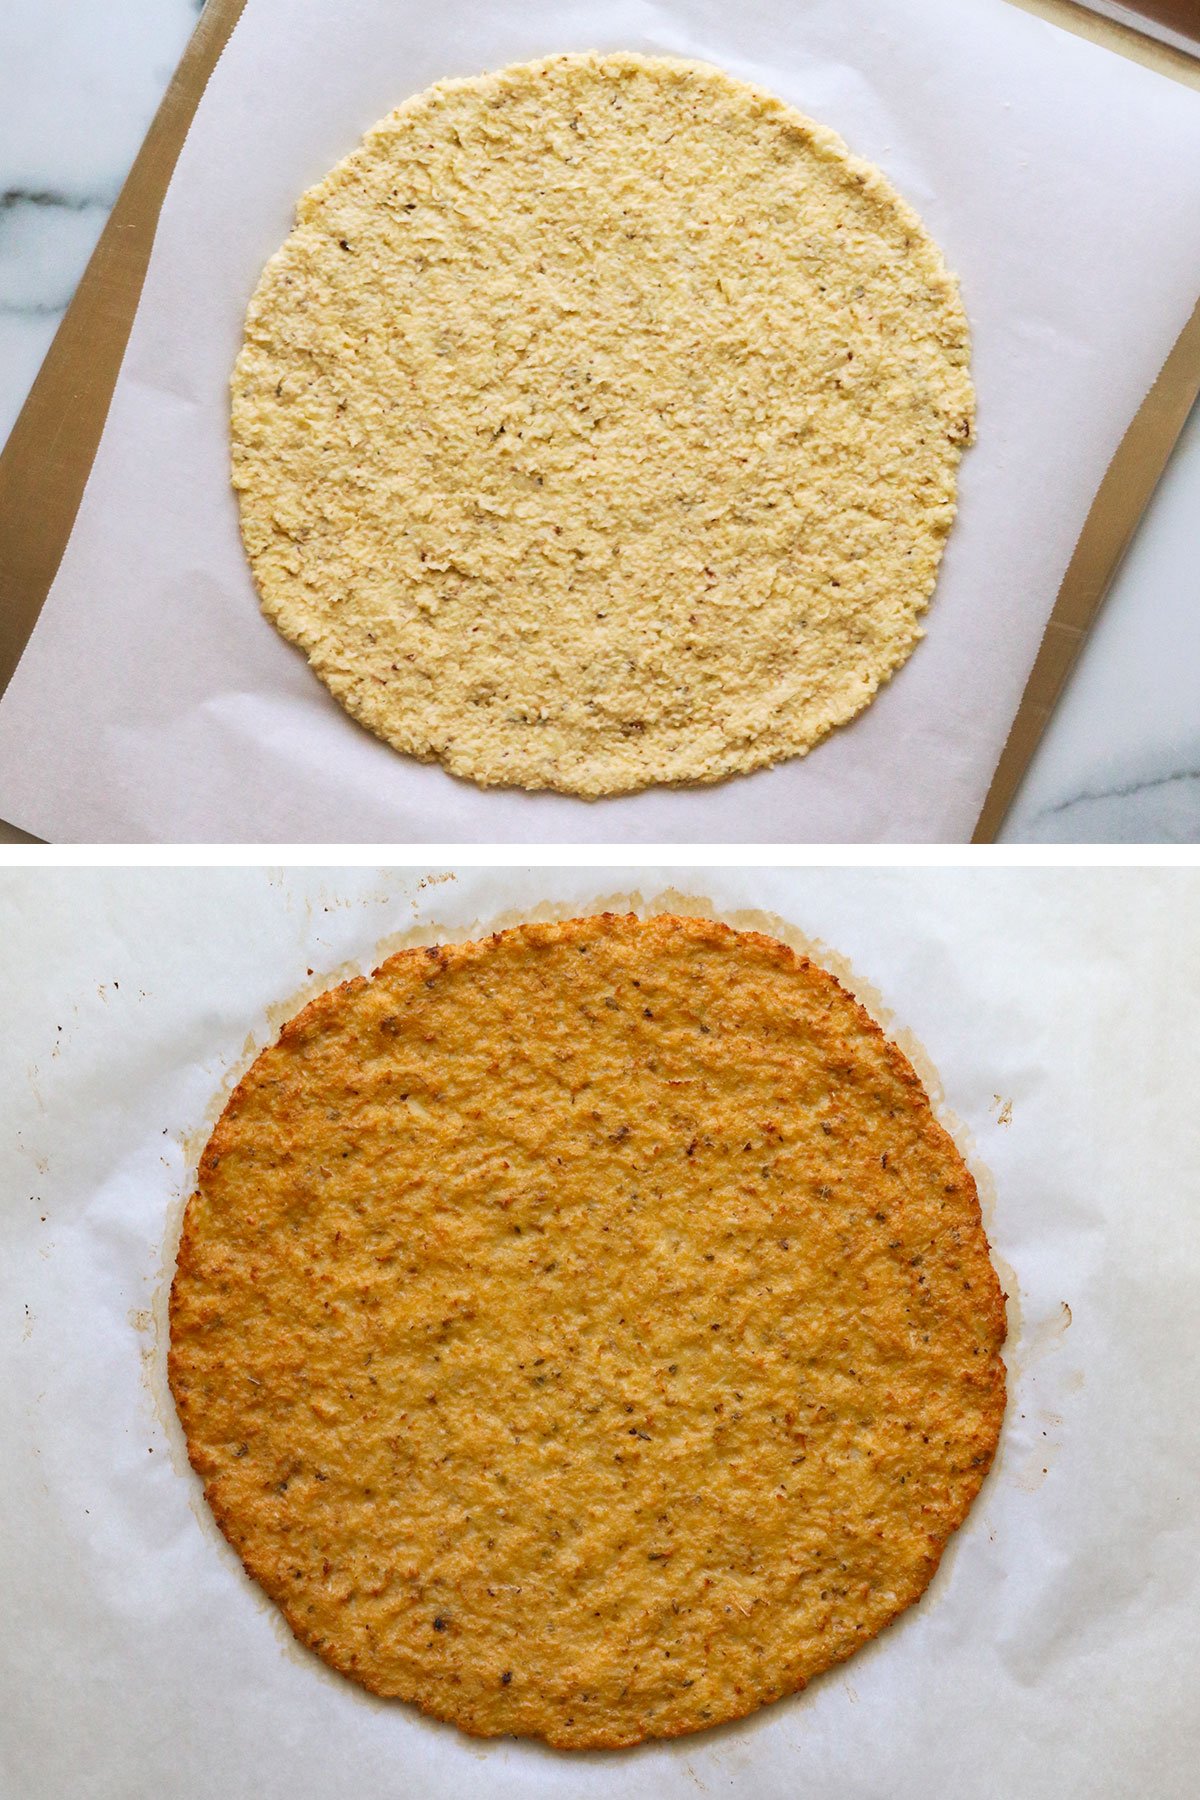
Place the cauliflower crust in the oven to bake at 350ºF for 30 minutes, or until the crust looks golden. Then it’s ready for toppings!
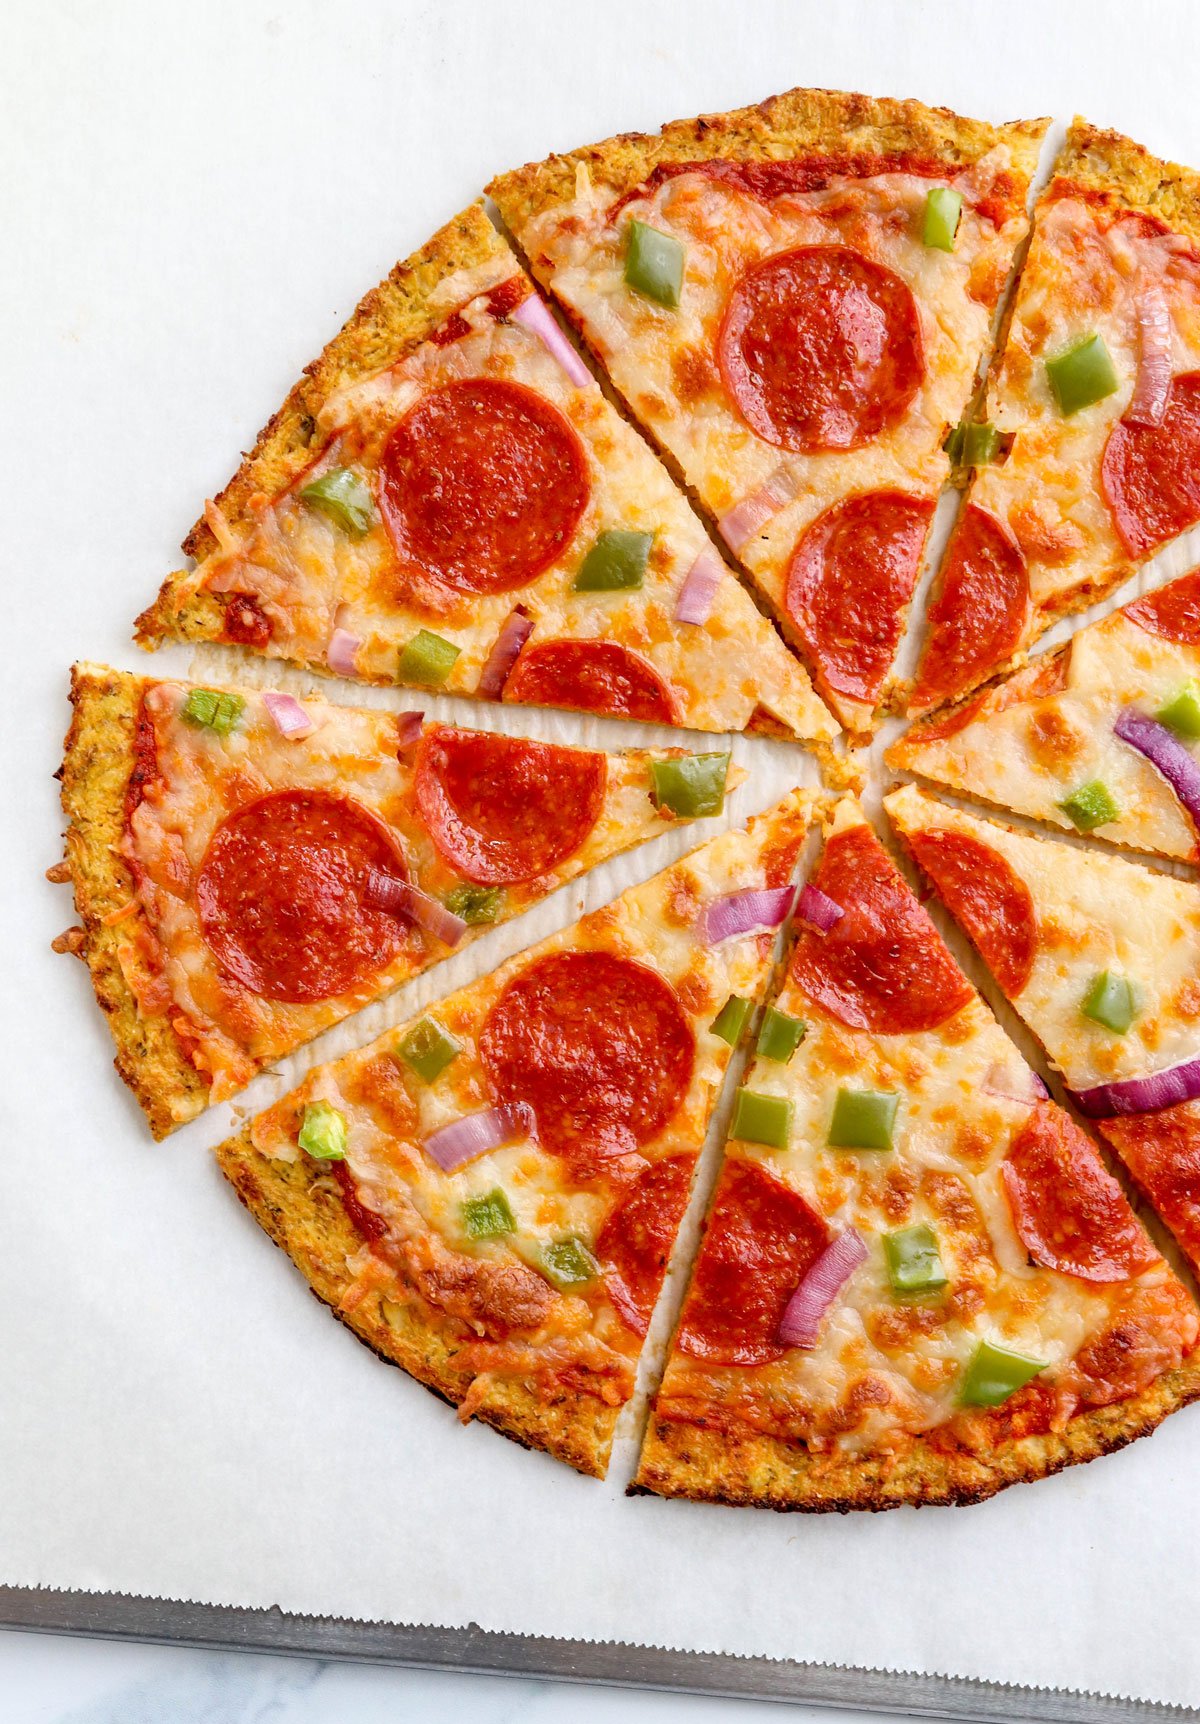
Add a thin layer of pizza sauce, mozzarella cheese, and any toppings you love, like pepperoni, mushrooms, onions, fresh basil, or olives.
Return the pizza to the oven to bake until the cheese has melted, about 10 more minutes.
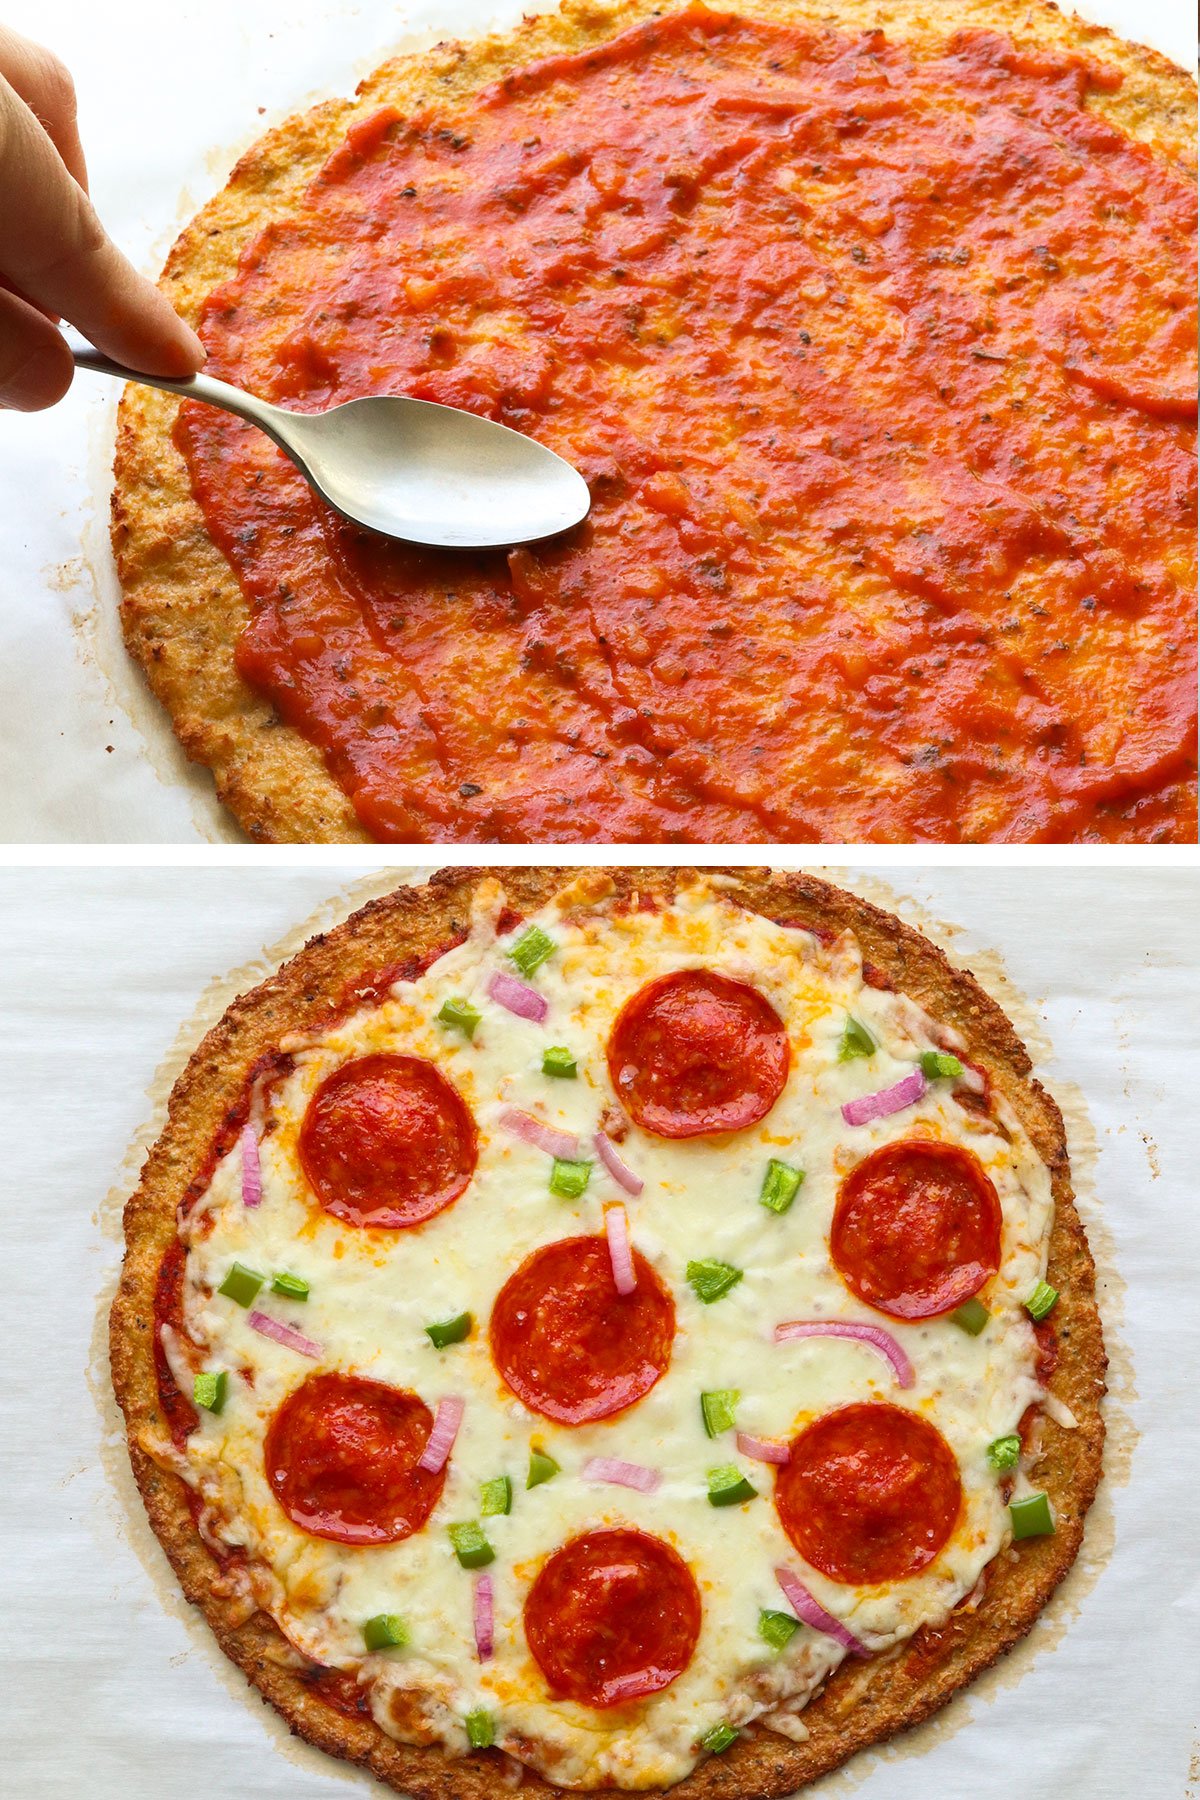
You can turn on the broiler and watch closely if you want the cheese to turn golden even faster.
Let the pizza cool for 5 minutes, then cut into slices. Because you took the time to remove excess moisture, the crust should be easy to pick up with your hands!
Leftover pizza slices can be stored in an airtight container in the fridge for up to 5 days. Or you can freeze them for up to 3 months.
Looking for more low-carb dinner ideas? Try Cauliflower Fried Rice, Zucchini Lasagna, or Chicken Vegetable Soup for more options.

Ingredients
- 1 pound cauliflower florets (or thawed from frozen; see notes)
- 1 large egg , beaten
- ⅓ cup soft goat cheese (or grated Parmesan)
- 1 teaspoon dried oregano
- ¼ teaspoon salt
Instructions
- Preheat the oven to 400ºF. If the cauliflower isn't already riced, add the cauliflower florets into a food processor and pulse briefly, until it has a rice-like texture. Line a large baking sheet with parchment paper, then spread the cauliflower rice out in a single layer. Bake for 15 minutes, or until the cauliflower is tender.
- If you're using frozen cauliflower, be sure that it is completely thawed, and process it into a rice-like texture using a food processor. (Alternatively, you can start with frozen cauliflower rice that has been thawed, to skip the food processor step.) There is no need to cook thawed frozen cauliflower so it will save you time! Tip: You can use up to 1 ½ pounds of cauliflower if you want to use two 12-ounce bags. This crust will still hold together well!
- Once the riced cauliflower has been cooked (or thawed), transfer it to a clean, thin dishtowel. Wrap up the steamed rice in the dishtowel, twist it up, then SQUEEZE all the excess moisture out! (Be careful if your cauliflower is still hot; let it cool before handling.) A lot of extra liquid will be released, which will help you avoid a soggy pizza crust.
- In a large bowl, mix up the squeezed-out rice, egg, cheese, oregano, and salt. It won't be like any pizza dough you've ever worked with, but don't worry, it will work!
- Press the dough out onto a baking sheet lined with parchment paper. (It's important that it's lined with parchment paper, not wax paper, or it will stick.) Keep the dough about 1/4-inch thick. Wet your hands to prevent sticking, if needed.
- Bake for 30 minutes at 400ºF or until the top looks dry and golden.
- Add your favorite pizza toppings to the crust, such as sauce and cheese, then return the pizza to the 400ºF oven. Bake an additional 5-10 minutes, just until the cheese is hot and bubbly. Slice and serve warm.
Video
Notes
Nutrition
If you try this Cauliflower Pizza Crust recipe, please leave a comment and star rating below letting me know how you like it.


I’ve made this a few times, and always get perplexed on the measuring of the cauliflower rice-is this before or after steaming and wringing? We love this pizza-even our nonpaleo adult kids! thank you!
I measured the 4 cups AFTER steaming and draining the rice, but BEFORE wringing it out. The amount reduces even more after removing all that extra moisture!
Luckily, this recipe is very forgiving, and it should hold together even if the measurements are a little off each time. 😉
Thank you so much for this recipe – have the crust in my oven now & it smells amazing!
Just wanted to suggest that you make a notation in your recipe that you measured COOKED cauliflower (because in your current instructions you specify RAW cauliflower). I followed the directions and ended up with very little “dough”, so used my remaining cauliflower to make up the difference and ended up much closer to what I suspect is the intended outcome for this recipe. If I had known to measure it out already steamed it would have saved me some guessing and extra steps 😉 (And this comment is waaay down the list – not easy to find!)
That being said, I LOVE your recipes and many are on regular rotation – thank you so much!!!
Thank you very much for posting this clarification! I’ve made this recipe twice, and measured the four cups *raw*. Needless to say, I ended up with barely a cup of cooked/strained cauliflower.
Great recipe. I used a tofu press to get the water out of the thawed frozen cauliflower. It worked great. I also appreciate Tamara’s sauce recipe. Thank you.
What’s so great about this recipe is it’s really forgiving: when I saw I wanted to try it right away, but, except for the egg and the seasonings, I had none of the ingredients. So, I used broccoli and zucchini “rice” and blended cheddar with plain yoghurt as the cheese. Since it didn’t have any strong character without the chevre, I threw in a teaspoon of miso, a clove of garlic, and some black pepper to compensate. I just used a simple topping of chopped red bell pepper. And it was delicious! Thank you so so much!
That sounds wonderful! I’m glad it turned out so well, even with the substitutions. 😉
If I don’t have parchment paper, has anyone used nonstick spray or foil??
I’ve tried baking it on a Silpat, which usually has similar results to using non-stick spray, and the crust wasn’t as dry or firm as when using the parchment paper.
Please let us all know if you have any luck, though!
Hi Megan. I made your Cauliflower Fried Rice two nights ago and your Cauliflower Pizza Crust for dinner tonight and both were SO good, particularly the pizza. My husband loved it! I made all the cauliflower rice a couple of days ago and kept it covered in the fridge so it was a lot simpler and quicker to make make both dishes. I even whipped up some more of the fried rice for lunch today! Thanks for some amazing recipes!
this crust was great. i was not expecting to like it but I really did!!!
My daughter followed the recipe exactly and the crust was easy to pick up, crisp, and I would not have known that it was cauliflower had she not told me. we are going to make it when we get home for sure. you must wring out the moisture after the cooked cauliflower cools some.
bon appetit!
Hi, Megan. My younger daughter was recently diagnosed with gluten and casein intolerance, so for now we steer clear off any milk products, including goat milk (it has a diferrent form of casein, but during the “cleansing” period none of it is allowed). So, my question to you – can i make the same crust but skip the cheese altogether? DO you recommend any alternatives? Is it just for flafor, or it actually keeps the thing together?
Thanks so much,
Jennt
Hi Jenny!
I haven’t tried making this without the cheese yet, so I can’t say for sure how it will turn out. I think if you reduce the cauliflower a bit, and just use the egg, it should turn out fine… but you just never know until you try.
If food combining isn’t an issue for you, perhaps adding a tablespoon of ground flax would help bind it together as well.
Let me know how it turns out! 🙂
My rice was still mush the second time around, and still didn’t look like yours, but I decided to proceed anyway, and I’m glad I did because it worked! It held together just fine and could easily be picked up to eat, we did not use any utensils. We topped it with sauce, mushrooms, onions, spinach, chili pepper flakes, parmesan, mozza, and fresh basil.
Yay, I’m so glad it worked for you!!
I was surprised at how tasty this was! Truly a keeper in the recipe book. The texture, flavor and look was all similar to pizza! I cannot wait to make this again. Wow. Thanks for the recipe!
So glad you enjoyed it, Tiffany!
since you have had 51 comments to date, and no one has asked for clarification, i must be asking a question that needs none. however, i am unsure about the steaming of the cauliflower…you said boil the water, put the cauliflower in, and cover and steam for 4 to 5 minutes. does that mean you let it boil on high, or does that mean you cover it and turn it off to steam??? what is the desired doneness of the cauliflower at the end of the 4 to 5 minutes. thank you for enlightening me. i appreciate it.
Hi Sue! I do let the water continue to boil while the cauliflower rice is covered for 5 minutes– though, I’m not sure it’s necessary. After 5 minutes, I usually just assume that it’s done, and don’t really check the texture, but it should be at a “fork tender” consistency. (Of course, it’s nearly impossible to check with a fork since the consistency is already rice!) You can usually smell when it’s done, as well, as your kitchen will start to fill with the strong scent of cooked cauliflower. 😉
Hope that helps!
hi megan,
thank you, and now will you trouble shoot for me?…
i did not think you wanted it to continue to boil covered, because, one, i did not think that meant steaming, and two, i thought it might burn. so what do i do now…can i salvage the cauliflower? put it back on and cook it a little longer? i know this is not rocket science, but i wanted to do it the way you did, at least for the first time. thanks for your patience with this neophyte cook.
If you brought the water to a boil, added the “rice” and covered for 5 minutes, it should be steamed properly– even if you turned off the heat. Next time I make it myself, I will probably reduce the heat to a gentle simmer, rather than keeping it boiling, because I don’t think it’s necessary.
If you’re concerned that it’s not cooked enough, (if the rice still feels too firm) I imagine you could cook it another 2 minutes in boiling water, then pick up the recipe from there! Be sure to drain and squeeze out the moisture well– that’s definitely the key to a good crust! And be prepared for the texture to be more moist and crumbly than traditional dough. You’ll have to shape a rather mushy dough onto the parchment paper, but it will be nice and firm after baking! Good luck! 🙂
Any chance the boiling step can be skipped entirely? Seems baking in the oven would cook the riced cauliflower and not introduce more water? Has anyone tried this?
The cauliflower needs to be cooked in order to release enough water. You can make it with “raw” cauliflower rice, but then the baked crust will be soggy.
Did you cook the cauliflower “rice” right in the 1″ of water? or in a steamer basket in the water?
Yes, I cooked the rice directly in the 1″ of boiling water– no steam basket. I drained it all into a fine mesh strainer after cooking, before transferring it to the dishtowel to squeeze out the rest of the moisture.
Hope that helps!
Could I use frozen cauliflower? Has anyone tried it before that way?