This post may contain affiliate links. Please read my disclosure and privacy policy.
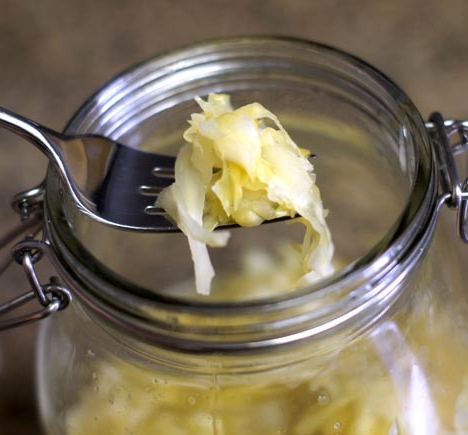
Raw sauerkraut is surprisingly easy to make and is WAY cheaper than buying the store-bought stuff. For a just a couple dollars, you’ll have more fresh sauerkraut than you’ll know what to do with!

Fermenting my own veggies has always terrified me, since I was convinced I’d probably do it wrong and wind up with botulism. But people have been eating fermented food for centuries, so it can’t be as scary as it sounds, right?
Right.
Plus, it’s loaded with friendly bacteria for your gut, which has been shown to improve digestion and the absorption of vitamins and minerals. So, eat your (fermented) veggies.
—
Homemade Raw Sauerkraut
Ingredients:
1 head green or purple cabbage
2 Tablespoons sea salt
Spring or distilled water, as needed
Tools:
Wood cutting board
Sharp knife
Glass jar
Large glass or metal bowl
Metal Tongs
Ziploc bag (if needed for added weight)
Directions:

(You’ll want to save these for later.)

Using a sharp knife, simply shred the cabbage and transfer it to a large glass bowl.
Add about 2 Tablespoons of salt, then, using tongs or clean hands, massage the cabbage until it starts to break down from the salt. It will release moisture and reduce in size.
Step 3: Transfer to a jar.

Transfer the massaged cabbage to a clean glass jar, preferably one that is large enough to fit your hand through the top. The most important part of making fermented veggies is that you remove all the air in the jar–> so you want to pack the cabbage tightly, leaving no gaps! I used my fist to punch it down, but a clean wooden spoon would work, too.
Step 4: Cover with water and reserved cabbage leaves.
Like I mentioned above, the key to properly fermented sauerkraut is making sure there is no air remaining in the shredded cabbage. While there is already plenty of moisture released from the cabbage to make the brine, I like to add a little extra spring water (do not use tap water!!) to make sure the liquid level is completely ABOVE the shredded cabbage.
 Once you’ve added the water, use the reserved cabbage leaves to press down the shredded cabbage–> keeping it submerged under the liquid.
Ideally, you’d fill up the jar all the way to the top, but mine didn’t work out that way. If that’s the case for you, too, simply fill a plastic bag with salt water (in case it bursts in the jar, you want it to be salt water!) to use as a “weight.” Place the salt water bag on top of the large cabbage leaf layer, and seal the jar. You should be able to see the liquid layer above the shredded cabbage line.
Step 5: Store in an insulated bag for 3-7 days.

If your house is a too warm or too cold, the insulated bag ensures that the fermentation process is kept at an even temperature. My sauerkraut took a full week to reach the classic “tangy” flavor this time around, but it may take less time in warmer climates. You can start checking on it after 3 days, just make sure the liquid level is high enough each time you re-seal the jar!
Once the sauerkraut has fermented to your liking, remove the weight and outer leaves and discard.
*I’ve heard that it’s not uncommon for a layer of mold to develop on the outer leaves. This doesn’t mean your sauerkraut is ruined! Simply discard the layer of mold, and everything underneath the brine should be safe. As always, use your best judgement–> if it smells off, don’t eat it.
Step 6: Store in the fridge and enjoy!

I’ve had raw food teachers tell me that raw sauerkraut can last almost indefinitely in the fridge… but hopefully you’ll eat it all before you can test that theory. It will definitely last for months in the fridge, so feel free to make a BIG batch!
Once you’re comfortable making your own sauerkraut, feel free to get creative with the veggies you add to it! Ginger, beets, carrots, garlic, and lemon juice all make tasty additions.
Ingredients
- 1 head green or purple cabbage
- 2 Tablespoons sea salt
- Spring or distilled water , as needed
Instructions
- Start with really clean tools. Sanitize your jar, knife, cutting board, tongs and glass bowl with boiling water, which should kill off any lurking bad bacteria. We only want the good kind growing in our veggies!
- Rinse cabbage well, and remove the large outer leaves. (You'll want to save these for later.)
- Using a sharp knife, shred the cabbage and transfer it to a large glass bowl. Add about 2 Tablespoons of salt, then, using tongs or clean hands, massage the cabbage until it starts to break down from the salt. It will release moisture and reduce in size.
- Transfer the massaged cabbage to a clean glass jar, preferably one that is large enough to fit your hand through the top. The most important part of making fermented veggies is that you remove all the air in the jar-- so you want to pack the cabbage tightly, leaving no gaps! I used my fist to punch it down, but a clean wooden spoon would work, too.
- While there is already plenty of moisture released from the cabbage to make the brine, I like to add a little extra spring water (do not use tap water!!) to make sure the liquid level is completely ABOVE the shredded cabbage.
- Once you've added the water, use the reserved cabbage leaves to press down the shredded cabbage-- keeping it submerged under the liquid.
- Ideally, you'd fill up the jar all the way to the top, but mine didn't work out that way. If that's the case for you, too, simply fill a plastic bag with salt water (in case it bursts in the jar, you want it to be salt water!) to use as a "weight." Place the salt water bag on top of the large cabbage leaf layer, and seal the jar. You should be able to see the liquid layer above the shredded cabbage line.
- Store the sealed jar in an insulated bag for 3-7 days. You can start checking on it after 3 days, just make sure the liquid level is high enough each time you re-seal the jar!
- Once the sauerkraut has fermented to your liking, remove the weight and outer leaves and discard. Note: It's not uncommon for a layer of mold to develop on the outer leaves. This doesn't mean your sauerkraut is ruined! Simply discard the layer of mold, and everything underneath the brine should be safe. As always, use your best judgement-- if it smells off, don't eat it.
- Store in the fridge and enjoy! The sauerkraut will last for months in the fridge, so feel free to make a BIG batch!
Notes
Nutrition
Per Serving: Calories: 18, Fat: 0g, Carbohydrates: 4g, Fiber: 1g


It’s so funny you post this because JUST yesterday I was watching Kimberly Synder’s video tutorial on her website about making her Probiotic and Enzyme salad and had my first go of it yesterday, with red cabbage! I’m a little scared, but it already has bubbles, so I think that’s promising? Anyway, I was wondering where you got your insulated bag? Can you just get them anywhere like Whole Foods or Bed Bath and Beyond?
Yes, I’ve found insulated bags at Trader Joe’s and Whole Foods. You could also use a travel cooler or insulated lunch box, depending on the size of your jar!
Hope your sauerkraut turns out well! 🙂
This does seem a little daunting but you do explain it well so I think it might be one of the things that I try to conquer this summer! I just tried sauerkraut for the first time last week and I actually liked it! Now that I know it is edible and that it is so good for digestion I really want to start incorporating it more!
I know I have said it before but I really enjoy your “what I ate” posts as well as your exercise posts!
Thanks, Keri! I’ll try to keep up on those types of posts more often!
I bet I’d like eating it, but the process of making it still just makes me want to sit down and stare at my computer instead of sterilizing jars and knives! Oh well, maybe someday I’ll do it.
I totally agree. Fermenting foods scares me 🙁 But it’s a good thing my hubby loves doing it. I’m going to pass along this recipe. Thanks!!
T
How lucky that your husband will make it for you!! Hope you both enjoy it! 😉
I’m impressed! I do love sauerkraut and yours looks delicious.
Love sauerkruat to,,,on top or side of everything,,,especially salads…I’ve made my own with or without other vegies. So easy, so good.
That’s so awesome you made your own! I have also wanted to try it but been a little leary…this is great! Sounds so simple too!!! Happy Memorial Day!
Hi
Megan it is funny how everyone makes it differently my father I have part of my family still in east europe where fermented veggies is very popular my father grandfather makes it that they do not put any wather you have to press it massage it like for 15-20 minutes and cabbage release own water(this water you have to remove) and leave it fermented for 2-3 weeks at least. This kind of sauerkraut I store not in fridge but in basement for whole winter and it is good. The impostatnt thing is to massage to release water and not other water to add but remove the water from cabbage and only leave little wet.
Wow, I didn’t realize how simple it was to make raw sauerkraut! This is such a great idea, I may be trying this out soon. It totally does sound scary, but by the looks of the ingredients and steps, it doesn’t look that bad now!
I’m embarrassed to admit the only time I’ve eaten sauerkraut is on a Reuben sandwich. (!) Now that I am cutting meat out of my diet and adding lots of veggies, can you suggest a couple of ways to use the sauerkraut?
I bet that’s probably how many people eat their sauerkraut! 😉 Fermented veggies are actually great for pairing with animal products, as they will aid in their digestion, so if you have a meal with meat, eggs or cheese, eating some sauerkraut before or with the meal could be helpful.
Like most probiotics, I think experts recommend taking fermented vegetables on an empty stomach before a meal. Personally, I don’t enjoy eating them plain, so I like to add a few tablespoons on top of my salads– especially the ones topped with raw goat cheese. The sauerkraut adds a wonderful tangy flavor and crunchy texture, and would also be a great addition to a veggie sandwich or wrap! I wouldn’t suggest cooking with it, but serving it on the side or on top of any cooked meal would be tasty, too!
I do recommend starting gradually with fermented veggies– they are powerful, and can make you feel bloated if you eat too much too soon! A couple tablespoons is a good start, then build up to eating 1/4 cup to 1/2 cup each day.
Hope that helps!
Cook with kraut! It is wonderful in soups and in stir fries. Add them at the end. Let soups cool slightly and most of the bacteria will live through it. You may be surprised at the number of other meals that are enhanced by kraut.
About sterilization:
When sterilizing your tools and containers, use bleach in the standard mixture with water. Use ONLY CLOROX brand bleach as it is the ONLY bleach certified for sterilization. Use a 10% solution of Clorox, soak all utensils for 10 minutes, then rinse with tap, R.O., DI, or distilled water. This is the ONLY way to assure that all bacteria are killed before beginning.
This is the process that every beer maker has always used and works properly. Even pouring boiling water over something does not necessarily kill adverse bacteria.