This post may contain affiliate links. Please read my disclosure and privacy policy.

The first time I searched for a homemade granola bar recipe, I mostly found no-cook recipes that called for freezing the bars to help them hold together. If you leave that type of recipe out at room temperature for too long, it will soften and fall apart.
It’s not ideal for a travel snack!
That’s why I spent weeks trying to figure out how to make granola bars stick together while using a natural sweetener like honey. I published a grain-free version of these bars in my first cookbook, and now I’m sharing a more classic version with rolled oats.
As it turns out, simply boiling honey for 1 minute is all it takes to turn it into a binder that holds together at room temperature. These bars are incredibly chewy, without being sticky, and are easy to customize with any add-ins you love.
⭐⭐⭐⭐⭐ Featured Review
“So easy to make and all 3 kids were asking for more. I love they the bars don’t fall apart when you pick them up. We did add 1/4 hemp hearts to the oats. So good! Thank you for the recipe – it’s a keeper!”
– JJ
Granola Bar Recipe Ingredients
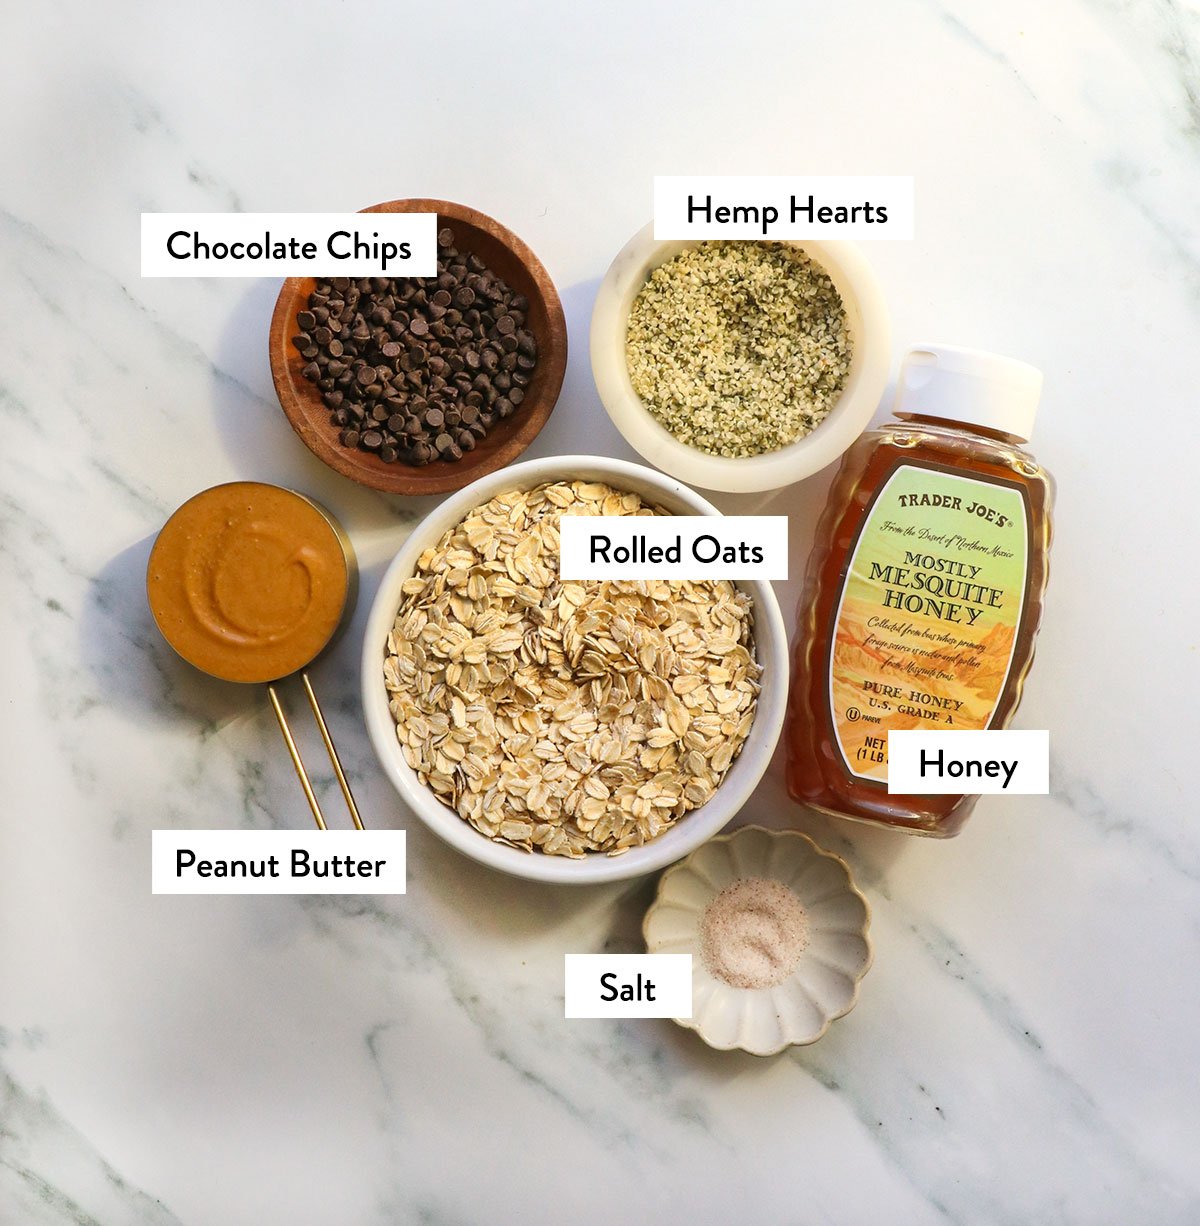
- Rolled Oats. This recipe calls for old-fashioned rolled oats, but you could use quick oats, too. If you need these bars to be gluten-free, make sure you check the packaging. You can buy oats that are “certified gluten-free” to avoid cross-contamination during processing.
- Hemp Hearts. This is optional, but it does boost the protein for each bar. You could also add chopped nuts, dried fruit, or any other add-ins you love. (My picky kids only like hemp hearts because they don’t notice them.)
- Peanut Butter. Use all-natural salted peanut butter for the best flavor. This means you’ll have to stir the peanut butter well when you first open the jar.
- Honey. This natural sweetener creates the best texture for chewy granola bars. Just boiling for 1-minute makes magic happen! But you can replace this with maple syrup if needed. (The texture is slightly less chewy with maple syrup.)
- Salt. Since honey is the binder, salt is added to help balance the sweetness. The bars will taste “too sweet” without this!
- Chocolate Chips. This is an optional topping. Melt them for a fancy-looking drizzle on top.
How to Make Granola Bars
Step 1:
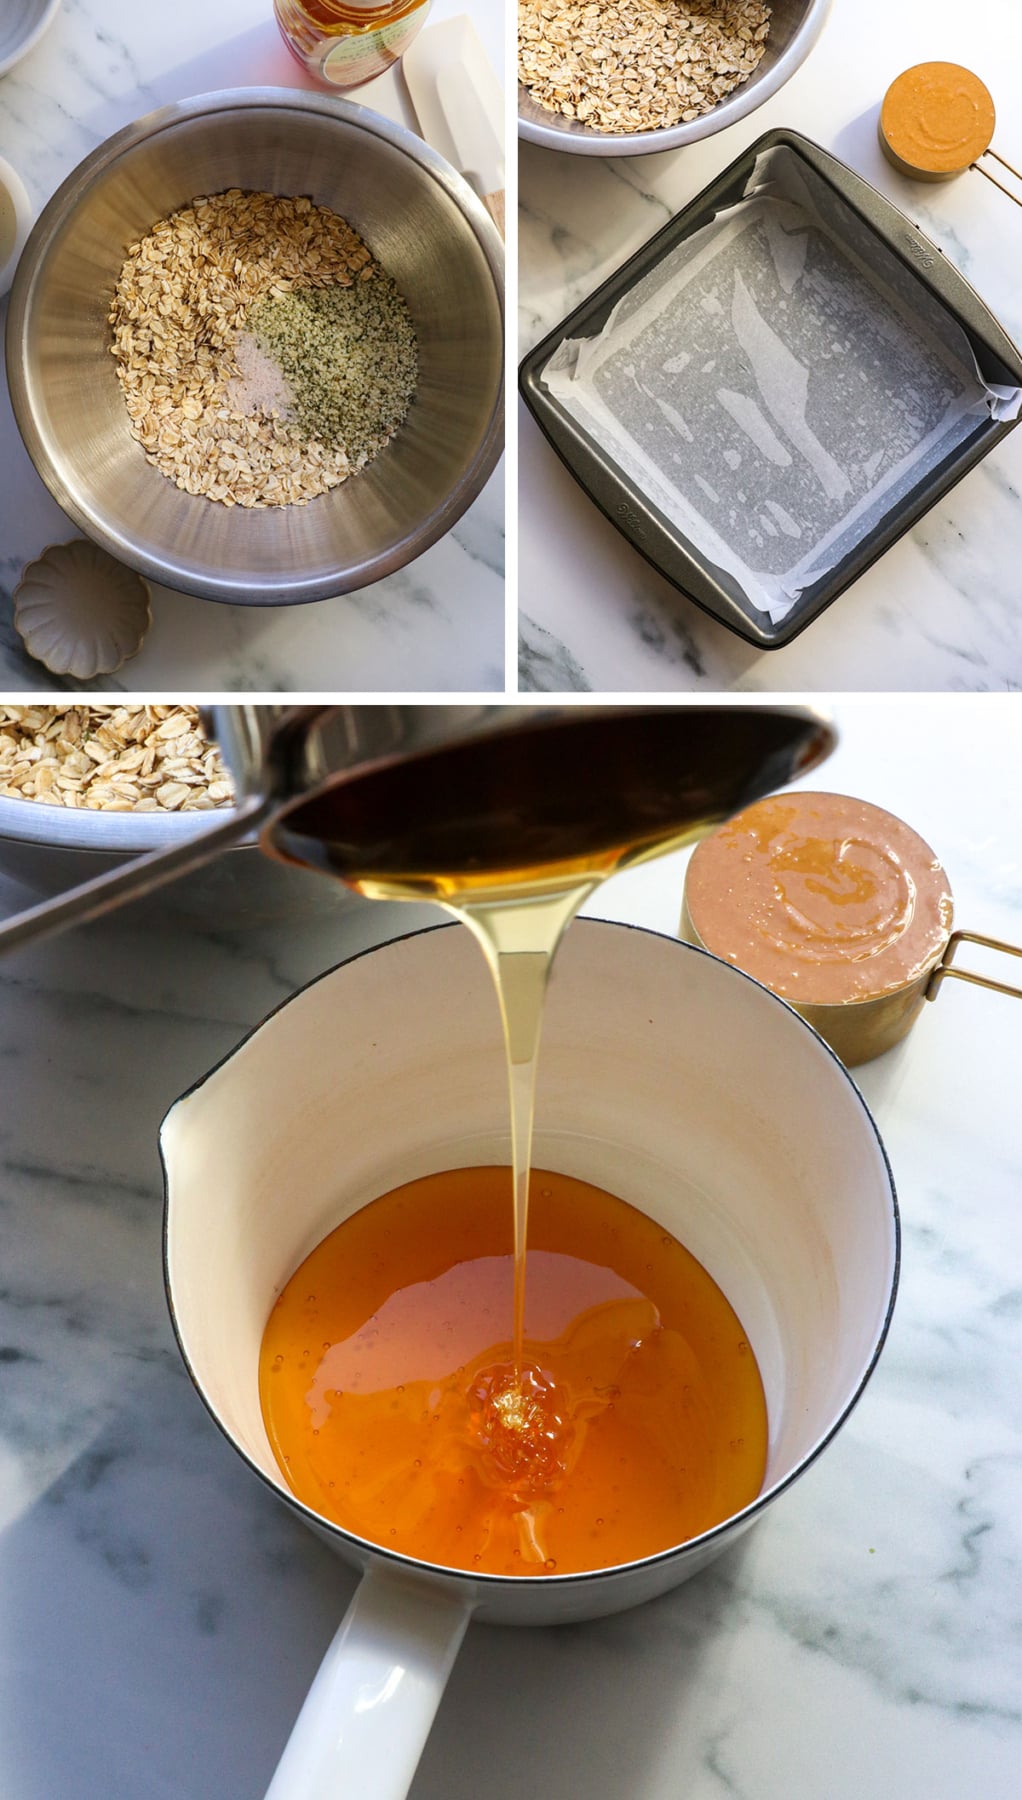
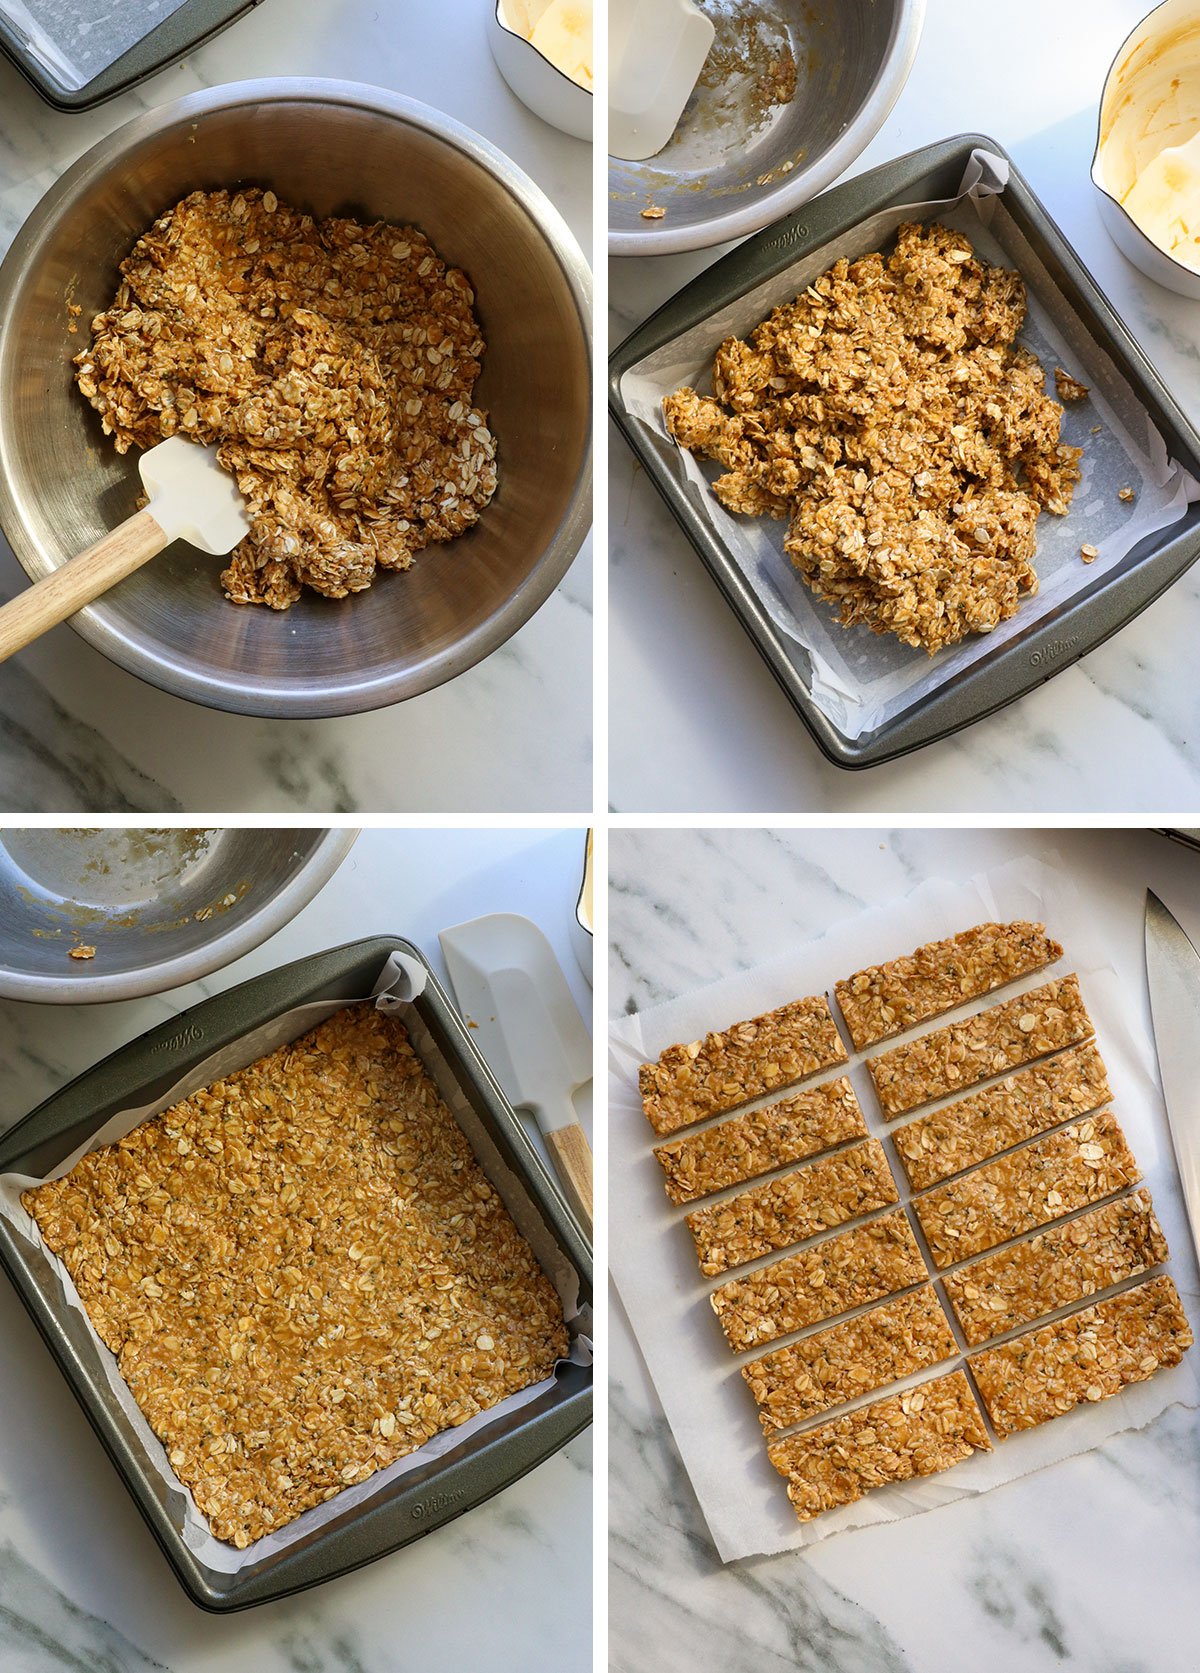
This recipe moves quickly, so it’s important that you have everything else ready to go before boiling the honey. First, prepare an 8-inch square pan by lightly spraying it with oil. Then press a piece of parchment paper into the pan. (The oil will hold it in place, so it won’t wiggle around later.)
In a large bowl, combine the rolled oats, hemp hearts (or other add-in) salt, and any optional mix-ins. If you don’t want to use one of the optional add-ins, use 2 cups of oats in total.
Stir the dry ingredients, then measure a half cup of peanut butter so it’s ready to go later.
Step 2:
Add the honey to a small saucepan, then place it on the stove over high heat. Bring it to a vigorous boil. As soon as you see large bubbles forming around the edge of the pan, set a timer for 1 minute.
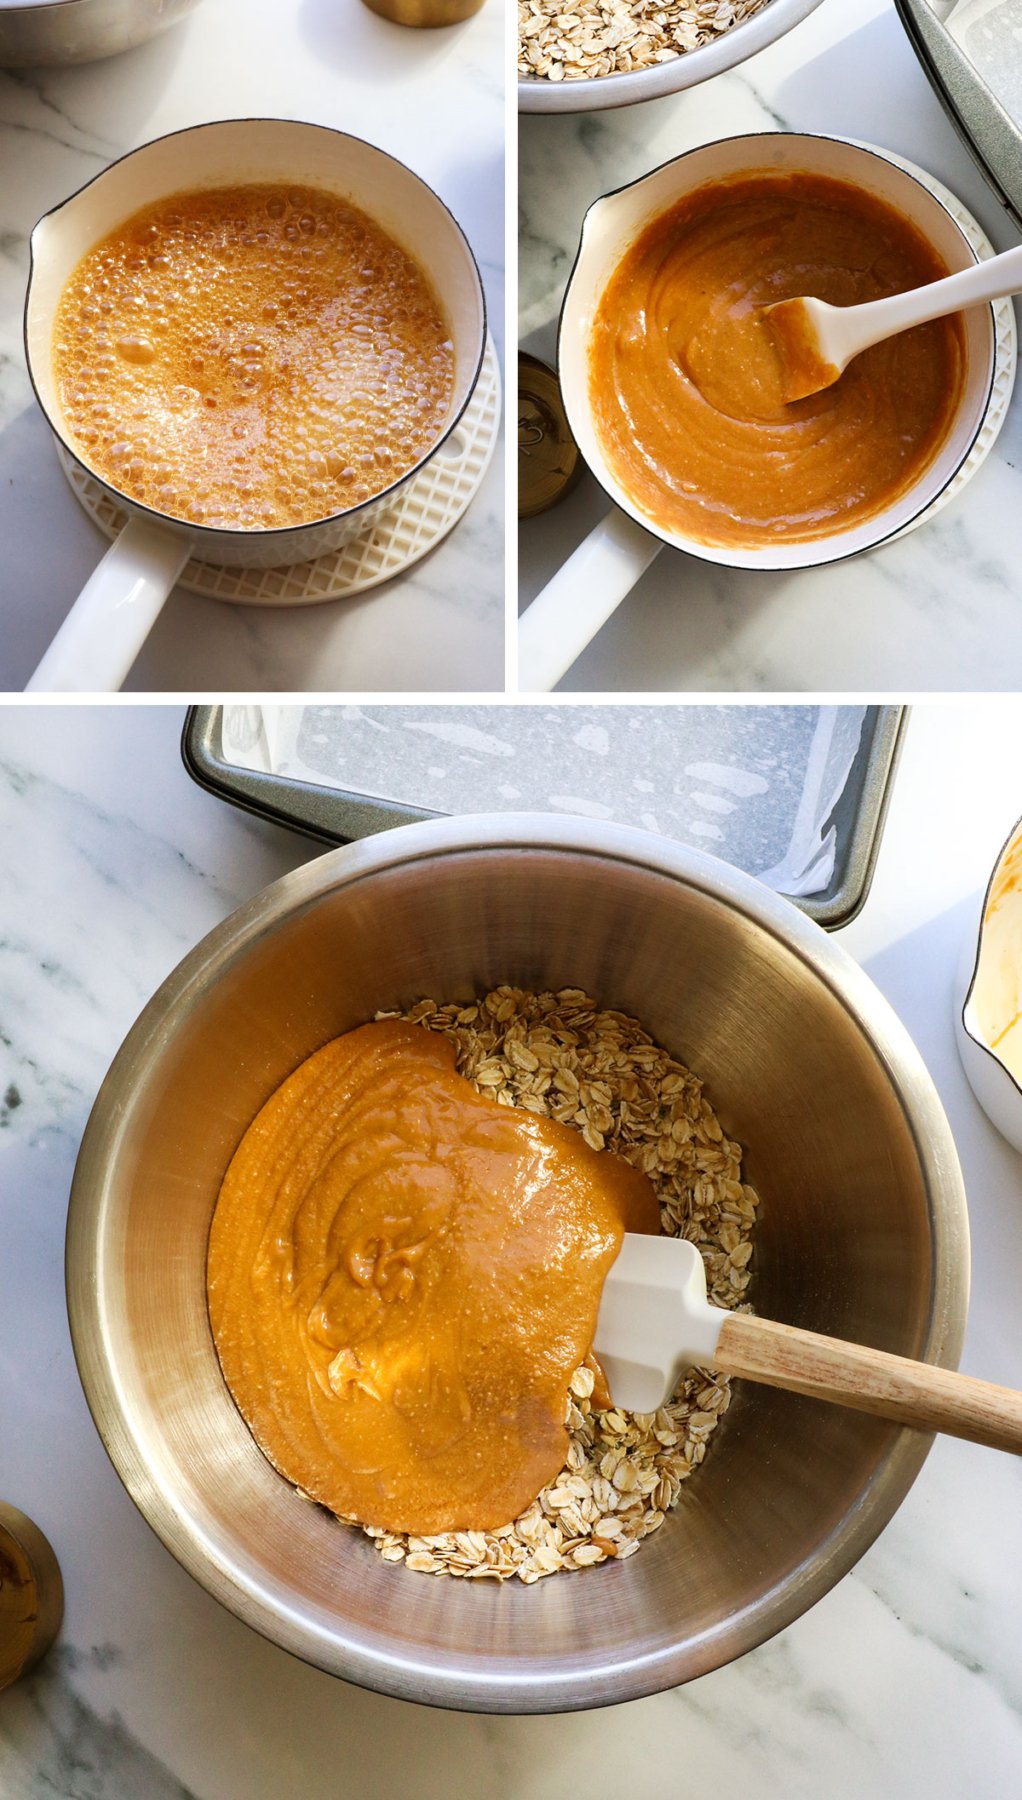
When the timer goes off, remove the honey from the heat and immediately stir in the peanut butter. The mixture will thicken as it cools, so it’s important to move quickly at this point.
Pour the peanut butter and honey mixture over the bowl of dry ingredients.
Want to save this for later?
Step 3:
Stir the peanut butter mixture into the rolled oats as quickly as possible. The mixture will likely start to harden as it cools, so be patient and keep stirring. I usually have to press the spatula into the mixture to keep everything moving, but eventually, the oats will be covered!
Transfer the granola bar mixture to the prepared pan, then use the spatula to press it firmly and evenly into the bottom. The firmer you press, the better the bars will hold together later.
Once the top looks smooth, place the pan in the freezer to chill for 10-15 minutes. This should give the bars sufficient time to firm up. As soon as the bars are firm in the center of the pan, you can remove the pan from the freezer and use the parchment paper to lift them from the pan.
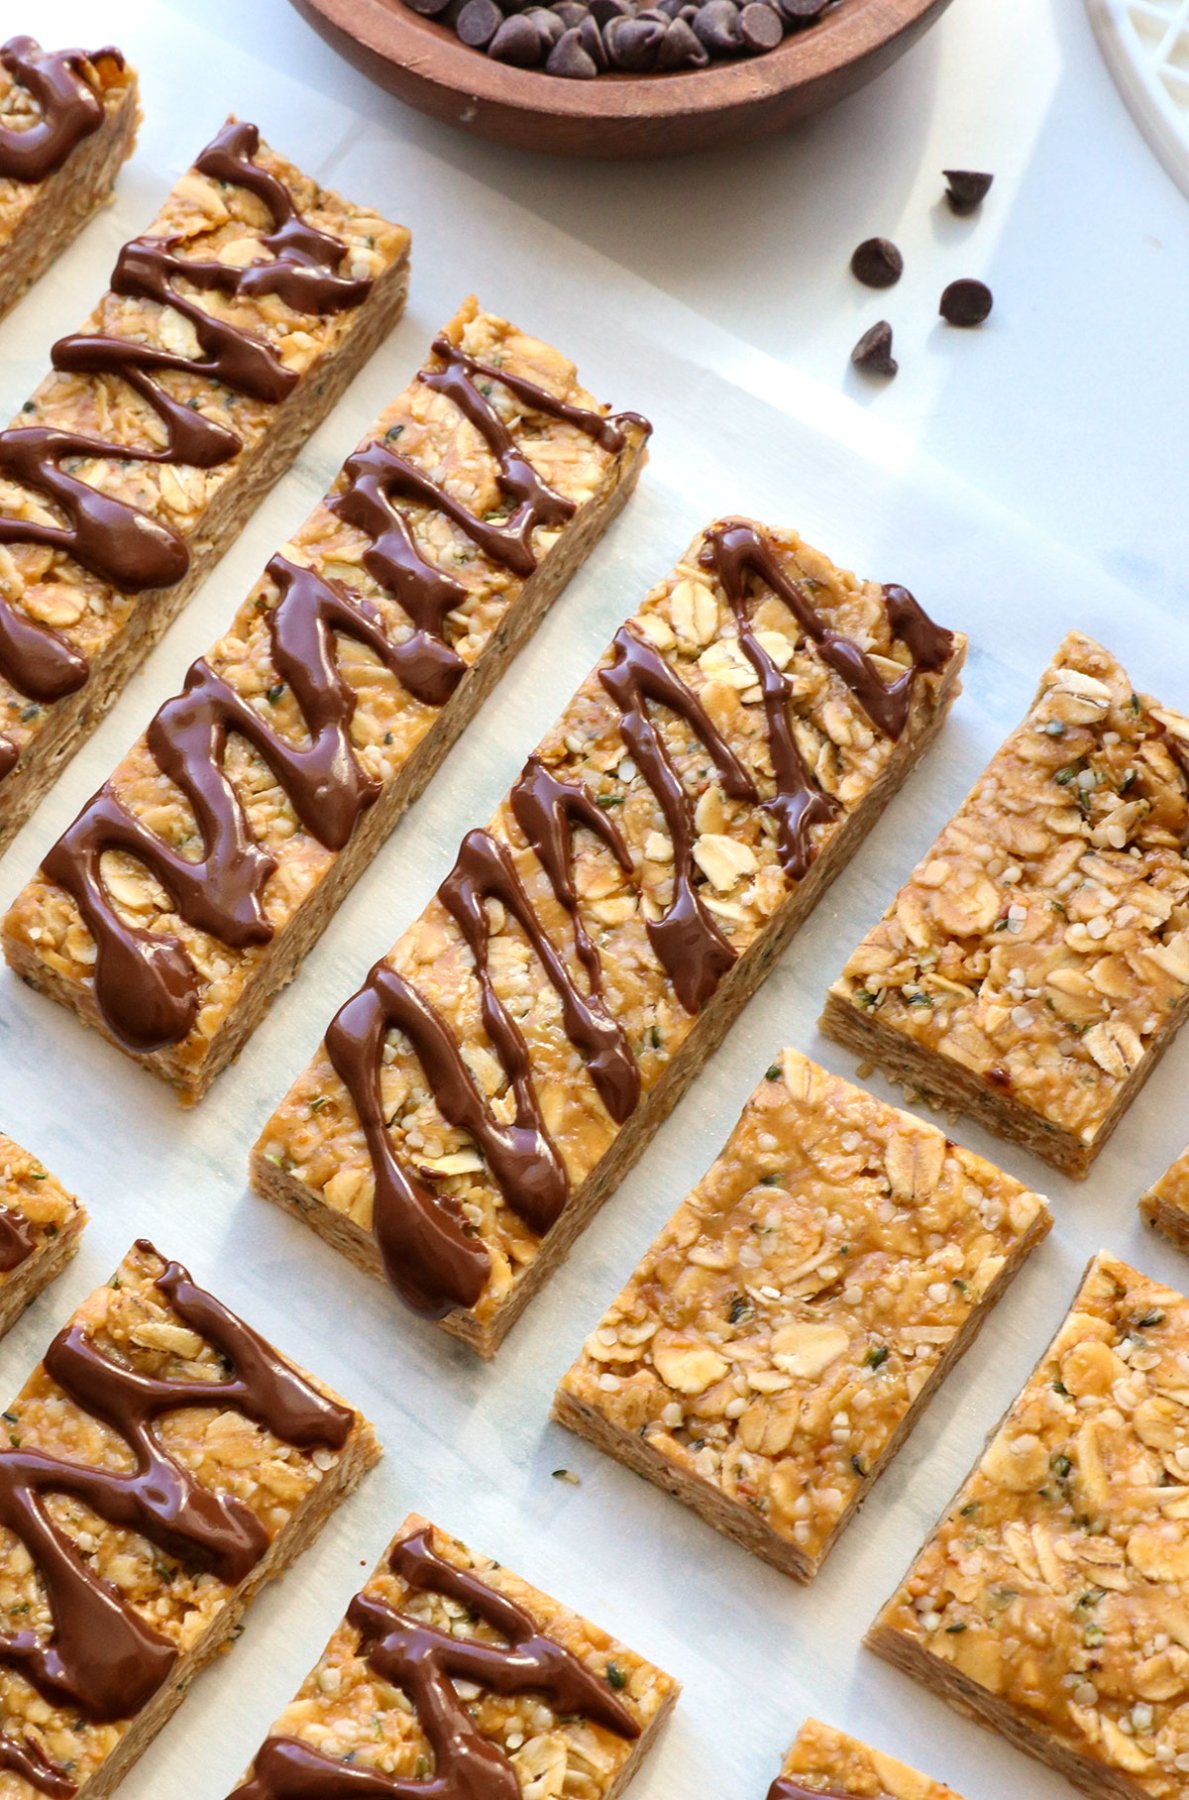
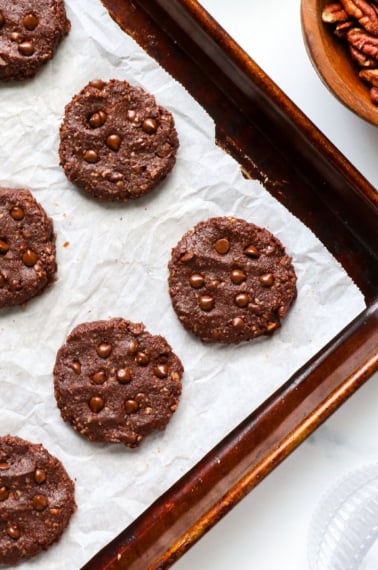
Use a sharp knife to slice 12 regular-sized bars. My family actually prefers to cut these in half again to make 24 bite-sized bars. (They don’t feel like such a commitment!)
Serving + Storage Tips
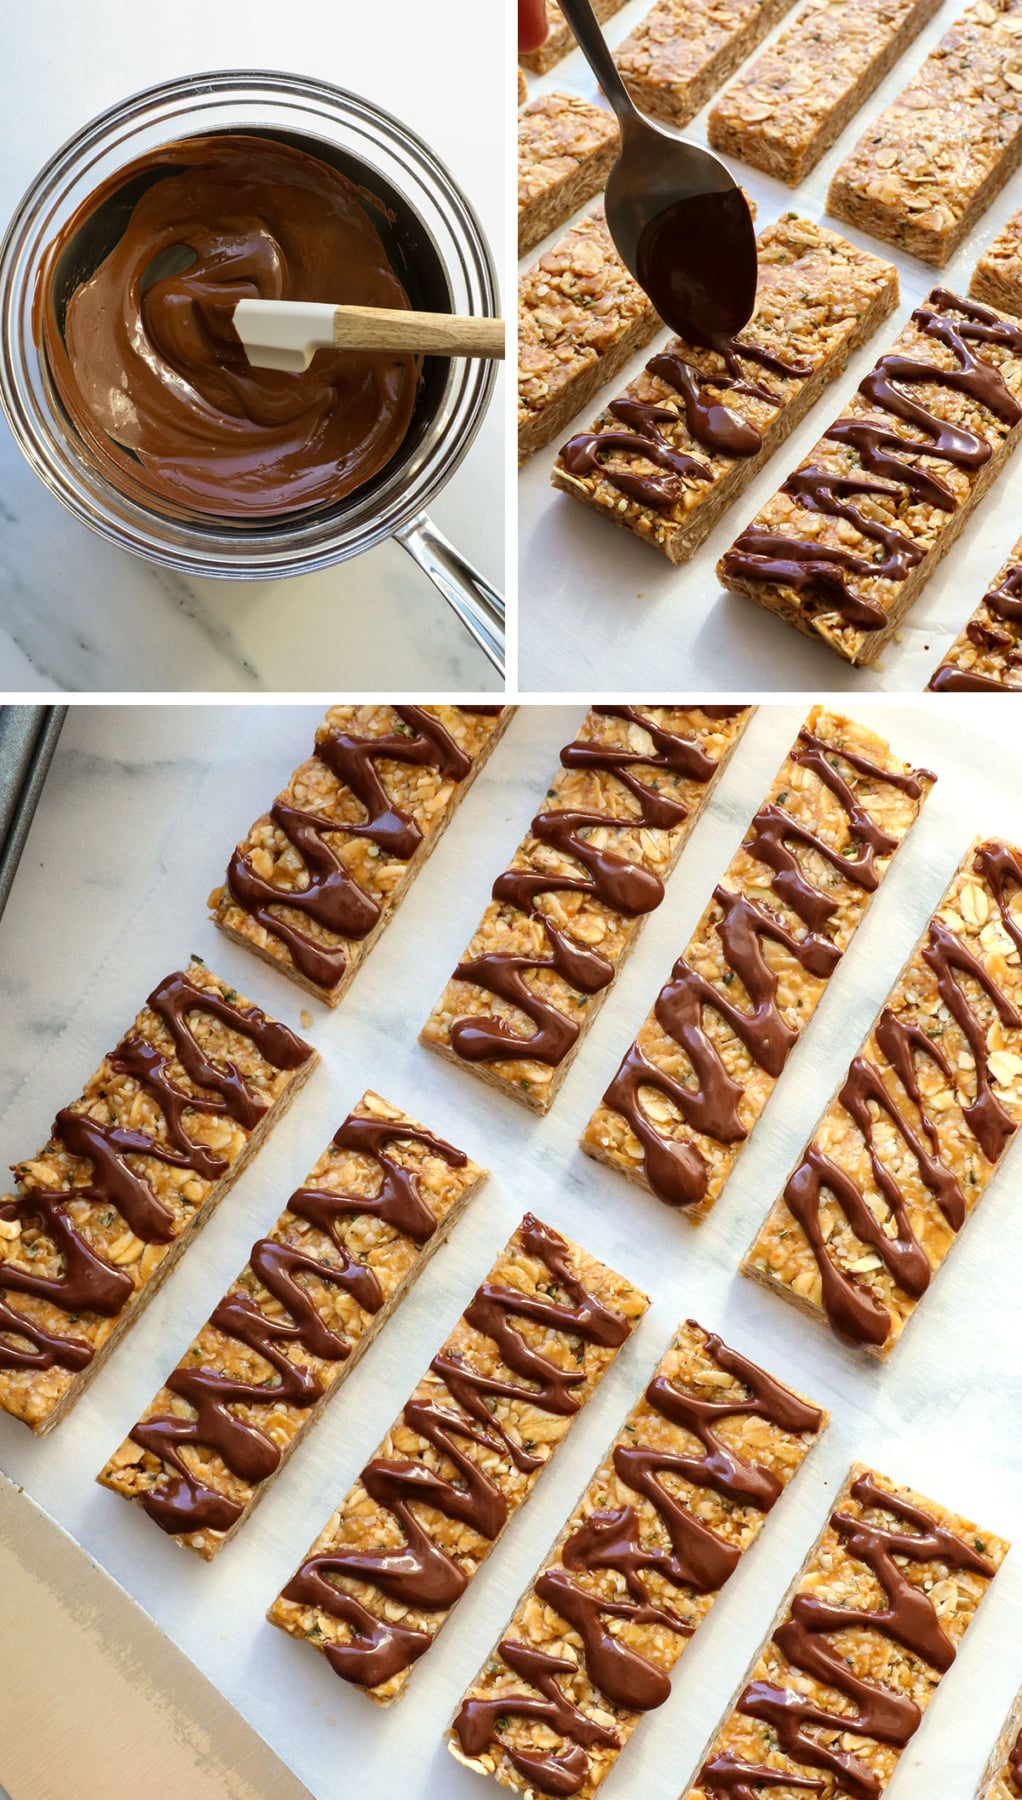
Once you’ve sliced the bars, you can add an optional chocolate coating if you like. I melt the chocolate chips in a double boiler. To make one, fill a small saucepan with an inch of water and bring it to a boil over high heat. Once the water is boiling, arrange a heat-safe bowl snugly over the pan and add the chocolate chips.
The heat from the steam below will gently melt the chocolate. When the chips look shiny, stir well until the chocolate is smoothly melted. If it’s looking thick, you can add a half teaspoon of coconut oil to help thin the consistency.
Drizzle the melted chocolate over the bars. If they are still cold from the freezer, the chocolate will start to firm up quickly. As soon as the chocolate is firm, the bars are ready to enjoy.
Storage Tip: These granola bars hold their shape and texture well at room temperature. I’ve left them in the pan on the counter for up to 5 days, and they are still great! That said, they will last much longer if you store them in the fridge. You can keep them in an airtight container for up to a month when chilled, or freeze them for up to 3 months.

Granola Bars Recipe (Honey Peanut Butter)
Ingredients
Granola Bars
- 1 ¾ cups old-fashioned rolled oats (certified gluten-free, if needed)
- ¼ cup hemp hearts (or any add-in; see notes)
- ½ cup all-natural peanut butter
- ½ cup honey (or maple syrup)
- ½ teaspoon fine sea salt
- ¼ cup dark chocolate chips (melted; optional topping)
Instructions
- Pour the oats, hemp hearts (or other mix-in), and salt into a large bowl and stir well, then set it aside. Lightly grease an 8-inch square pan with cooking spray and press a square of parchment paper into the bottom. (The oil will hold the parchment paper in place, so it doesn't move around later.) Make sure these two things are done first, before you move to the next step, because this recipe moves quickly.
- In a small saucepan over medium-high heat, bring the honey to a boil. As soon as you see large bubbles forming around the edge of the pan, set a timer and let the honey boil for 1 minute without stirring.
- Remove from the pan of honey from the heat and stir in the peanut butter immediately. As soon as the mixture is smooth, pour it over the oats.
- Use a spatula to stir quickly, coating the oats evenly with the peanut butter mixture. It will harden as it cools, so it may become more difficult to stir as it cools down. (Just be patient and keep stirring.)
- Transfer the mixture to the prepared pan, and press it very firmly into the bottom. Place the pan in the fridge for freezer to cool quickly. Once they feel firm to the touch (about 10 minutes in the freezer) then use the parchment paper to lift the bars out of the pan and slice them into 12 pieces. You can also make smaller, bite-sized pieces by cutting those bars in half.
- Drizzle the top of each granola bar with melted chocolate, if desired. Once the chocolate has hardened, they are ready to serve. These granola bars can be kept at room temperature for up to 5 days, or in an airtight container in the fridge for up to 1 month. You can also freeze them for up to 3 months if you'd like to make a larger batch. They can thaw overnight in the fridge.
Video
Notes
Nutrition
More Recipes to Try
- Banana Snack Cake
- Peanut Butter Protein Balls (no protein powder)
- No-Bake Protein Balls
- Date Energy Balls
- Peanut Butter Banana Muffins
If you try this granola bar recipe, please leave a comment and star rating below letting me know how you like them.


I made these tonight! They truly are easy and all ingredients are staples in my house so no trip to the grocery store needed. They are delicious and already I’m planning to make them again.
These were great! Thank you! I made your mummy ones for Halloween (same recipe) and they were a hit!
Love this recipe. I am wondering for the peanut butter here if it’s best to use salted or unsalted peanut butter?
There are so many options now at the store 🙃
Hi Alex! I prefer salted peanut butter because it balances the sweetness of the honey. But either option will work.
Such a delicious and simple recipe to make. My husband, kids (2, 5, 13, 18, & 21 yo) and I love it so much that I have now started to gift them to our families. Highly recommend!
Thank you for sharing such a wonderful recipe from your home to ours.
bars were great, simple and very flavorful. Really appreciate the protein. thank you for sharing
I am making these bars for the second time in a week- the texture is unlike any others I have made, maybe because of boiling the honey?! We love them. I used hemp hearts, cashews and dried cherries.
We have been making these for years. I double the batch and that’s not enough for our large family. Very rarely do we find a recipe that stands the test of time. Thank you so much from our family to yours!
Super easy to make & delicious. I added pistachios & dried cherries & also used natural peanut butter. Will freeze most of bars so I don’t eat them all.
I’ve made these several times and we love them! I change between bags of salad toppers (one blueberries and honey pecan another with cranberries, pepitas and sunflower seeds) as my add-ins and one bag can make 1-2 recipes. Little sea salt on top is a perfect balance. Thank you so much for sharing the recipe!!
I like this recipe. Not so much the peanut butter. I used almond butter. I followed the recipe but the bars are sticky. Any suggestions?