This post may contain affiliate links. Please read my disclosure and privacy policy.

I originally posted this recipe back in 2011, when I learned the secret to making a cauliflower pizza crust that isn’t soggy. (Hint: you need to squeeze out the moisture from the cooked cauliflower before making your crust!)
Now that we’ve been making this pizza crust for over a decade, I’ve learned some time-saving tricks, like using frozen cauliflower to skip the cooking process. Sometimes you can even find frozen riced cauliflower, which lets you skip using the food processor.
Be sure to read all the tips below if you’d like to make a frozen pizza crust for future use, or if you need to make any substitutions.
⭐⭐⭐⭐⭐Featured Reviews
“Made EXACTLY as recipe states. This was phenomenal! The last recipe for the crust I tried left a lot to be desired. This has an excellent smell, taste, and mouth-feel. The texture is perfect!”
-Kristy
“I have tried a few different cauliflower crust recipes and this is by far the best one! I have made it exactly as the recipe indicates many times and it always turns out perfect.”
– TP
Ingredients for Cauliflower Pizza
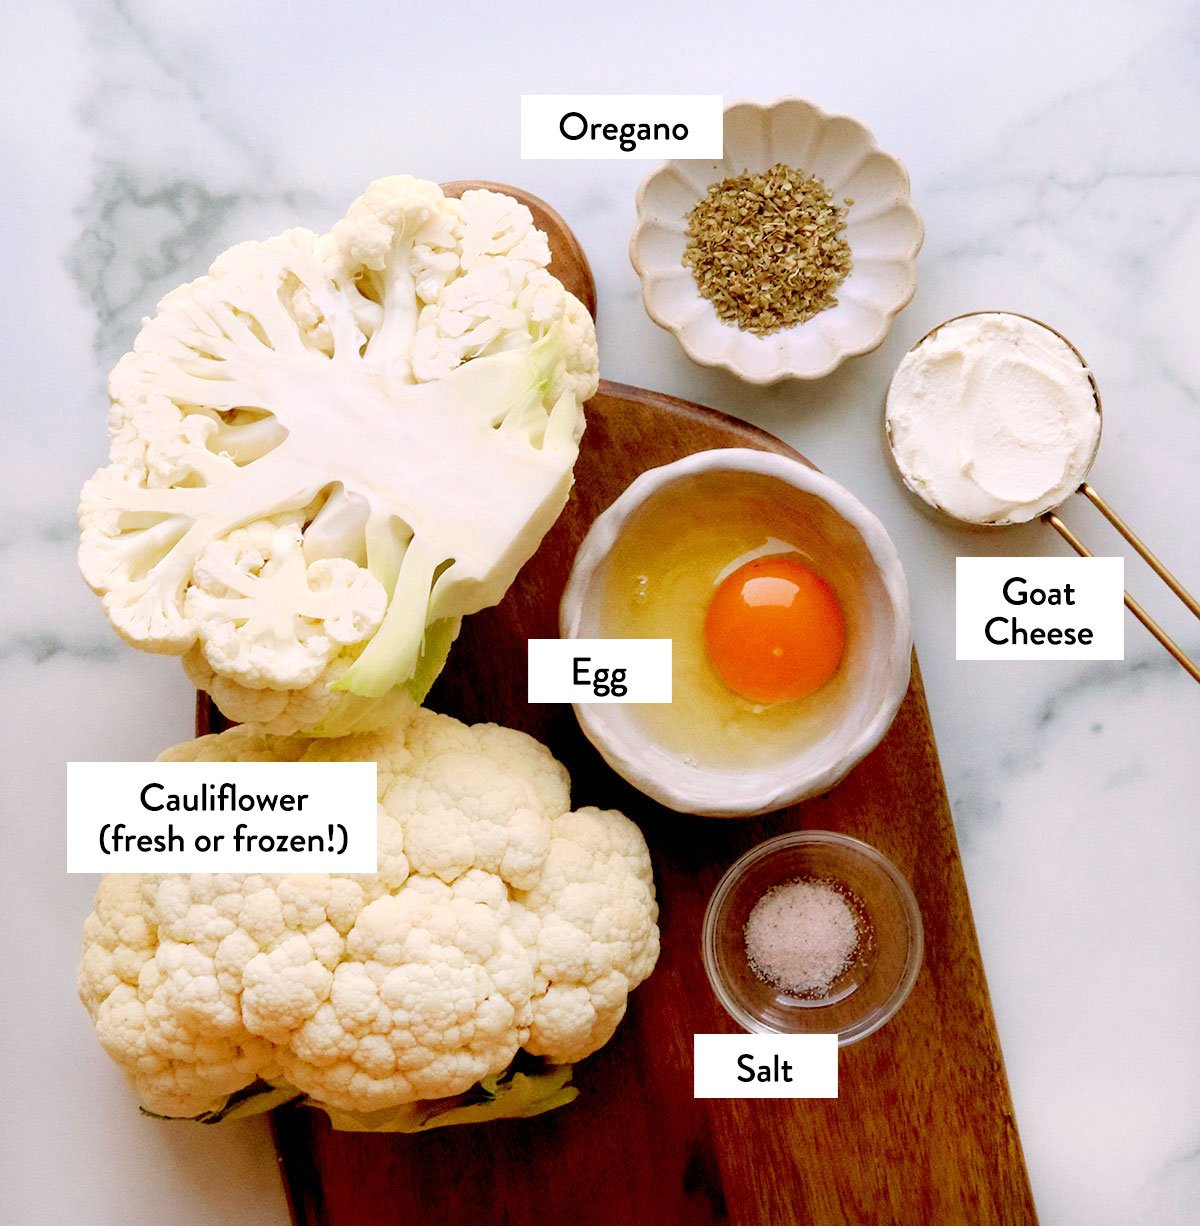
- Fresh or Frozen Cauliflower. While you can certainly make this recipe with fresh cauliflower florets, it’s 100% easier if you start with frozen cauliflower florets that have been thawed. (You can either let the bag thaw in the fridge overnight or warm it up to thaw it faster.) Your life will be even easier if you can find frozen, riced cauliflower at the store. I’ll walk you through all the variations I’ve tested below.
- Egg. This adds protein and holds the crust together. I don’t recommend using an egg substitute for this recipe, but I have tested a vegan Cauliflower pizza crust if you need an egg-free recipe.
- Cheese. Even if you’re not the biggest fan of goat cheese, soft goat cheese (also known as chevre) creates the best texture for cauliflower pizza crust. I highly recommend trying the recipe as written, but other varieties of cheese will work, too. Read the comments below for feedback on mozzarella or Parmesan.
- Spices. I think pizza crust tastes best with a little extra flavor. Adding oregano and salt boosts the overall flavor so you don’t feel like you’re eating a crust made mostly of cauliflower.
How to Make Cauliflower Pizza Crust
Step 1:
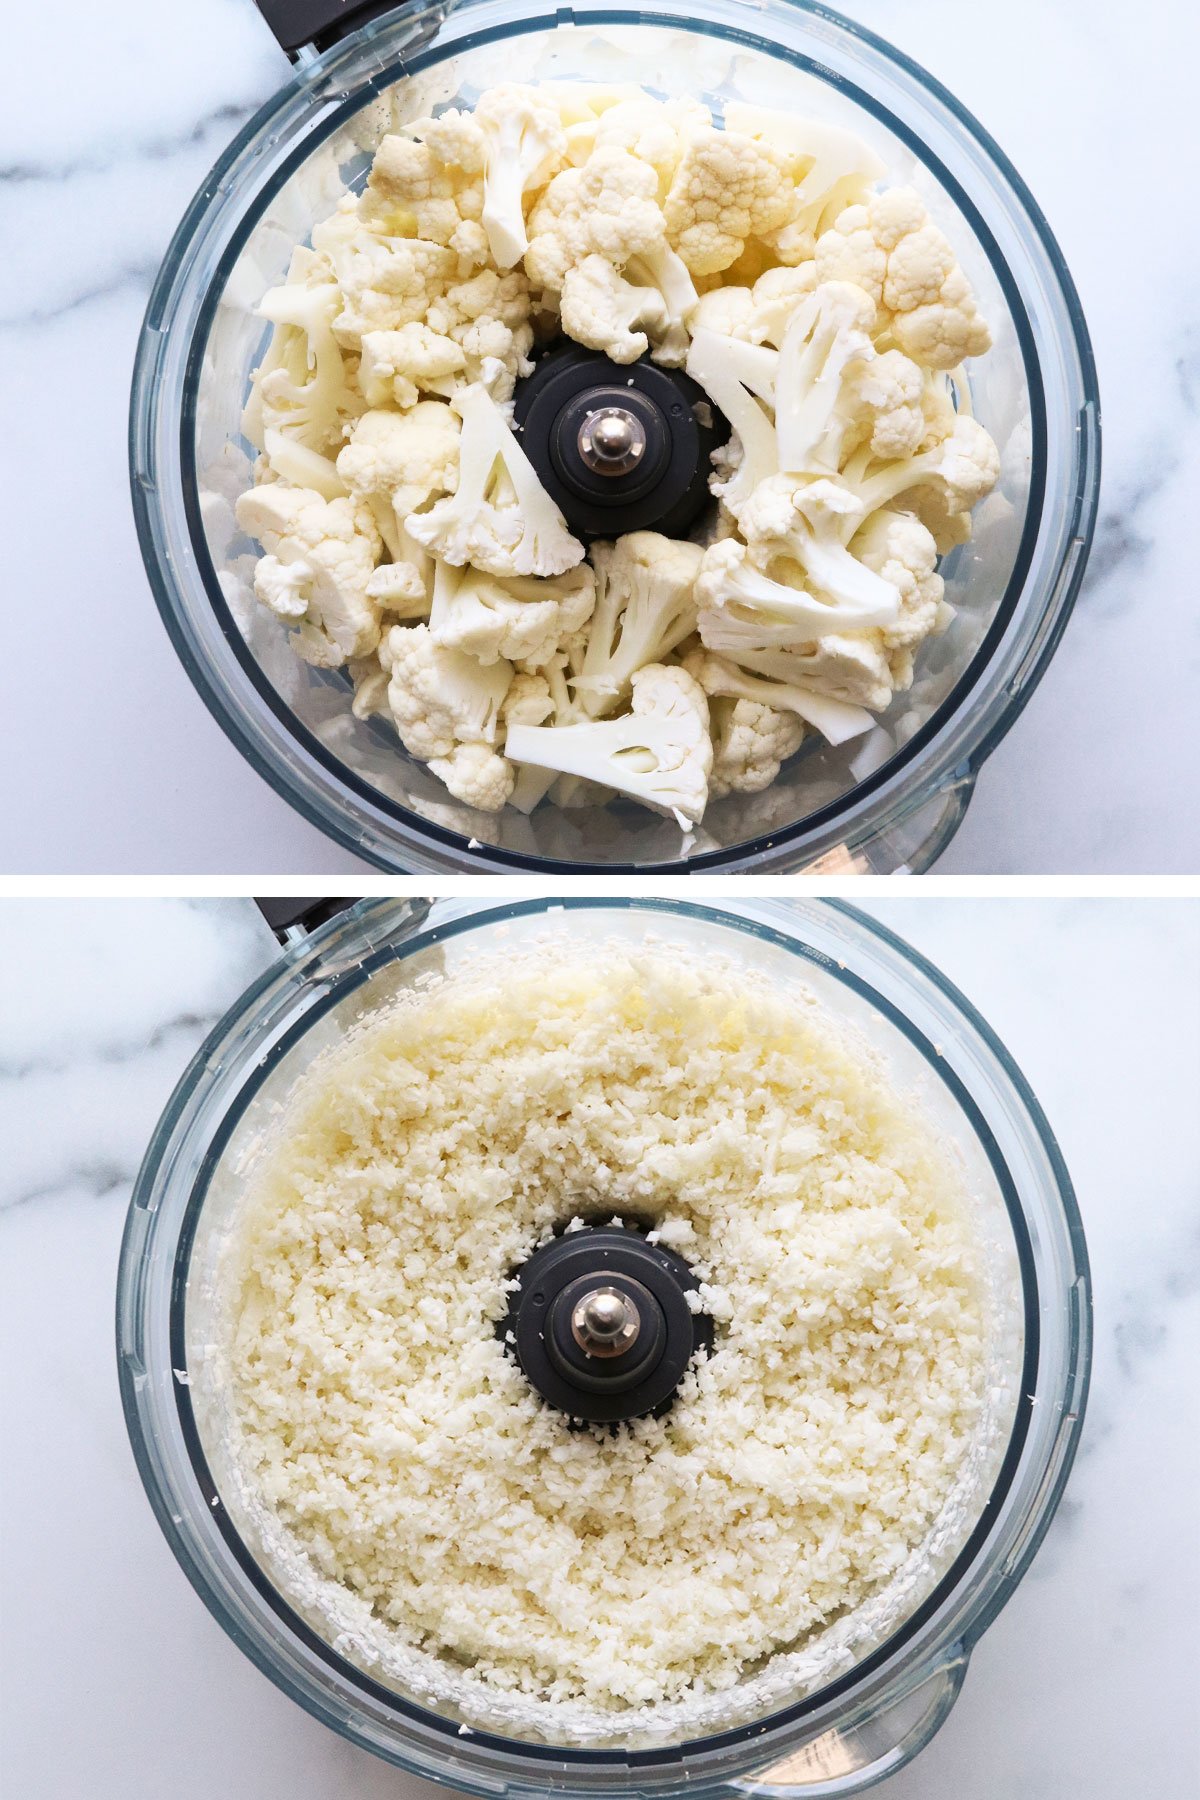
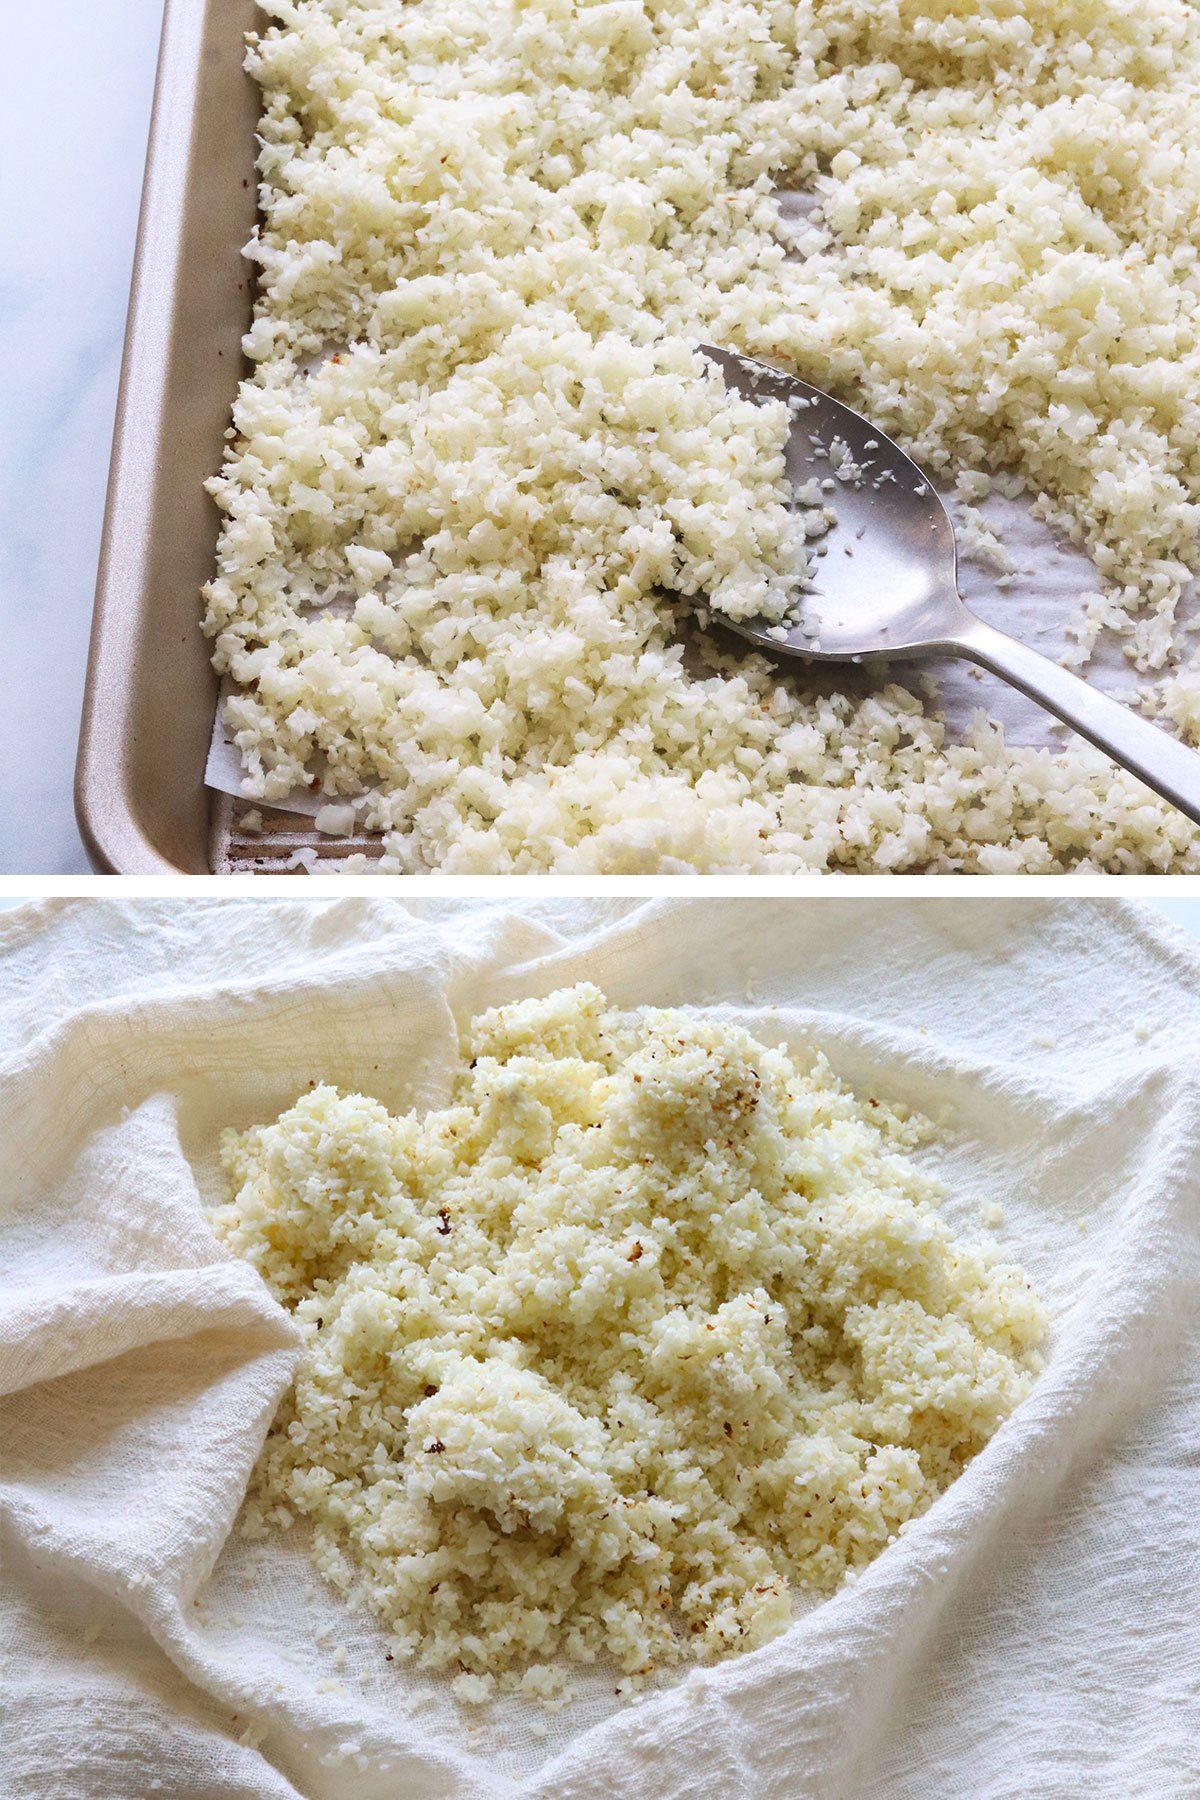
Preheat the oven to 400ºF and line a large baking sheet with parchment paper. If you’re using fresh cauliflower, place the cauliflower florets in a food processor fitted with an S-blade. (Mine is a 12-cup size.)
Briefly pulse the florets until they have a rice-like texture.
Step 2:
Transfer the cauliflower rice to the prepared baking sheet and spread it out into an even layer. Place it in the oven to soften and cook for 15 minutes.
Alternatively, you can place the cauliflower in a covered microwave-safe bowl and cook for 4 to 5 minutes on high to steam it. Or, you can cook it in a large skillet with a 1/4 cup of water for 8 to 10 minutes, until it has softened and the water has evaporated.
Once the cauliflower has cooked, let it cool for 10 minutes, or until you can safely handle it without burning yourself.
Time-Saving Tip
If you buy frozen cauliflower florets, you can simply let them thaw overnight in the fridge before making this crust. They will have a tender texture, so you can skip the cooking step altogether. Simply pulse them in a food processor and then wring out the moisture as directed.

Step 3:
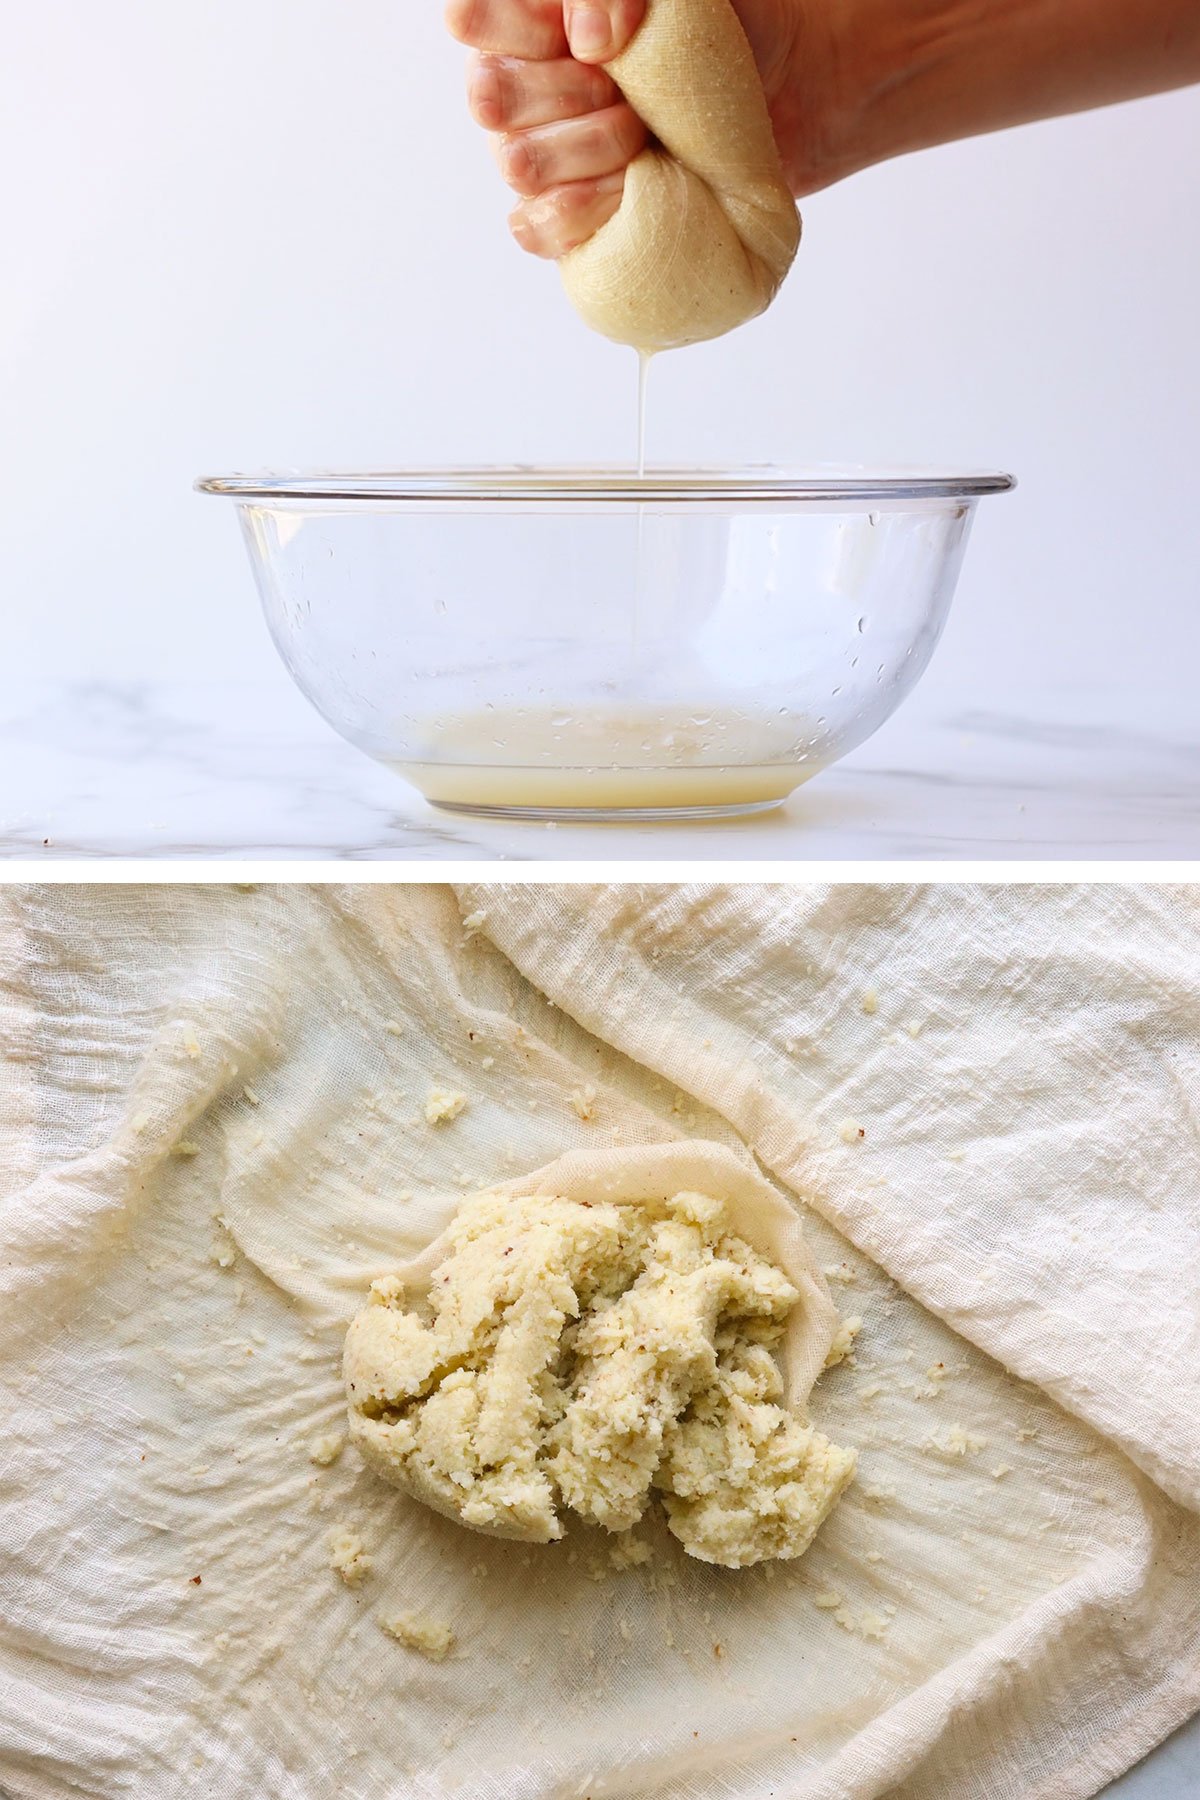
Transfer the riced cauliflower to the center of a clean dish towel or cheesecloth. Arrange the towel filled with cauliflower over a small bowl, then squeeze as much liquid as possible from the cooked cauliflower.
It might not feel like there’s excess moisture at first, but you may be surprised by how much liquid is released! (There should be at least 3 to 4 tablespoons of liquid in the bowl.)
Step 4:
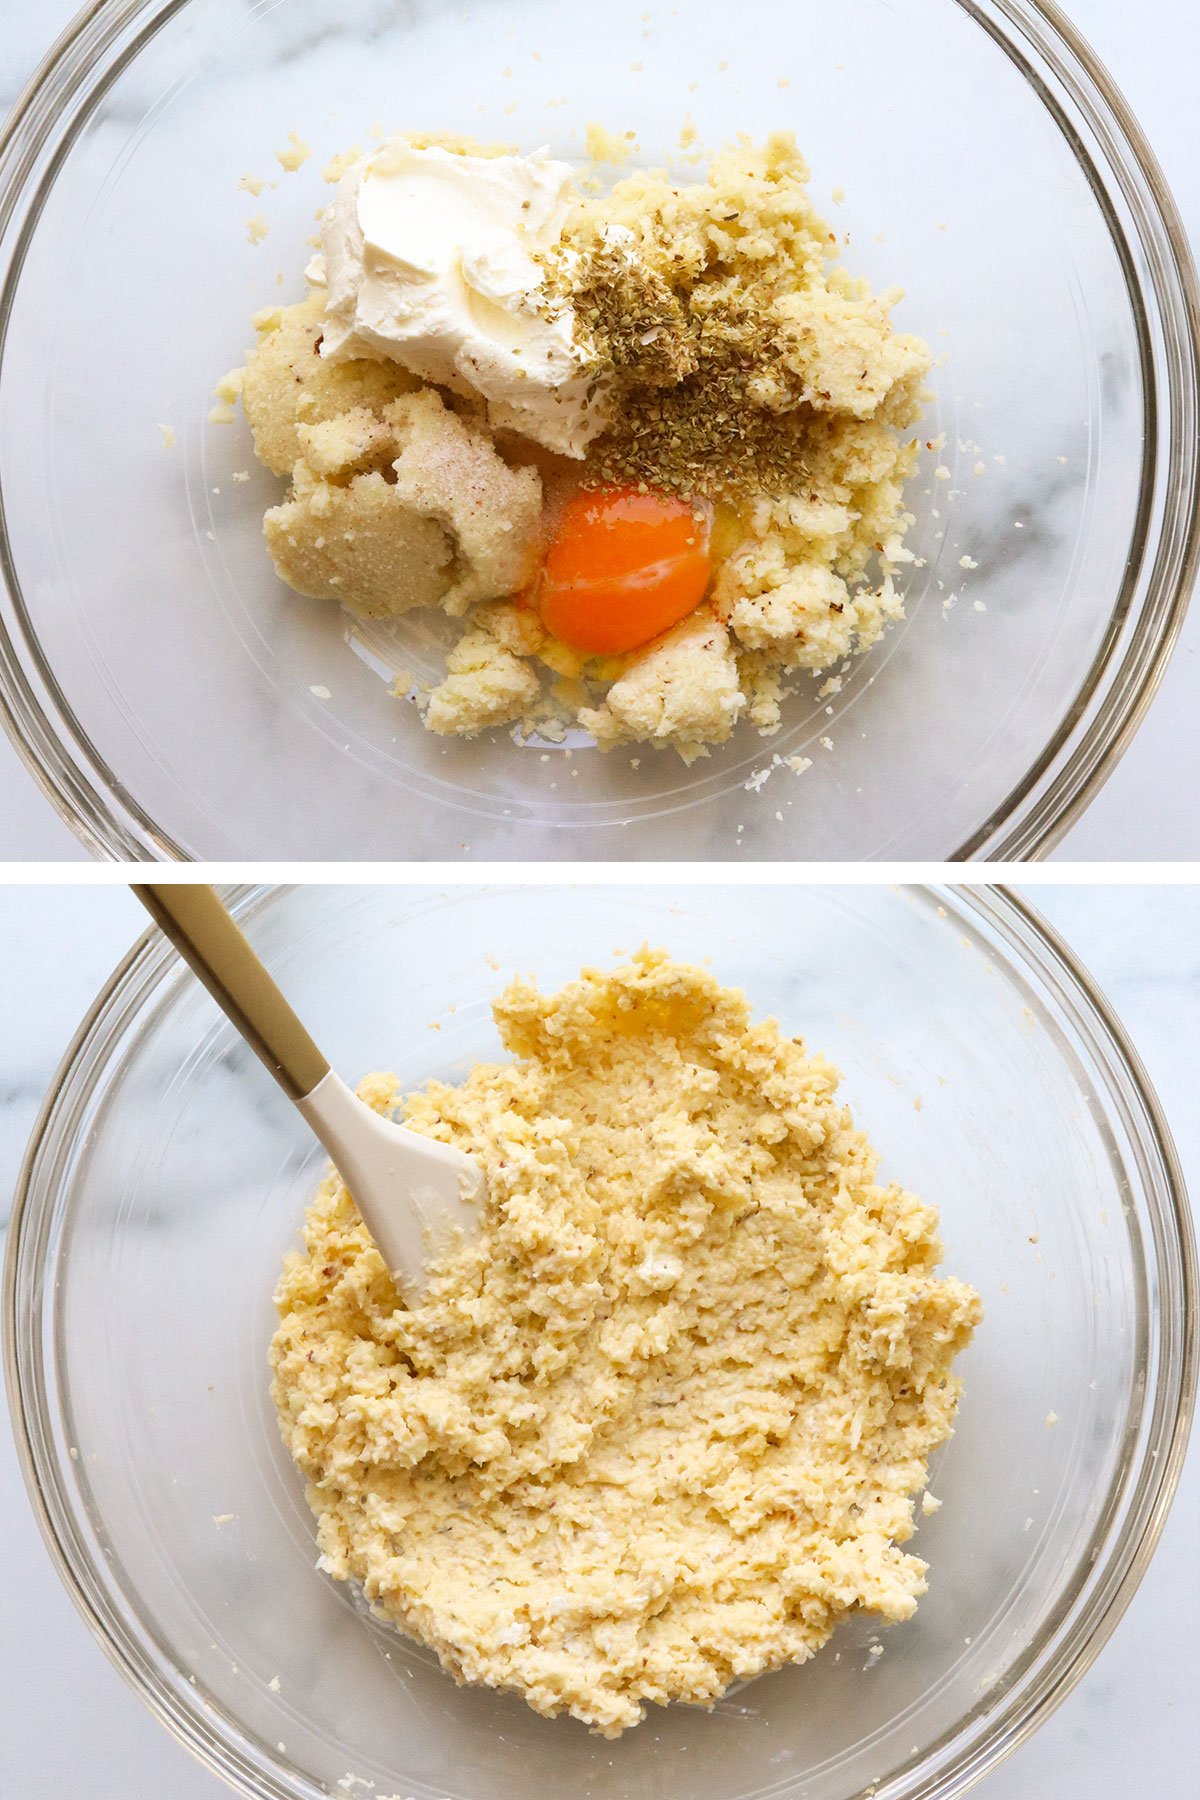
Place the cauliflower rice that you just squeezed into a large bowl, then add in the egg, cheese, oregano, salt, and a pinch of black pepper, if desired.
Use a spatula to stir well until the cauliflower mixture looks relatively uniform.
Step 5:
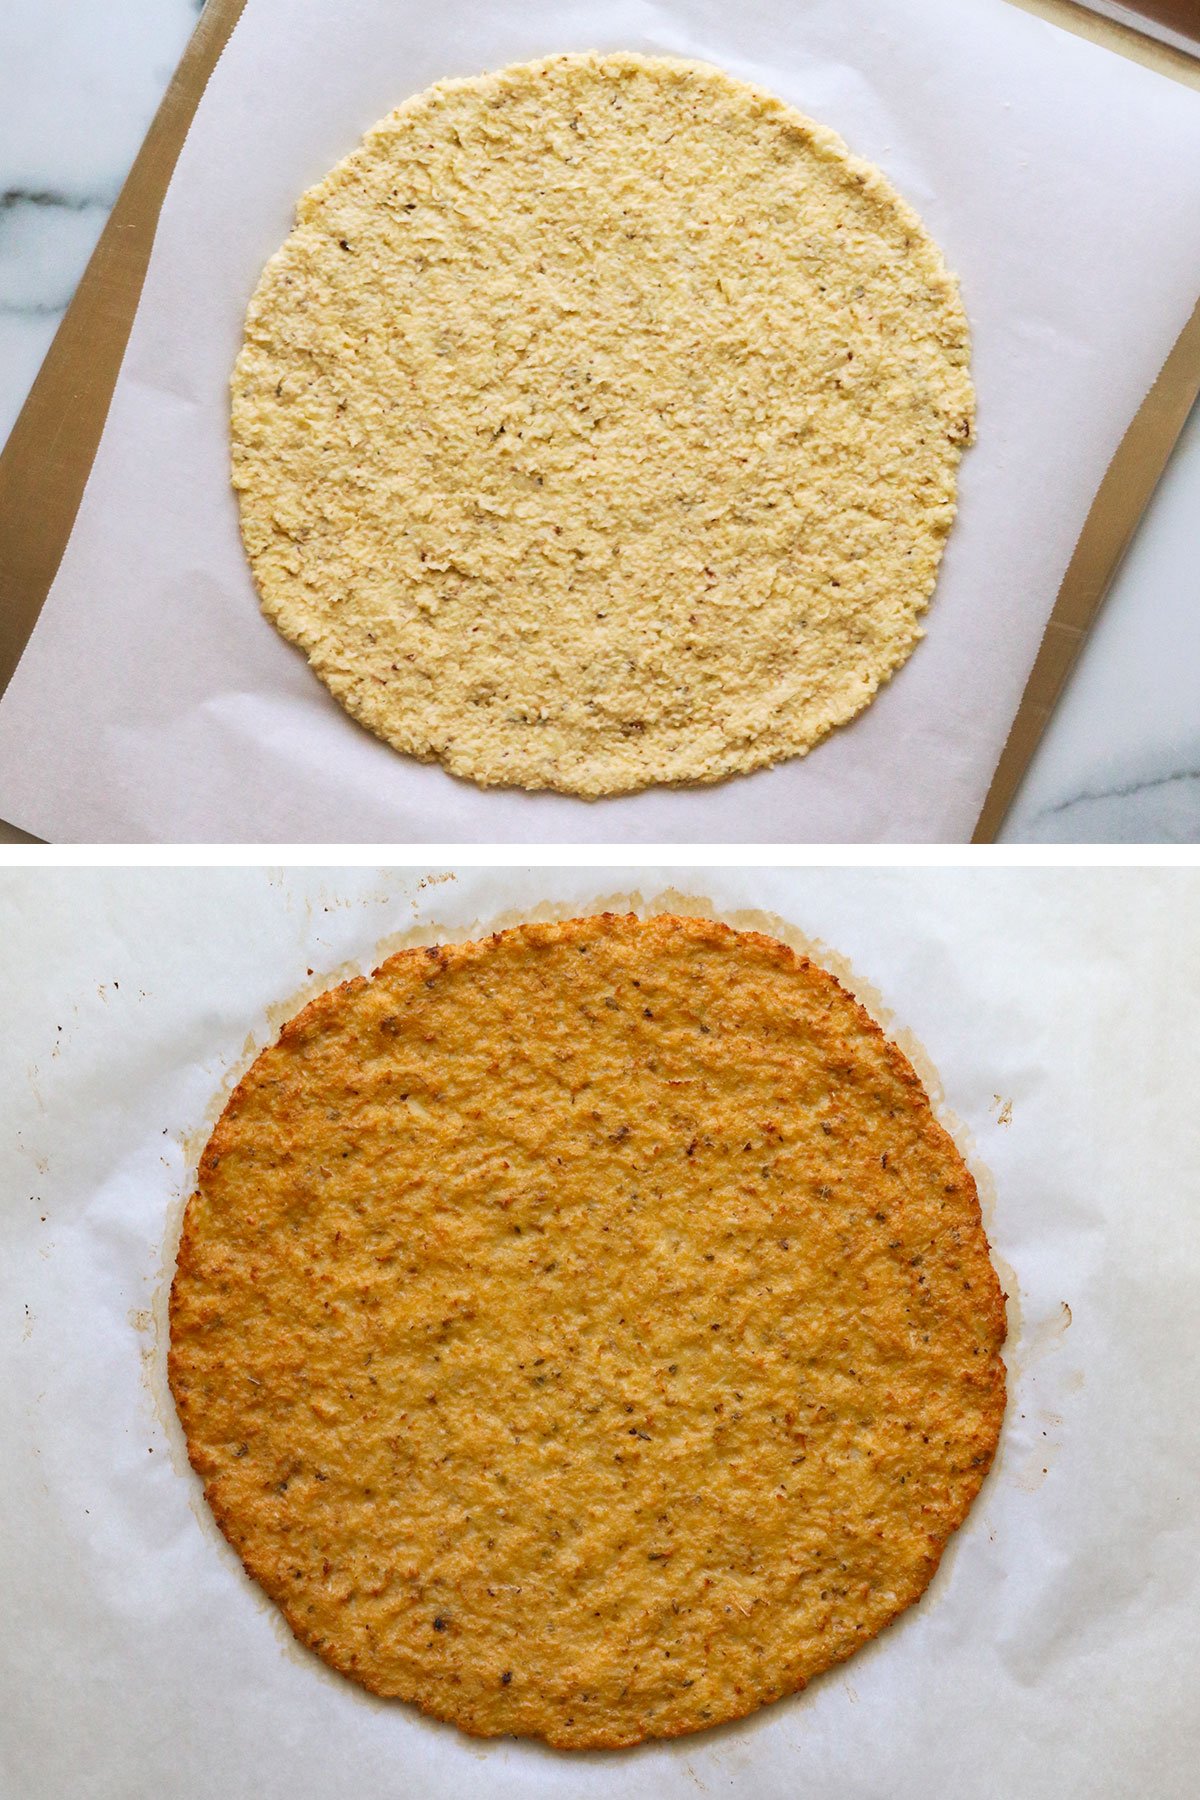
Arrange a fresh piece of parchment paper on the large baking sheet, if needed, then place the cauliflower mixture in the center of the pan.
Use your hands to gently press the cauliflower pizza dough into a round pizza crust, about 10 to 12 inches wide. It will be thin, but there shouldn’t be any holes in the crust.
Note: Get your hands wet if the crust is sticking to your fingers; wet hands help prevent sticking!
Step 6:
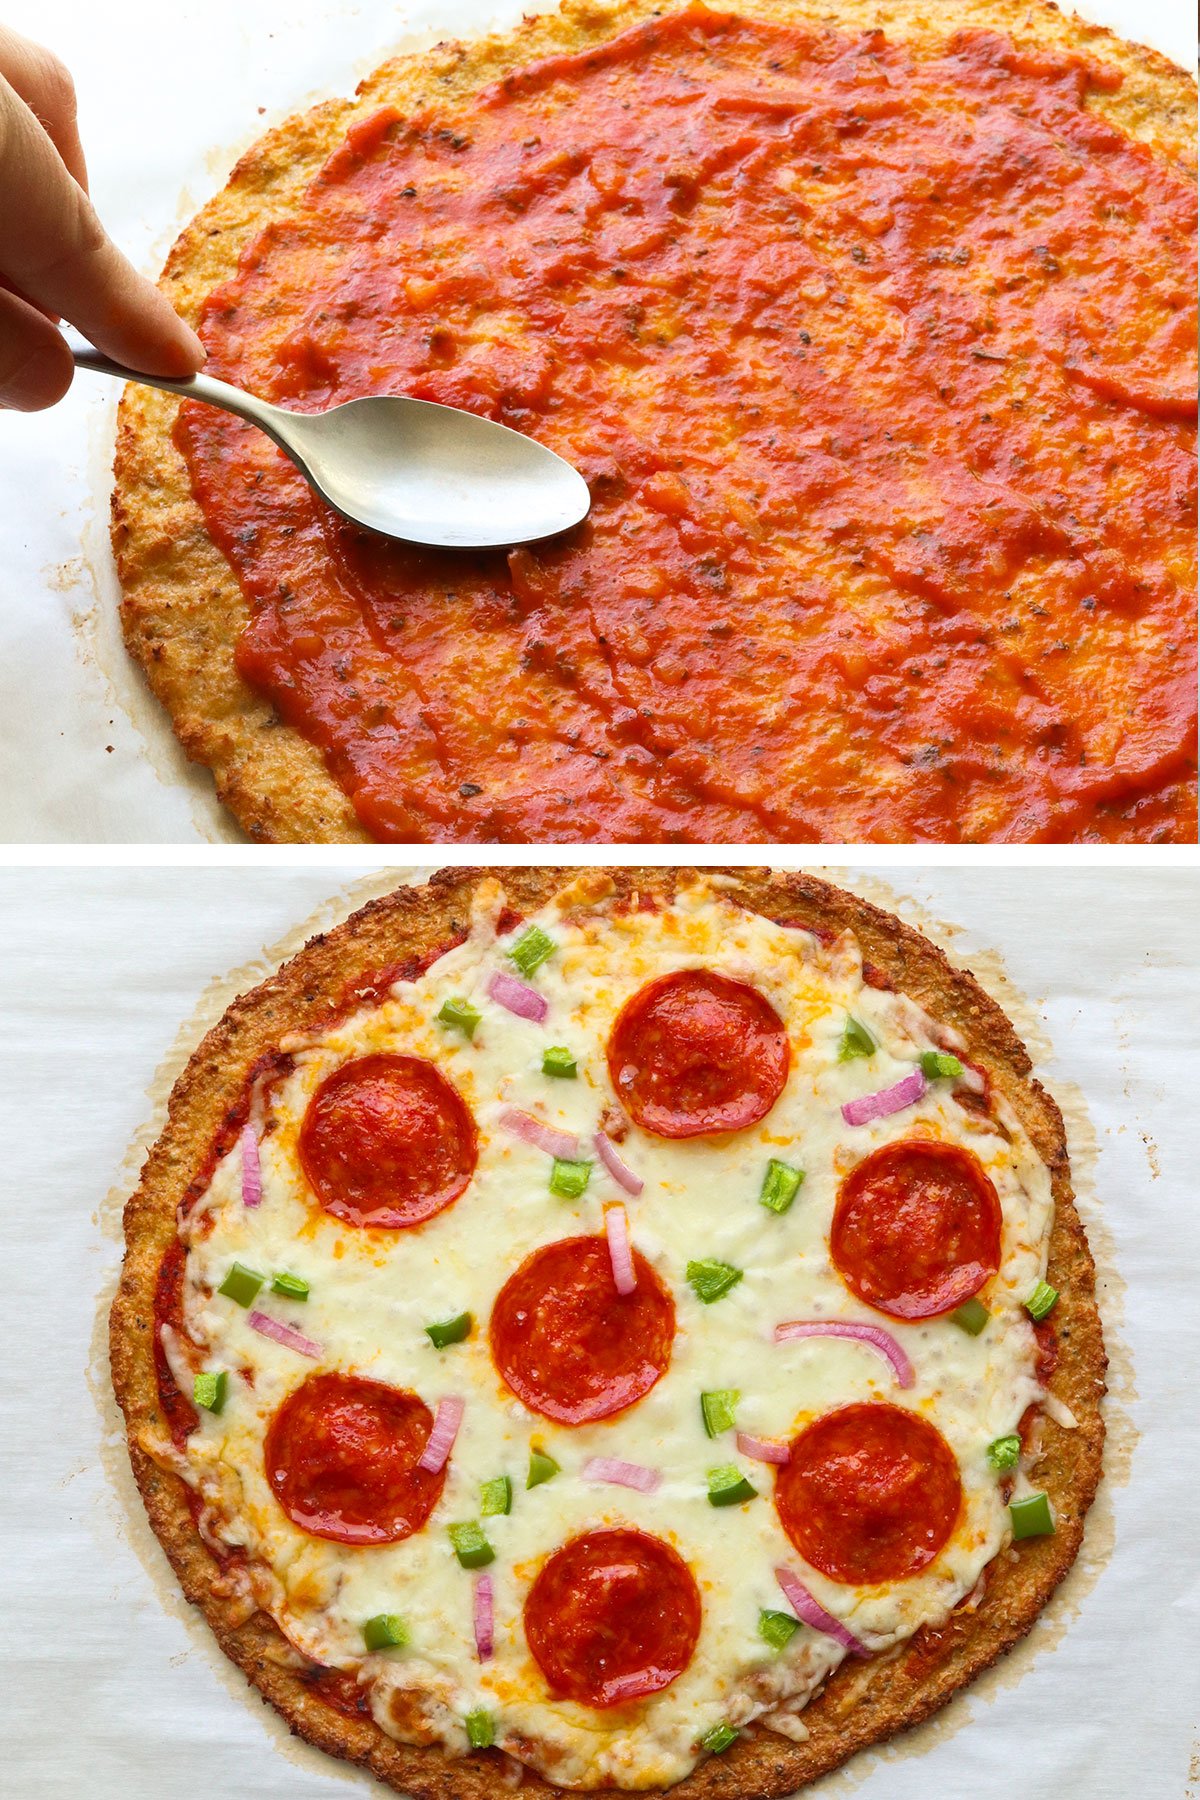
Place the cauliflower crust in the oven and bake at 400°F for 30 minutes, or until golden brown. Then it’s ready for toppings!
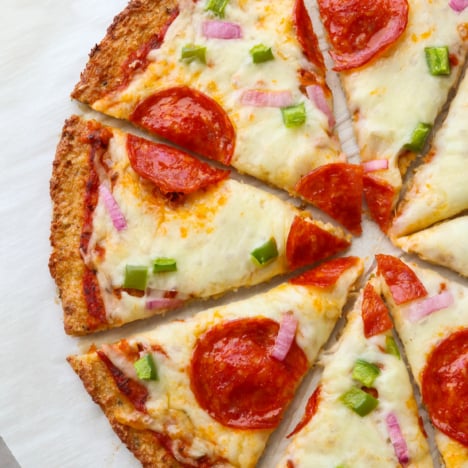
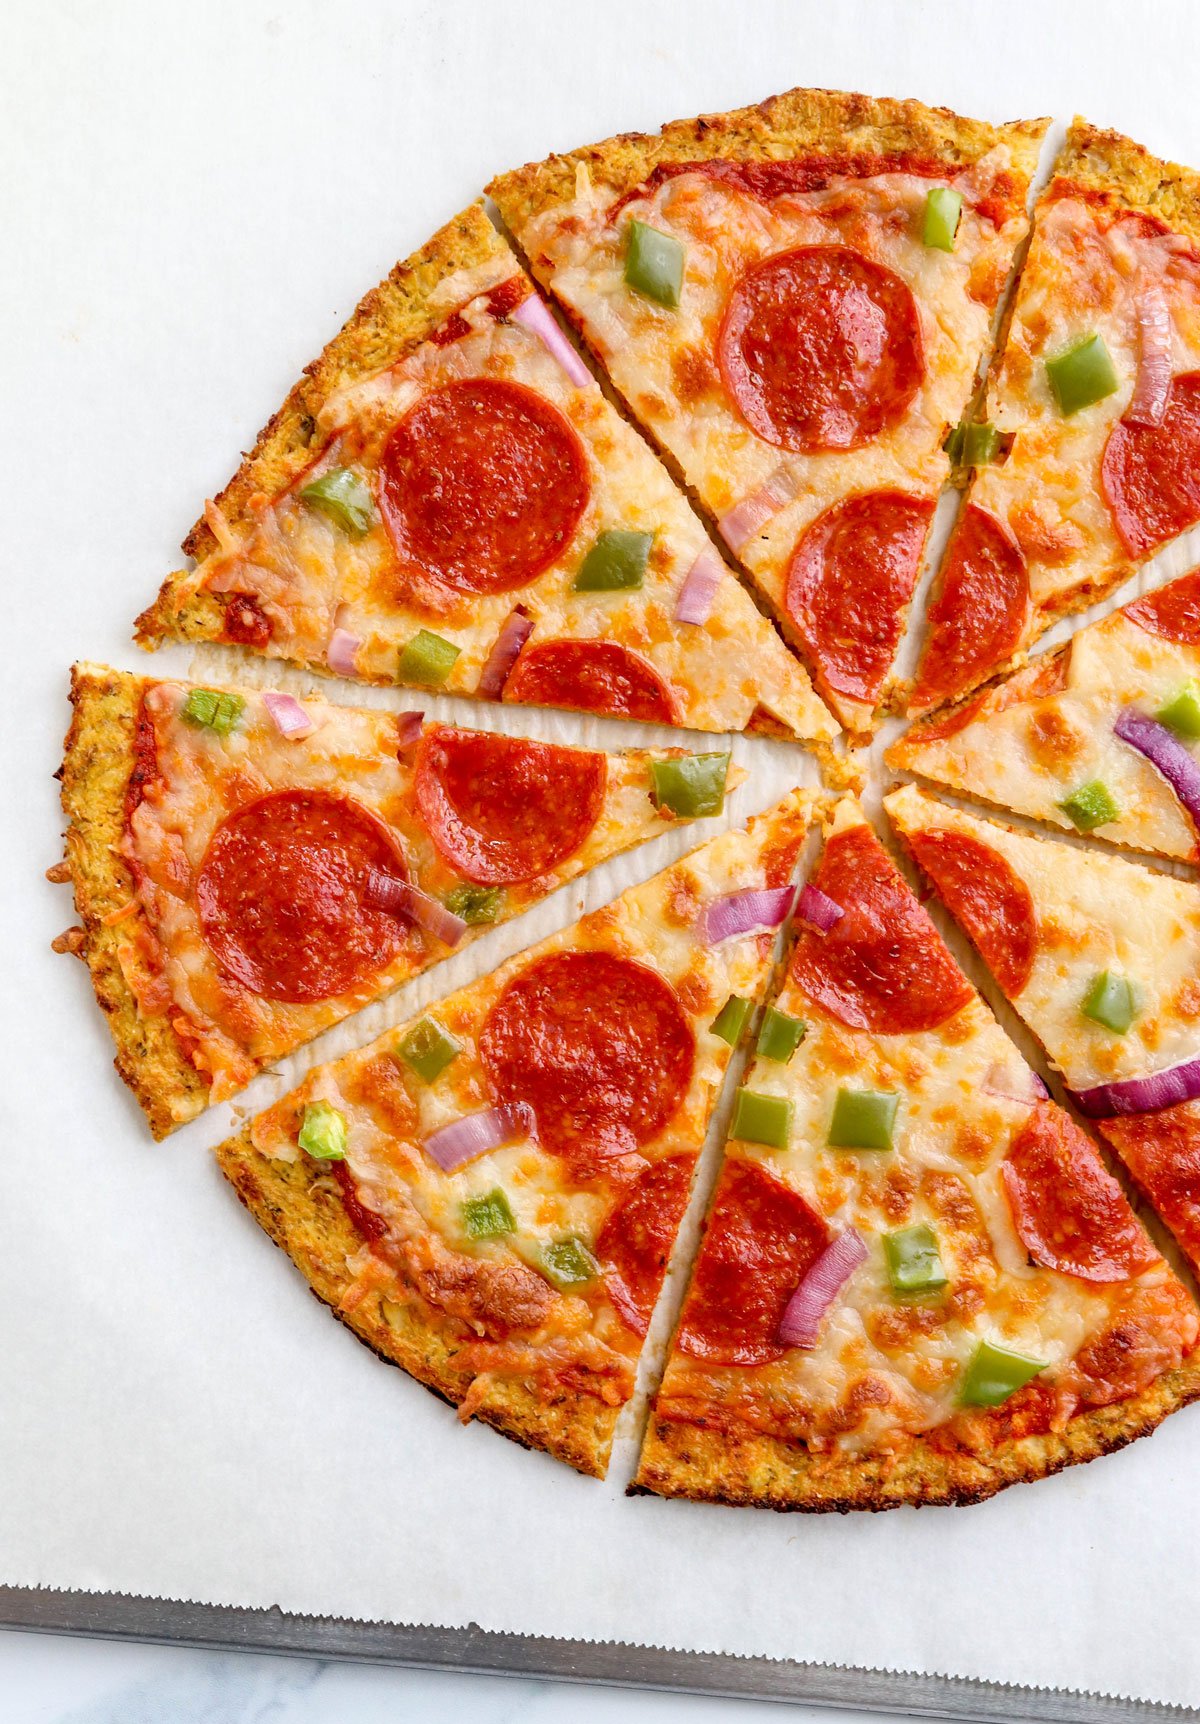
Add a thin layer of pizza sauce, mozzarella cheese, and any toppings you love, like pepperoni, mushrooms, onions, fresh basil, or olives.
Return the pizza to the oven to bake until the cheese has melted, about 10 more minutes. You can turn on the broiler and watch closely if you want the cheese to turn golden even faster.
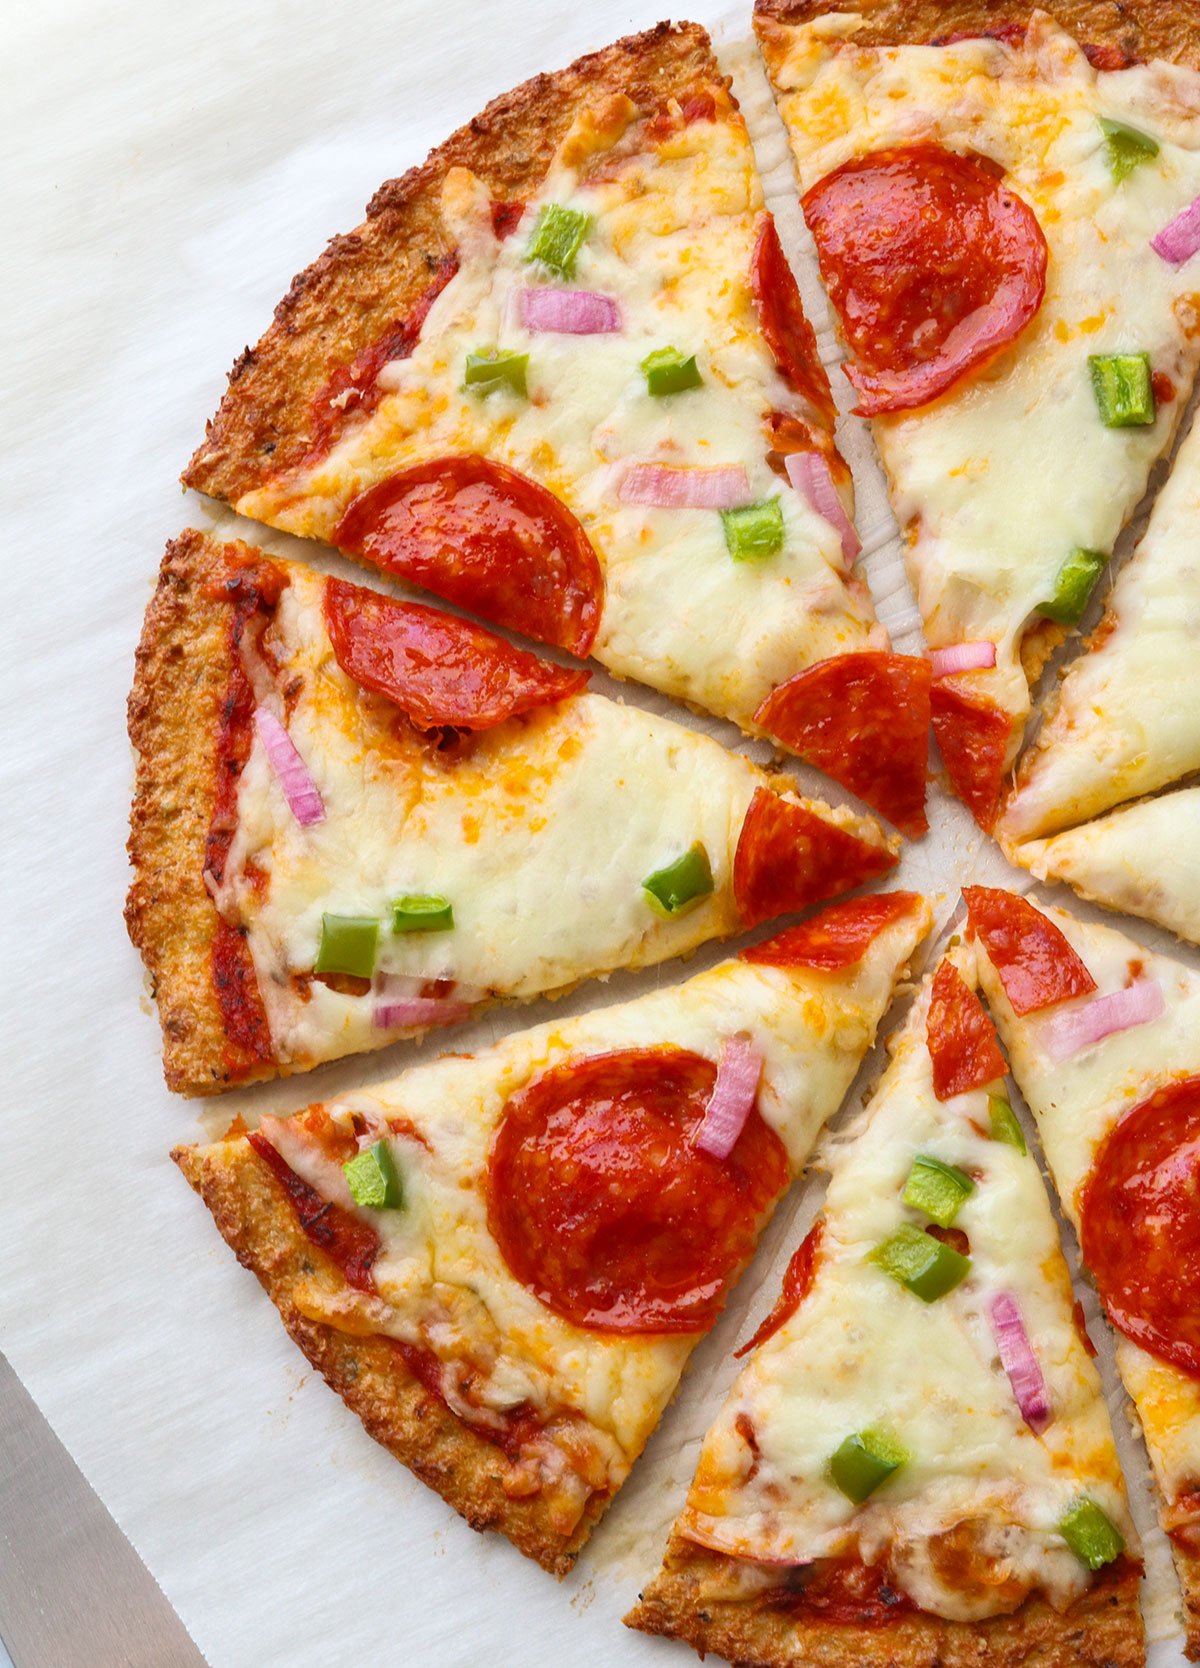
Let the pizza cool for 5 minutes, then cut it into slices. Because you took the time to remove excess moisture, the crust should be easy to pick up with your hands!
Storage + Reheating Tips
Leftover pizza slices can be stored in an airtight container in the fridge for up to 5 days. Or you can freeze them for up to 3 months.
If you’d like to freeze a whole pizza crust, bake the crust as directed for 30 minutes, then let it cool completely. You can freeze the pizza crust tightly covered for up to 6 months. Since you’re already cleaning your food processor after this, you might as well make a double batch!
When you’re ready to bake your frozen cauliflower pizza crust, place it on a baking sheet and add your toppings. There’s no need to thaw the crust before baking. Bake at 400ºF for 10-15 minutes, or until the cheese is golden and bubbly.

Cauliflower Pizza Crust
Ingredients
- 1 pound cauliflower florets (or thawed from frozen; see notes)
- 1 large egg , beaten
- ⅓ cup soft goat cheese (or grated Parmesan)
- 1 teaspoon dried oregano
- ¼ teaspoon salt
Instructions
- Preheat the oven to 400ºF. If the cauliflower isn't already riced, add the cauliflower florets into a food processor and pulse briefly, until it has a rice-like texture. Line a large baking sheet with parchment paper, then spread the cauliflower rice out in a single layer. Bake for 15 minutes, or until the cauliflower is tender.
- If you're using frozen cauliflower, be sure that it is completely thawed, and process it into a rice-like texture using a food processor. (Alternatively, you can start with frozen cauliflower rice that has been thawed, to skip the food processor step.) There is no need to cook thawed frozen cauliflower so it will save you time! Tip: You can use up to 1 ½ pounds of cauliflower if you want to use two 12-ounce bags. This crust will still hold together well!
- Once the riced cauliflower has been cooked (or thawed), transfer it to a clean, thin dishtowel. Wrap up the steamed rice in the dishtowel, twist it up, then SQUEEZE all the excess moisture out! (Be careful if your cauliflower is still hot; let it cool before handling.) A lot of extra liquid will be released, which will help you avoid a soggy pizza crust.
- In a large bowl, mix up the squeezed-out rice, egg, cheese, oregano, and salt. It won't be like any pizza dough you've ever worked with, but don't worry, it will work!
- Press the dough out onto a baking sheet lined with parchment paper. (It's important that it's lined with parchment paper, not wax paper, or it will stick.) Keep the dough about 1/4-inch thick. Wet your hands to prevent sticking, if needed.
- Bake for 30 minutes at 400ºF or until the top looks dry and golden.
- Add your favorite pizza toppings to the crust, such as sauce and cheese, then return the pizza to the 400ºF oven. Bake an additional 5-10 minutes, just until the cheese is hot and bubbly. Slice and serve warm.
Video
Notes
Nutrition
More Low-Carb Recipes to Try
- Cauliflower Fried Rice
- Zucchini Lasagna
- Chicken Vegetable Soup
- Zucchini Hummus (no beans)
- Cottage Cheese Dip
- Mexican Chicken Soup
- Healthy Chicken Burgers
If you try this Cauliflower Pizza Crust recipe, please leave a comment and star rating below letting me know how you like it.


Hi
Neat recipe. Reminds me a little of some of the Thrive pizza crusts however they can’t be picked up. thanks
Made this recipe tonight! So delicious and healthy! Thank you so much for sharing! I posted it on my blog also (with your reference of course :))))
You’re totally right; the secret is *totally* draining the veggie. I make an amazing zucchini crust, too, and that one’s especially moist if the veg isn’t squeezed. Yay for cheese cloths and potato ricers!
Hi Jamie,
could you please post the recipe for your zucchini crust since that’s what’s in season and I have plenty in my fridge. Thanks
That is so interesting! I created the original recipe and my ratio is 1 cup cauliflower: 1 cup cheese : 1 egg. Are you able to pick this pizza up in your hand?
Here’s my original recipe: http://yourlighterside.com/recipe-the-original-cauliflower-pizza-dough-2/
I have made the pizza several ways since 2008, but it seemed the more cauliflower and the less cheese, the worse it held together.
Love your site!
Fondly,
Jamie
Wow, that’s awesome Jamie!
Yes, we were able to hold the pizza with our hands– but I think the key was straining the cauliflower really well with the dish towel. At least a cup of water was released! When I’ve tried making it before, the moist cauliflower made it much more flimsy.
Can’t wait to eat this again and again! 😀
YESSSS! I made the cauliflower flatbread last week and it was really good! But moist and not like crust. There’s head of cauliflower in my fridge that is about to be pizzafied! THANK YOU! And cheers to Doris!
OMG, this looks so good. I want to try it but I don’t handle dairy well and my daughter is lactose intolerant. Is there anything you think I could subsitute for the goat cheese?
Thanks!!
I have a feeling that the crust would hold together without the cheese– the egg is the main binder.
If that doesn’t work, you could always try a cheese substitute, like Daiya. (I’ve never tried it myself, but I hear it melts like real cheese.)
Let me know if you try it!
This was great — I made it without the goat cheese, and with Daiya as a topping.
Actually, goats milk is completely different from cows milk – it’s hypoallergenic (for those with milk protein allergies), and many people with lactose intolerance find that it doesn’t affect them. Once I found this out, it made dealing with food allergies so much easier!
As someone who grew up on a goat farm, the only “real” difference between goat’s milk and cow’s milk is that goat milk does not have lactose. Butterfat percentages vary from breed to breed, just like in cows.
That is not correct information Deb. Please read this information to better educate yourself. I own goats and Jersey milk cows so I do speak with some knowledge.
http://www.dynamicchiropractic.com/mpacms/dc/article.php?id=38646
This is not accurate. While it’s very possible for someone who has an allergy or intolerance to cow’s milk tolerate goat milk, that entirely depends on the sensitivity of the person, and also depends on WHICH protein the person is sensitive to. For instance, if their issue is with whey proteins, switching to goat dairy could be worse as there’s supposed to be more whey in goat dairy; or it could be better as not all whey proteins will elicit the reaction. Some people may have an issue with caseins. They’re multiple different proteins which are, again, found in both cow and goat dairy. The major difference is not that one milk does not have the casein the person is reacting to, but that the concentrations of the different casein’s vary wildly. And then there’s the myth of lactose not being in goat dairy. Goat dairy has lactose. However, once again, lactose isn’t a single, always-the-same entity. It has different forms, and some people may find they can digest one form of it over another.
All things said and done, it’s probably worth giving goat dairy a try, but there’s no guarantees.
Personally though, as a celiac who doesn’t seem to tolerate dairy well, I try to avoid all dairy because I read a study that indicated to me that some celiacs can have a similar immune response (in vitro cells) to alpha and beta caseins. Seeing the miniscule amount of gluten I need to avoid, I figure that if casein is indeed my issue, I should absolutely avoid even smaller amounts of goat dairy.
Interesting. I did not know all this. I found that I cannot tolerate whey protein, but I think I’m going to have to go dairy-free to find out what I can tolerate by reintroducing it.
I have made this pizza two times, and each time it just gets better. I recently changed my diet to no carbs. This recipe is great!!! My husband even likes it.
I’m gluten, soy & dairy free so LOVE love love & use Daiya faux cheeses all the time!! Definitely going to try this cauliflower pizza crust recipe using Daiya shreds:-)))
I’ve done this using some almond flour in the place of cheese – it even gives it a bit of a “breadier” taste and feel. LOVE this recipe!
Awesome Idea! i’m going to try that next time!
Leigh, Great tip about adding some almond flour. I will give that a go. I tried making this recipe tonight for my daughter (in a rush). It was pretty simple even for a first attempt. My daughter can’t eat eggs so tried it with a 1TBSP ground chia seed to 3TBSP water ratio. I think I’ll try the ‘flax-egg’ next time. I’ve got some more experimenting to do with this one to get it just right, but great to know we’re on the right track. Came home to find no pizza left. The babysitter finished it off…
Megan, Dr. Seema Kanwal told me about you!
How much almond flour did you use?
I wonder on top of using flax meal – add some cornstarch to help with the binding, that is if you like to use cornstarch. Or what about garbanzo flour instead of almond flour.
I’m GF and considering going vegan eventually so this is a whole new realm to me, but this crust looks so amazing. I’m going to have to try this very soon.
1/4 cup of almond flour they said
Interesting! I’m going to try that, too.
How much flour did you use
Have you tried nutitional yeast it has a cheesey taste is packed with protein. I got mine in the bulk foods from Whole Foods.
Nutritional yeast is so good on anything, I was just also thinking this would be good on the pizza! 🙂
This looks so very good,,,but I don’t do eggs or animal cheese,,,maybe vegan cheese?? There must be something I can do for the egg??
Doris and I tried subbing Agar for the egg, and it didn’t work. There was a comment above suggesting maybe a flax egg? Or maybe that Ener-G egg replacement?
Please let us know if you have any success with an egg substitute!
I can’t wait to try this-I have definitely got to pick up cauliflower this week!!!
Oh Megan! You are such a blessing! I love pizza too but haven’t eaten the traditional kind in a year. I can’t wait to make this! Do you think I could substitute flax egg for the egg? Thanks again for sharing all the delights you learned from Doris!
Hmmm, I’m not sure… Doris and I tried using Agar as a vegan substitute, and it didn’t work.
If you try it, please come back and let us know if the flax egg works!
Megan, have you tried using a vegan cheese to hold the crust together? if it works, then this would be the perfect pizza for me!
Thanks for sharing these awesome recipes.
I haven’t tried it myself, but I assume if the vegan cheese melts like regular cheese, it should work! Please let us know how it turns out for you!
So I tried this with a Flax Egg (the rest of the recipe I kept the same, including the cheese), unfortunately, the crust wasn’t quite hand-eating-abled but I’m going to experiment again! I may try the vegan version next time but I loved the goat cheese in this one!!
You can see my tea towel breaking (from squeezing the water out so well, haha) & results here: https://www.instagram.com/hashtagallergic/
I am so excited about this crust! Thank you so much for sharing Doris’s awesome recipes!