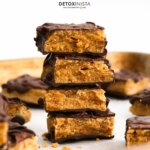
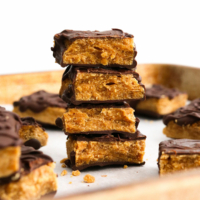
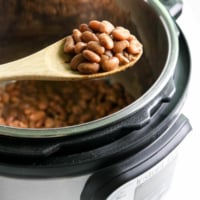
Homemade Butterfingers have the same crispy, crunchy texture as the popular name-brand candy bars, without any high-fructose corn syrup. All you need is 5 simple ingredients to make them!
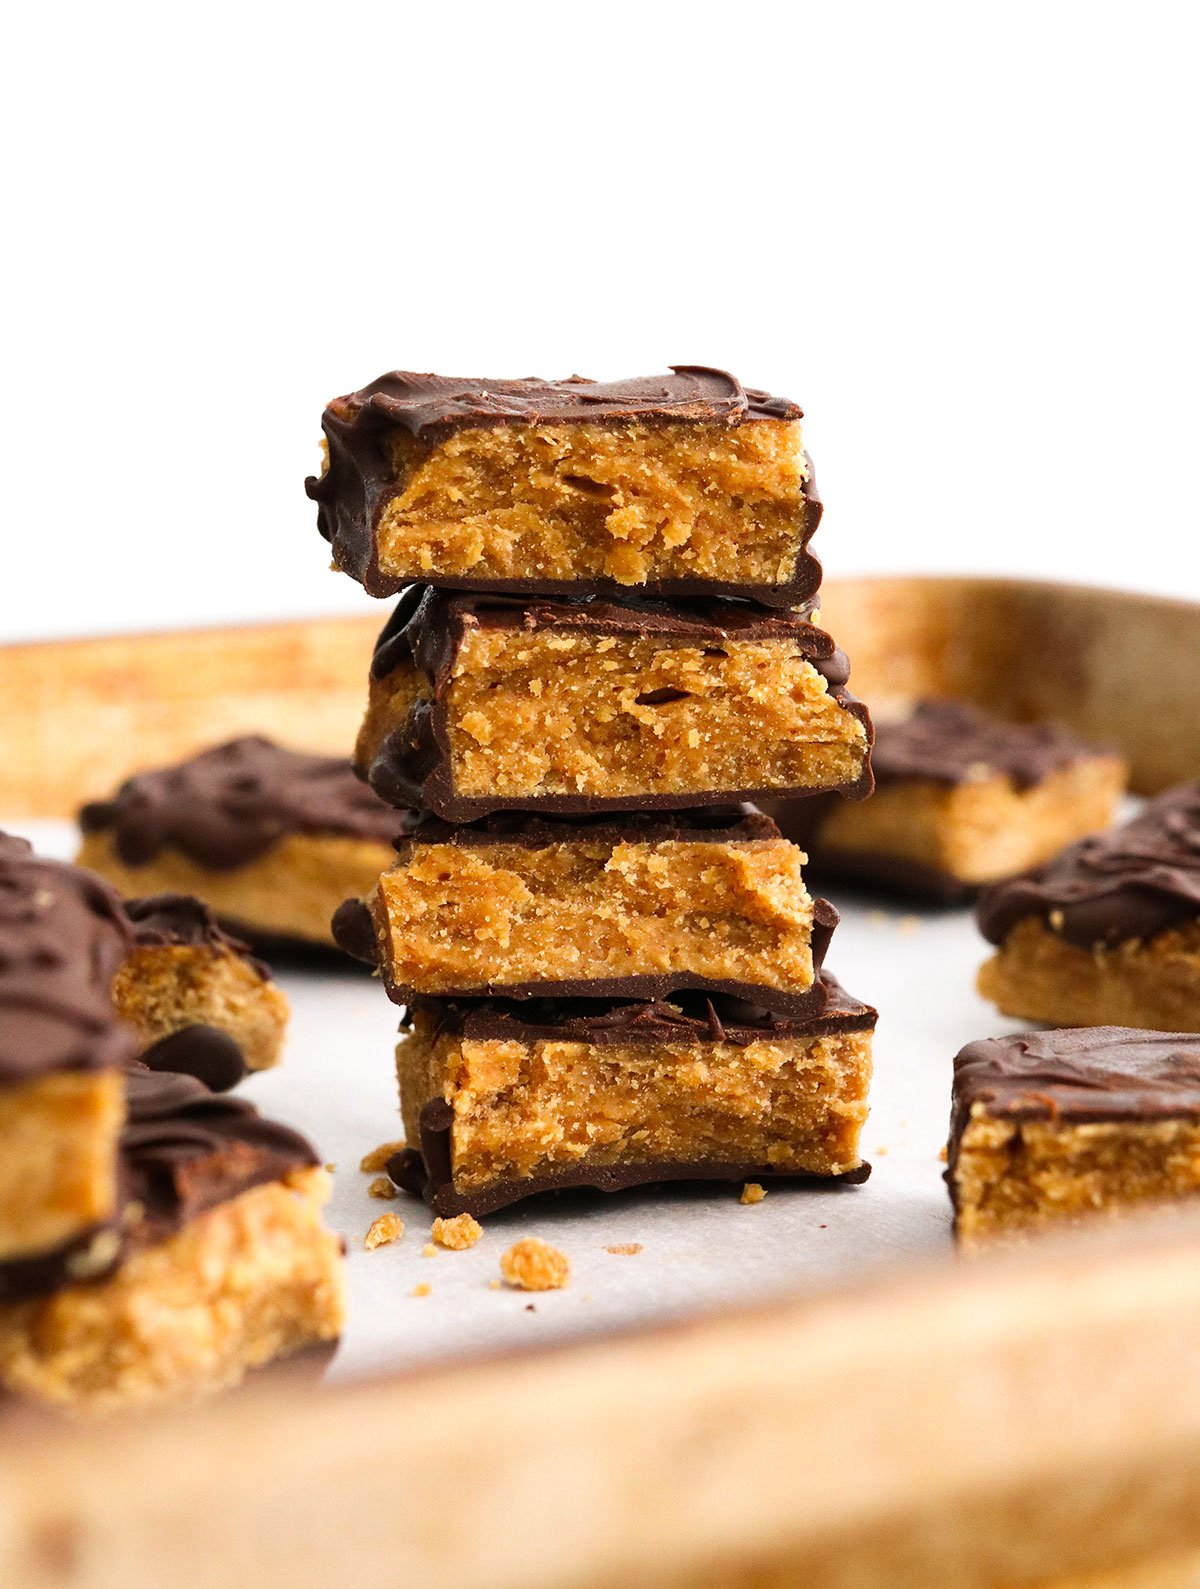
The concept of making Butterfingers is surprisingly easy. The filling is essentially a hard candy mixed with peanut butter, to create a crispy, crunchy, and buttery texture. They are the perfect treat to make for Halloween!
While other popular recipes rely on melted candy corn and crushed corn flakes, this recipe gets its crunchy texture by boiling maple syrup until it reaches the “hard crack” stage used in candy making. The result is a less-processed butterfinger candy bar.
Looking for other homemade candy recipes? Try my popular homemade Crunch Bars, Almond Butter Cups, or Vegan Snickers Bars for more delicious ideas.
Ingredients You’ll Need
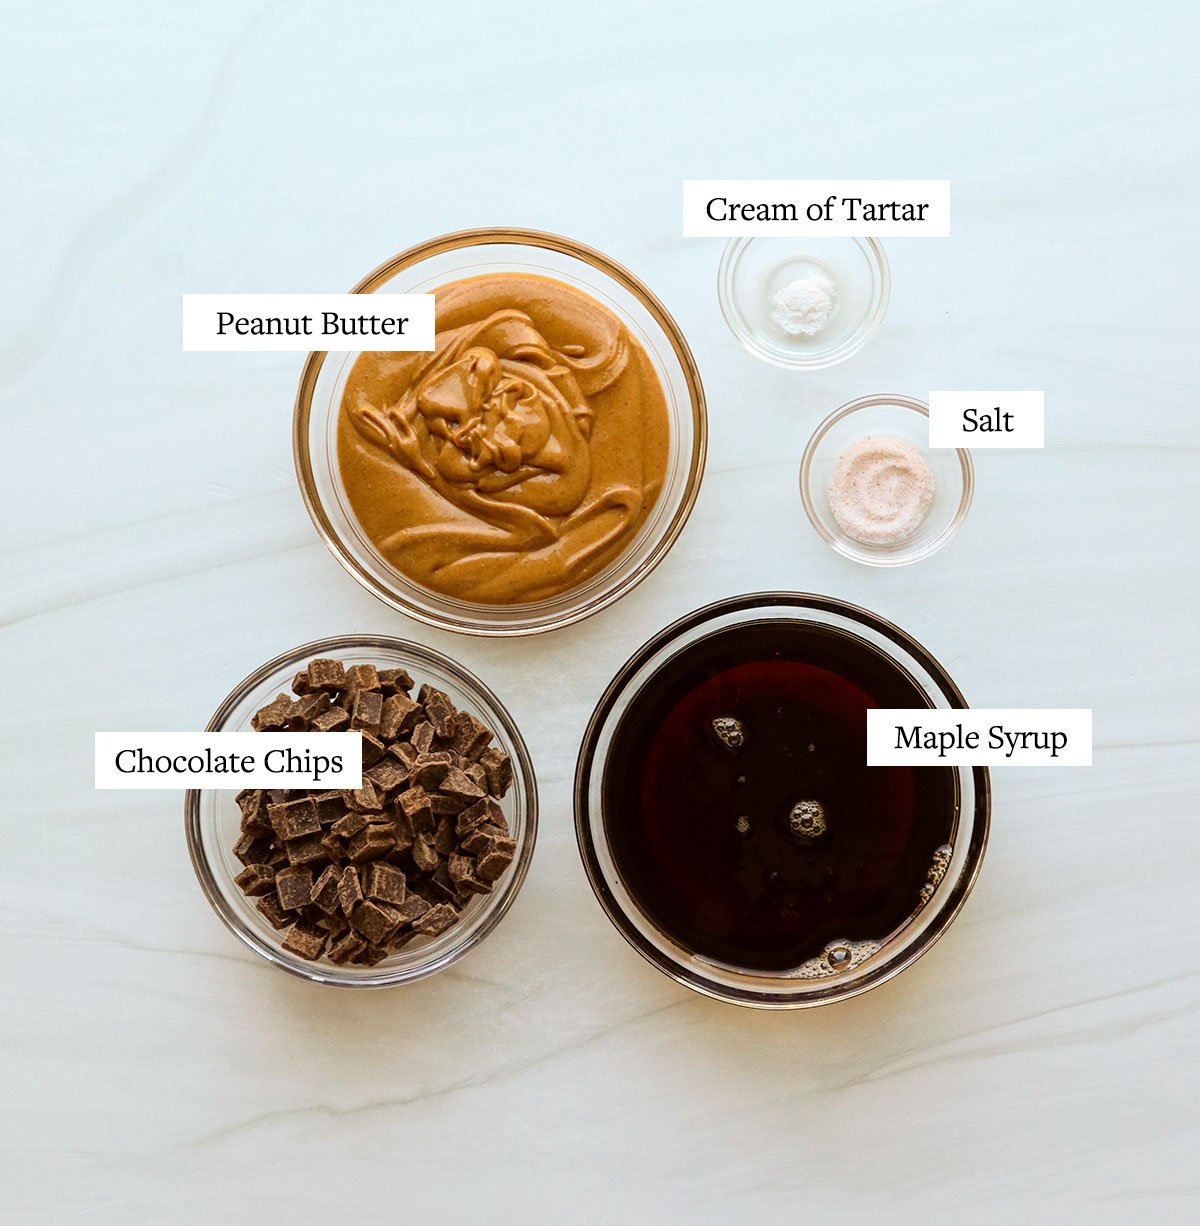
Maple syrup or honey can be used for the base in this recipe, but honey will give you a more prominent honey-flavor. I use an all-natural creamy peanut butter for this recipe, but I imagine any other nut butter could be used if you prefer.
Cream of tartar is used in candy making to prevent large sugar crystals from forming. Adding it to the maple syrup should help with the crunch factor in this recipe.
Melted dark chocolate chips make the outer chocolate coating easy, but you can also make your own chocolate coating using the one in this recipe, if you prefer.
How to Make Homemade Butterfingers
Spray a square 9-inch baking dish with cooking spray and line it with parchment paper. It’s important that this is ready to go right away because this recipe will move quickly. Measure out the peanut butter and salt, too.
In a small saucepan combine the maple syrup and cream of tartar. Whisk well until the cream of tartar has dissolved. This is the ONLY time you will stir this mixture.
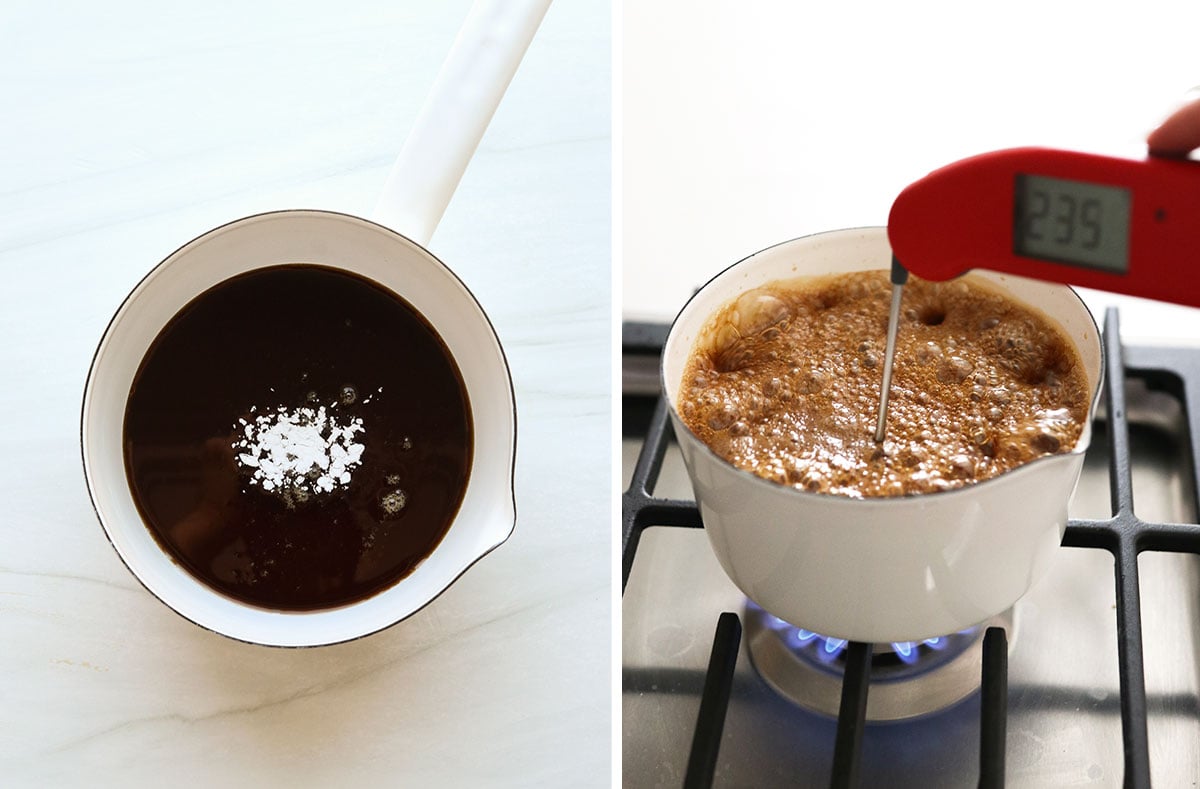
Attach a candy thermometer (affiliate link) to the saucepan, making sure that the stem of the thermometer is not touching the sides or bottom of the pot. Ideally, the tip should be submerged in 2 inches of syrup for the most accurate results, but you can also use an instant-read thermometer periodically as the maple syrup boils.
Bring the maple syrup to a rolling boil over medium-high heat. Watch the pot to make sure it doesn’t boil over (lower the heat if it starts to rise too much) and continue to boil until the maple syrup reaches the “hard crack” stage which is 300ºF.
Note: Candy making is tricky because the sugar can quickly burn once you get near the 300ºF goal temperature. You’ll get the crispiest results if you let the maple syrup reach 300ºF, but if you don’t want to risk burning it, you can remove it from the heat once it reaches at least 270ºF which is the soft crack stage. (This stage is used for making toffee and butterscotch. It’s not quite as crispy, but will still create a firm candy.)
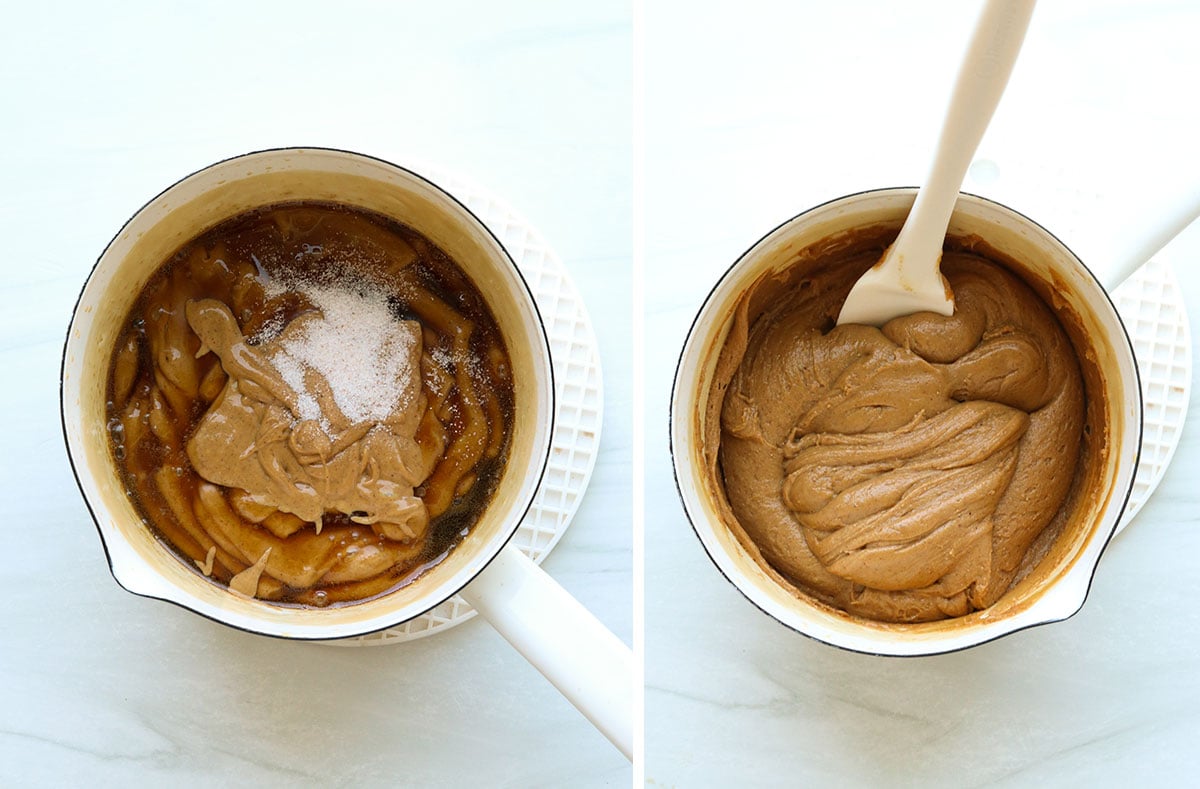
Once the maple syrup has reached the correct temperature, immediately turn off the heat and stir in the peanut butter and salt. Stir as quickly as you can without splattering (because it’s hot!) then immediately pour it into the parchment-lined pan.
Use a spatula to spread out the mixture while it’s still hot because it will harden quickly. (For example, I took a quick photo of the mixture in the pot for this post, and it totally hardened in the pan before I could get to the next step. So work quickly!)
Transfer the pan to the freezer to chill for 10 minutes.
While you wait, go ahead and melt the chocolate over a double-boiler. The perk of using a double boiler is the pan of boiled water can be kept underneath the bowl of chocolate, so it will stay melted while you coat both sides of the candy bars. (Alternatively, you can melt the chocolate in a heat-safe bowl in the microwave using 30-second intervals.)
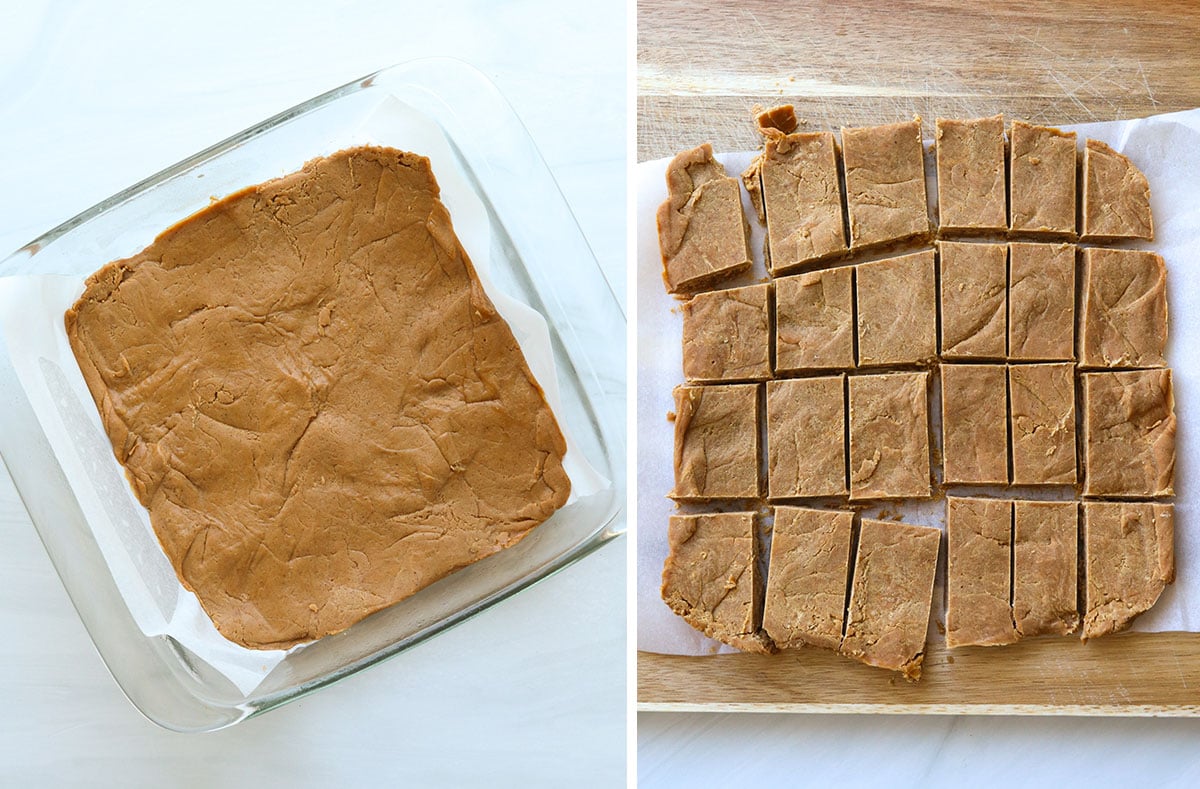
Remove the pan from the freezer. The bottom may still feel warm to the touch, which is good because the bars are easier to slice when they aren’t totally cold. Use a large sharp knife to cut the peanut butter layer into bars.
Make 5 vertical cuts to make 6 rows of candy bars, and then cut them in half to create 12 large candy bars. Or, cut them in half again to make smaller fun-size bars. (Or Butterfinger bites!)
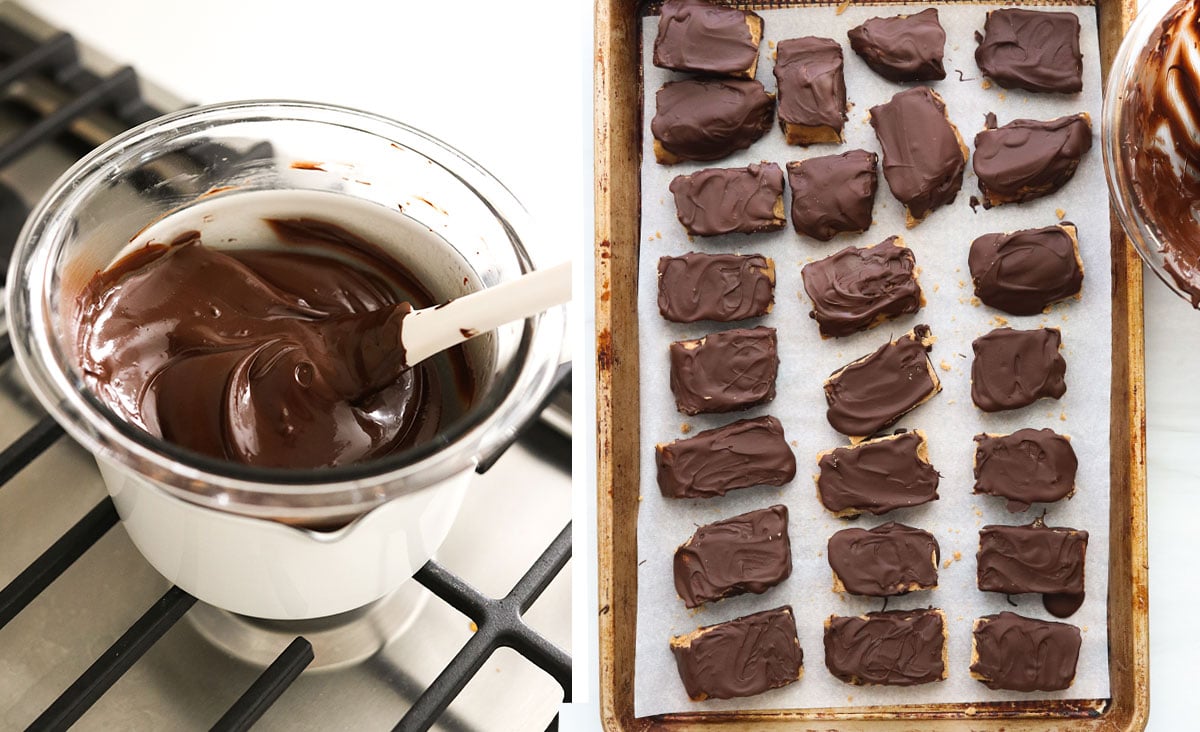
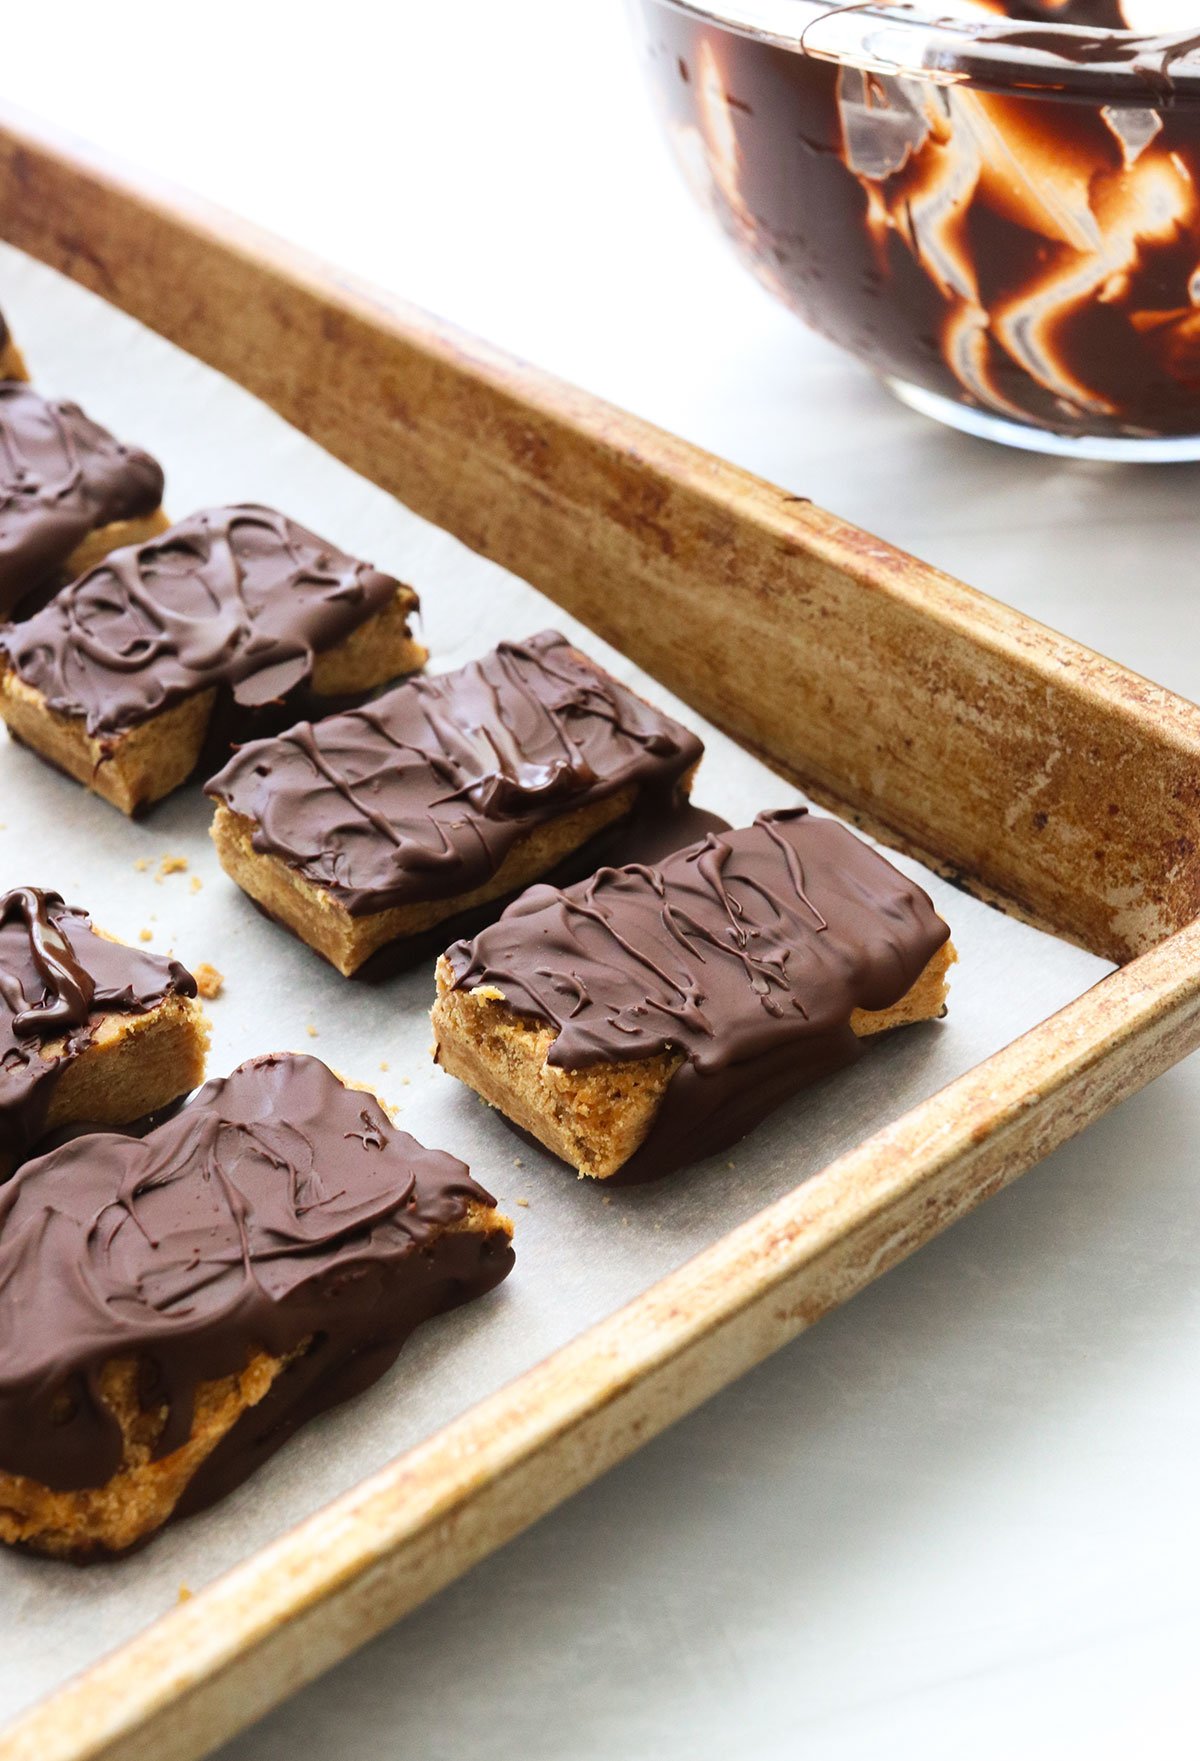
Use 2 forks to dip each bar into the melted chocolate and let the excess chocolate drip off before placing them on a parchment-lined baking sheet. Or, use a spoon to spread the melted chocolate over each bar. Once the chocolate has hardened, flip the bars over and coat the other side.
There’s no need to be perfect or totally coat the sides of the bars because the process can feel tedious. (Next time, I’d probably just coat the tops and call it a day.)
Store homemade butterfingers in the fridge or freezer for the longest shelf life and crispiest results. They will keep for 2 weeks in the fridge, or up to 6 months in the freezer.
Helpful Tips
Because candy-making has a bit of a learning curve, here are some helpful notes that may prevent any disasters during the process.
- Test your Candy Thermometer: Testing the thermometer may help to prevent any scorched maple syrup in your kitchen. Test your candy thermometer by placing it in a pot filled with at least 2 inches of water and bringing it to a boil. Boiling water should reach 212ºF. If your thermometer is off, adjust accordingly! (See tips below)
- Prevent Boiling Over: To prevent the maple syrup or honey from boiling over, spread a small amount of butter or coconut oil along the inner rim of your saucepan.
- Adjust the temperature for the level of liquid: The thermometer’s temperature reading will vary, based on the level of liquid in the saucepan. My smallest saucepan is too wide to have the liquid level cover enough of the thermometer’s tip, and as a result, I didn’t get an accurate reading. I ended up compensating for this measurement by figuring out how many degrees “off” my thermometer was with such a low level of liquid. To do this, boil exactly 1 cup of water, and see what the thermometer reading is. For mine, it only reached 180ºF, but I know the boiling point for water is actually 212ºF. So, there was a 32-degree difference, which I accounted for by only boiling my maple syrup to 268ºF, which would be the equivalent of 300ºF.
- Looking for more crunch? You can add up to 1 cup of crushed cereal for extra crunch. But be sure it’s ready to stir in quickly since this recipe hardens so fast after the maple syrup is boiled.
Looking for more healthy desserts? Try my date-sweetened Chocolate Peanut Butter Balls, Vegan Freezer Fudge, or Banana Snack Cake for more ideas.
Healthier Homemade Butterfingers
Ingredients
- 1 cup pure maple syrup
- ⅛ teaspoon cream of tartar
- 1 cup peanut butter (creamy or crunchy)
- ½ teaspoon sea salt
- 1 ½ cups dark chocolate chips
Instructions
- Lightly grease a 9-inch square baking dish and line it with parchment paper. You'll want this ready to go before you get started, because this recipe moves quickly. Measure out the peanut butter and salt, as well, so you won't have to do that later.
- Pour the maple syrup into a small saucepan and stir in the cream of tartar until dissolved. This is the ONLY time you will stir this mixture.
- Attach a candy thermometer to the saucepan, making sure that the stem of the thermometer is not touching the sides or bottom of the pot. Ideally, the tip should be submerged in 2-inches of syrup, for the most accurate results. You can also use an instant read thermometer periodically as the maple syrup boils.
- Bring the maple syrup to a rolling boil over medium heat, then continue boiling until the temperature reaches 300ºF (the hard crack stage for candy). This can take anywhere from 7 to 10 minutes, depending on your stove top.
- When the maple syrup has reached 300ºF turn off the heat immediately and stir in the peanut butter and salt. Stir as quickly as possible, without splattering.
- Immediately transfer the peanut butter mixture into the prepared pan. Use a spatula to spread it out evenly while it's still hot, because it will harden fast. (Even waiting 2 minutes might mean the mixture will be stuck in your pan, hard as a rock.) Place the pan in your freezer to cool for 5 to 10 minutes.
- Remove the pan from the freezer while the bottom is still slightly warm. The bars are easier to cut while they aren't totally cool. Make 6 vertical cuts into the bars, then cut them in half to make 12 full-size candy bars. Or, cut those bars in half again to create 24 smaller fun-size bars. Return the bars to the freezer while you melt the chocolate.
- Melt the dark chocolate in a double boiler, stirring until it's smooth. (Or use a microwave in 30-second intervals.) Arrange the bars on a large parchment lined baking sheet, and spread the melted chocolate over the top of the bars. Once it has cooled, flip the bars over and coat the other size.
- Place the chocolate covered bars in the freezer to chill until firm, about 1 hour. Then they are ready to serve, straight from the freezer! These bars are the most crispy when served frozen, but you can also serve them from the fridge or at room temperature.
- Homemade butterfingers can be stored in an airtight container in the fridge for up to 2 weeks, or in the freezer for up to 6 months.
Video
Notes
Nutrition
If you try these homemade candy bars, please leave a comment and star rating below letting me know how you like them.

Is there a substitute for the cream of tartar?
I used to melt paraffin with chocolate coatings to keep them from melting in your hands. Not exactly natural or the healthiest thing to eat. What would you recommend for a substitute for the paraffin?
Hey Ricia!
Have you tried cocoa butter? The kind I mean comes in little squares, which stay solid at room temperature. The kind I have is Big Tree Farms raw cacao butter, which my American sister Amber sent me from her home in California. Big Tree Farms Raw Cacao Butter is made in Ashland, Oregon. The next best kind is Sunfoods Cocoa Butter, which you can find here: https://www.sunfood.com/food/cacao-chocolate-cocoa.html
I have tried to make this 3 times and now at 40 minutes the maple syrup hasn’t reached 300 degrees. ( 240°) What am I doing wrong???
Bought a new saucepan and thermometer.
Thanks
Cheryl
Have you tried turning up the heat on your stove? If I feel it’s taking too long, I’ll increase the heat so that the process goes faster.
Loved these! Followed direction exactly and they turned out perfect.
Thank you!
We made these tonight, and they were great! I can’t eat butterfingers anymore (most candy, actually) for allergy/autimmune reasons. Thanks so much for posting this!!! I bet this recipe would be great for people with peanut allergies – just swap the p.b. for a safe alternate like cashew or sunflower butter (if making for a friend, check the label tto be sure it’s a variety made on different equipment/in a different facility).
Some notes: I did have problems heating the maple syrup. Once it got to around 230F, it started burning. I am not sure what I did wrong. I was concerned so I stirred it, but that only seemed to make it worse! I have been making my own body sugar (for waxing) for years – it’s basically candy that you use on your skin. It never burns, even at 260F with no stirring. Same cooking pot too.
Since I didn’t want to sink another $6-$8 in burned syrup, I decided to use my body sugar recipe to get some experience with the recipe. I used 1/2 cup water, 1 cup sugar, and 2 tbsp lemon juice in place of the syrup and cream of tartar. The bars came out AMAZING!
I am not experienced with chocolate coating. I will definitely make a thinner coat next time (like in your photo). The thick coating was a bit much even for me… lol.
Despite the few bumps, I feel this is an easy recipe to work with. Once the peanut butter is added to the candy mixture, the filling starts cooling quickly. I was able to cut and shape the bars within minutes. Sticking the bars in the freezer before coating them helped the chocolate solidify quickly and evenly.
If you are on the fence and think this recipe seems hard, make the leap! It’s actually very easy 🙂
Thank you so much for this recipe! It’s an oldie but goodie. I made these yesterday and used both maple syrup and honey, and added about 1/4 cup of nutritional yeast to give it more of that “cheesey” butterfinger flavor. I also used someone else’s advice to spread it on a silpat and then fold it over itself to make more crunchy layers. Worked great! Love being able to eat some of my favorite candy after going gluten and dairy free with a clear conscience!
What size pants should I use if making one batch or two? I’m hesitant to try to wing it without knowing which size pan these will work in without being tooooo thin or toooo thick and instead, more true to the actual bar.
I think I used a 1/4 sheet pan in the photos here, but you can use something bigger if you want because the pan size doesn’t really matter. You could skip the pan and just press the batter out on a piece of parchment paper on your counter, instead. You get to choose the thickness of the bars, and you just press out the batter until you reach that thickness. I think of it like cinnamon roll batter, only much stiffer– so you have to work fast!
I made these today for my boyfriend for Valentine’s Day and wow! The candies tasted just like store-bought butterfingers!
THANKS FOR THIS! My wife and son went nuts over it! To me it was not just like Butterfinger insides, but that’s OK. They LOVE it! I used a small amount of real butter, 1/2 cup maple syrup because that’s all I had, and 1/2 cup Sourwood honey. At the end of boiling, right before adding the PB, I added 1 tsp vanilla extract. Reminded me more of Mary Janes or Squirrel Nut Zippers.
Could I just caramelize sugar instead of using honey or maple syrup?
Can I sub with a different nut butter?
Yes, texture-wise I think any nut butter should work, it will just change the flavor.
This looks delicious! Do you think date syrup would work in place of maple or honey?
I love this recipe and have shared it several times. It does take a few tries to nail it down though. One question I have is why does the maple syrup take longer to get to temp than 10 minutes. I am using a small sauce pan on med heat and it seems to take more. Along the 20 minute mark to get to 300. I have tried increasing the temp but ended up with a semi burnt flavor (i ate them all up regardless). Any thoughts?
Hey Megan!
I am a blind woman who absolutely loooooooooooooooooves to cook! And I’m one of those girlies who absolutely loooooooooooooooooooooooves anything sweet! I guess you could say I’m a sweetoholic! I made some of your Butterfinger Candy bars yesterday with my provider, Mary. I’ve gotta tell you, they taste amazing! They taste like paradise! Heaven in the stars! The downside, however, is that my thermometer was not able to go into the pan but 1/4 inch deep. That seems rather strange when you have 1 cup of maple syrup in there. I think I might need a different pan, possibly a smaller but deeper pan, as the pan I used is a Teflon saucepan. Mary says I might need a pan that’s 1/3 the size of the one I have. Another downside is, we were able to bring the syrup to a boil, but not enough to reach 300 degrees, as I don’t have something to attach my thermometer to the pan. I have a Talking Cooking Thermometer, which I purchased from The Braille Superstore (http://www.braillebookstore.com/Talking-Cooking-Thermometer), and it works wonders! However, Mary was having a hard time holding the thermometer still, where it wouldn’t touch the bottom or sides of the pan. Do you have any recommendations as to a clip with which I could attach the thermometer to the pan so it will hold still? Also, do you recommend any specific pan for melting things like maple syrup? I used “Maple Gold” pure maple syrup, made in Canada! $20 for a bottle, but a good $20, as it lasts a long time!
Sorry about that, the website is actually http://www.braillebookstore.com/Talking-Cooking-Thermometer.1
I made this didn’t have a thermometer used hard crack method it didn’t get hard just felt like smooth peanut butter even when it was in the freezer. Could I put the whole thing back in the pot
Just to let you know… corn syrup is NOT the same thing as High-Fructose corn syrup. Corn syrup has been around since the early 1800, is made of 100% Glucose, and is no worse for you than maple syrup (they are both boiled down sugars). Both should be used in moderation…
High-fructose Corn Syrup has had it’s Fructose enzymes changed chemically and is the one associated with severe insulin changes in the body, Diabetes, PCOS, Metabolic Disease, Heart disease, obesity, etc etc. Fructose is bad but modified fructose is even worse.
Regular corn syrup is GLUCOSE. It doesn’t mean it’s good for you by any means… all syrups are boiled down sugars and, as I said earlier, need to be moderated.
The following are other examples of basic syrups:
— Acetomel – a syrup made from honey and vinegar with a sweet and sour taste
— *Agave syrup* – a sweetener commercially produced from several species of agave
— Attar – a type of sweet syrup used in the preparation of Middle Eastern desserts
— *Barley malt syrup* – an unrefined sweetener processed by extraction from sprouted, i.e.,
malted, barley, containing approximately 65 percent maltose, 30 percent complex carbohydrate, 3% protein
— Birch syrup – a savory mineral-tasting syrup made from the sap of birch trees and produced in much the same way as maple syrup
— Bludwine – flavored syrups that were used in soft drinks
— Brown rice syrup – derived by culturing cooked rice starch
— Chashni – the generic name in North Indian, Pakistani, Nepali and Afghan languages for a sugary syrup
— Cheong – a name for various sweetened foods in Korean cuisine in the form of syrups, marmalades, and fruit preserves
— Cherry Smash – a fountain syrup made from cherry syrup along with a blend of other fruit flavors which soda jerks mixed with carbonated water and phosphate.[1]
— Chocolate syrup
— *Cider syrup* – is also known as apple molasses, a kind of fruit syrup
— *Date honey* – a thick dark brown, very sweet, fruit syrup extracted from dates
— Evaporated cane juice – The US Food and Drug Administration (FDA) defines evaporated cane juice as any sweetener derived from sugarcane syrup. The US FDA considers the term “evaporated cane juice” to be misleading because the term incorrectly suggests that it is a juice, when it is sugar syrup. Instead, the US FDA recommends using “sugar cane syrup” or “dried cane syrup” on food labels.[2][3]
— Falernum – a syrup liqueur from the Caribbean, best known for its use in tropical drinks
— Flavored syrup – typically consists of a simple syrup, that is, sugar (fully mixed with water while heated), with naturally occurring or artificial (synthesized) flavorings also dissolved in them.[4]
— Fruit syrup – concentrated fruit juices used as sweeteners
— Glucose syrup – also known as confectioner’s glucose, is a syrup made from the hydrolysis of starch
— *Golden syrup* – or light treacle, is a thick amber-coloured form of inverted sugar syrup made in the process of refining sugar cane or sugar beet juice into sugar, or by treatment of a sugar solution with acid.
— Grape syrup – a condiment made with concentrated grape juice
— *Grenadine* – a commonly used, non-alcoholic bar syrup, characterized by a flavor that is both tart and sweet, and by a deep red color.
— Honey syrup – made by stirring a heated mixture of honey and water until the honey dissolves.
— *Inverted sugar syrup* – (also called invert syrup) is an edible mixture of two simple sugars – glucose and fructose – that is made by heating sucrose (table sugar) with water.[5]
— Kuromitsu – a Japanese sugar syrup, literally “black honey”, it is similar to molasses, but thinner and milder
— *Maple syrup* – usually made from the xylem sap of sugar maple, red maple, or black maple trees, although it can also be made from other maple species.
— Mizuame – a Japanese glucose syrup of subtle flavor, traditionally made from rice and malt.
— *Molasses* – a thick, sweet syrup made from boiling sugar cane.
— Orgeat syrup – a sweet syrup made from almonds, sugar, and rose water or orange flower water
— *Palm syrup* – an edible sweet syrup produced from the sap of a number of palms, it is produced in the Canary Islands and coastal regions of South America.
— Pekmez – a molasses-like syrup obtained after condensing juices of fruit must, especially grape
— Rose syrup – made from rose water with added sugar
— Squash – a non-alcoholic concentrated syrup used in beverage making
— Steen’s cane syrup – a traditional American sweetener made by the simple concentration of cane juice through long cooking in open kettles.
— Sugar beet syrup – “The beet-root, when being boiled, yields a juice similar to syrup of sugar, which is beautiful to look at on account of its vermilion color”[6] (1575).[7] This was written by 16th-century scientist, Olivier de Serres, who discovered a process for preparing sugar syrup from the common red beet.
— Sweet sorghum – Sweet sorghum has been widely cultivated in the U.S. since the 1850s for use in sweeteners, primarily in the form of sorghum syrup
— Syrup of Maidenhair – a syrup made from adiantum (maidenhair fern)[citation needed]
— *Treacle(golden syrup)* – any uncrystallised syrup made during the refining of sugar.[8][9] The most common forms of treacle are golden syrup, a pale variety, and a darker variety known as black treacle. Black treacle, or molasses, has a distinctively strong, slightly bitter flavour, and a richer colour than golden syrup.[10]
— Vincotto – In Salento – in the heel of Italy – Vincotto is produced from the slow reduction together of a blend of cooked grape must and of a wine that has started to spoil and sour attaining the consistency of dense non-alcoholic syrup. This tradition goes back to the times of the ancient Romans.
— Yacón syrup – a sweetening agent extracted from the tuberous roots of the yacón plant (Smallanthus sonchifolius) indigenous to the Andes mountains.[11]
— Yeot – a variety of hangwa, Korean traditional confectionery, it can be made in either liquid or solid form, as a syrup, taffy, or candy.
MEGAN. Oh my goodness. These are AMAZING! I love butterfingers, they used to be one of my favorite candies, and it was hard watching my kids eat all their Halloween butterfingers and not enjoy one myself. (While I think it is absolutely ok to indulge every so often, for me “real” butterfingers don’t taste as good as they used to. They’re too sweet. It’s me, not them, lol. Not worth the indulgence.) But THESE!!! They are absolutely perfect. Not too sweet, and THAT CRUNCH. It’s spot on. Thank you for this better-than-the-original recipe!!!
These came out perfect. Although I stopped the sugar at 285, because it looked like it was going to burn. My whole family said they were one of the best things I ever made. Thank you! Other butterfingers recipes add a lot of junky ingredients.
Can you use Dark Chocolate baking bar instead of the chips?
I value your opinion. Thank you.
This was delicious, even though mine cooled before I got it all in the pan! The crumbled bits tasted just as good. I live overseas and can´t get Butterfingers, so this was an amazing recipe to find. Thank you!
I would love to make these! I have to keep my at sugar intake to a minimum. Is there a low-sugar alternative to the maple syrup?
This is so good. WOW. Started to smell burn around 275 and so I stopped cooking. Still turned out perfectly!!!